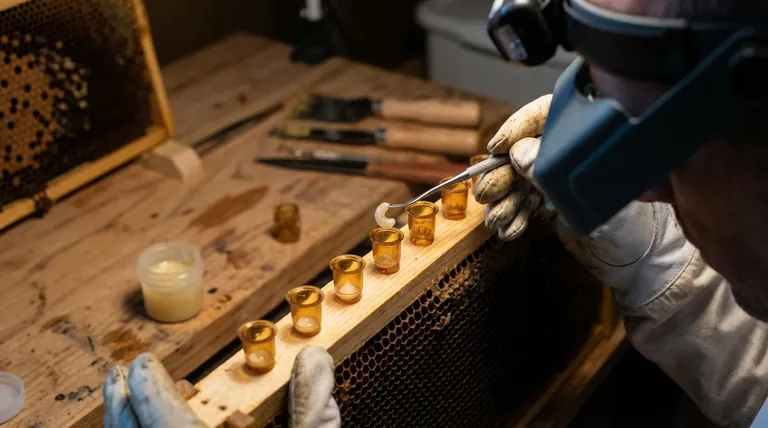
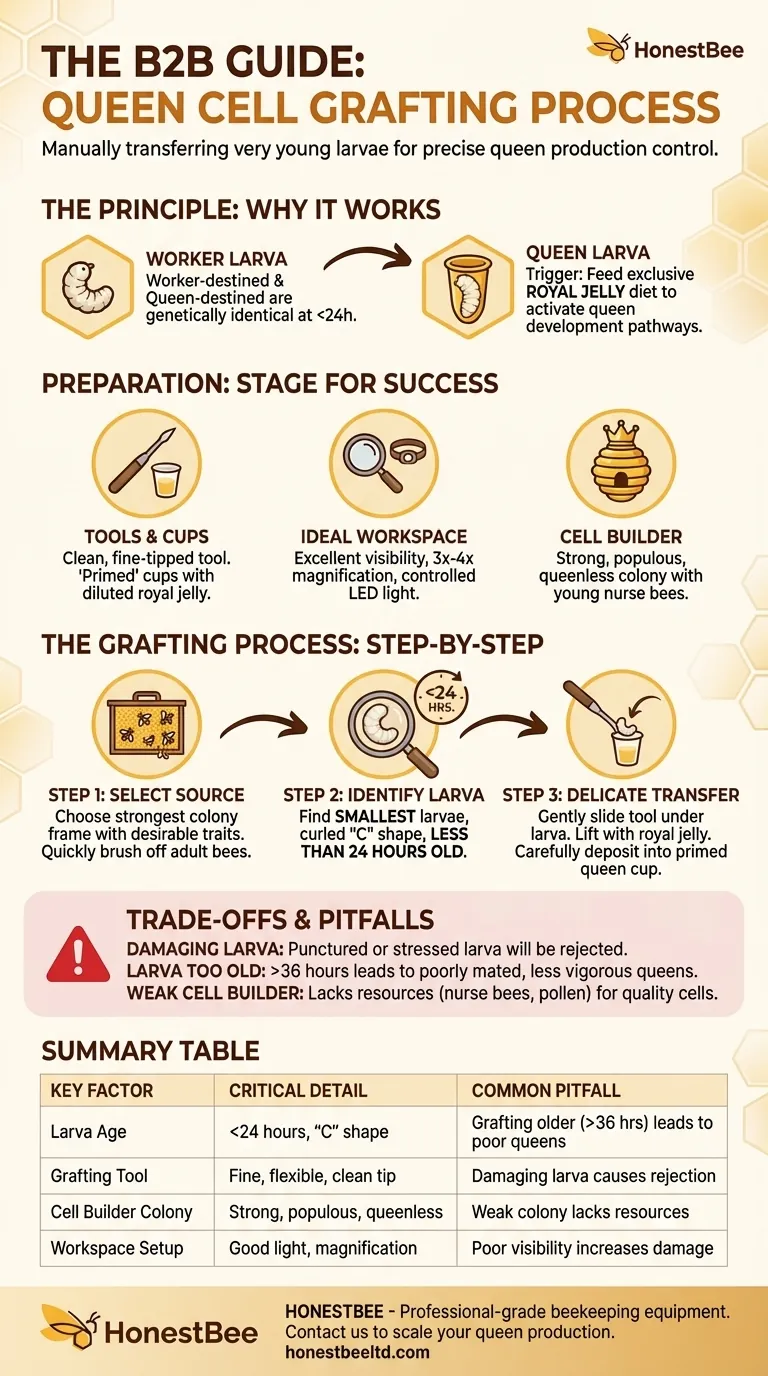
To graft queen cells, you must manually transfer a very young larva (less than 24 hours old) from a standard worker cell into a prepared queen cell cup. This cup is then placed in a strong, queenless "cell builder" colony, which is tricked into feeding the larva copious amounts of royal jelly, triggering its development into a queen. The process requires a steady hand, good lighting, and magnification to avoid damaging the delicate larva.
Grafting is not just a technical task; it is the fundamental method for controlling and scaling queen production. It empowers the beekeeper to select desirable genetic traits and produce a specific number of queens on a predictable schedule.
The Principle: Why Grafting Works
Triggering the Queen Instinct
Grafting works by manipulating the bees' natural queen-rearing instincts. A worker-destined larva and a queen-destined larva are genetically identical for the first day or so.
The key difference is how they are fed and oriented. By moving a very young larva into a vertical queen cup and placing it in a colony primed to raise a queen, you trigger the nurse bees to feed it an exclusive diet of royal jelly. This specialized diet activates the developmental pathways that create a queen instead of a worker.
Preparation: Setting the Stage for Success
Your success rate is determined long before you pick up the grafting tool. Meticulous preparation of your tools, environment, and bees is critical.
Preparing Your Tools and Cell Cups
A specialized grafting tool with a fine, flexible tip is essential. Ensure it is perfectly clean before you begin. Some beekeepers moisten the tip with water or royal jelly to help the larva slide off smoothly.
The plastic or wax queen cell cups should be "primed" by placing a tiny drop of diluted royal jelly in the bottom of each cup. This provides an immediate food source and can increase the acceptance rate of the grafts.
Creating the Ideal Workspace
Grafting is a precision task that demands excellent visibility. Work in a well-lit, preferably dark room where you can control the light source.
An LED headlamp provides direct, focused light. For most people, especially those over 40, 3x-4x magnification via reading glasses or a headset is non-negotiable for seeing the tiny larvae clearly and avoiding damage.
Preparing the Cell Builder Colony
The "cell builder" (sometimes called a swarm box or starter/finisher colony) is the engine of queen rearing. This is a powerful, populous colony made queenless several hours or overnight before introducing the grafted cells.
This queenless state creates an urgent biological drive to raise a new queen. The grafted cells should be placed on a frame bar and inserted into the center of this colony, typically between a frame of pollen and a frame of open brood, to ensure the nurse bees find them immediately.
The Grafting Process: A Step-by-Step Guide
Step 1: Select the Source Frame
Choose a frame containing eggs and newly hatched larvae from your strongest colony with the most desirable traits (e.g., gentle temperament, honey production, disease resistance).
Gently brush all the adult bees off the frame so you have a clear view of the brood. You must work quickly to prevent the larvae from drying out.
Step 2: Identify the Perfect Larva
Look for the smallest larvae you can find, ideally those that have just hatched and are still curled in a distinct "C" shape at the bottom of the cell. These are less than 24 hours old.
Older, larger larvae will be accepted by the bees, but they will develop into poorly mated and less vigorous queens. This is a primary cause of failure in queen rearing.
Step 3: The Delicate Transfer
- Slide the flexible tip of your grafting tool down the side of the worker cell.
- Gently slip the tool underneath the curve of the larva.
- Lift the larva straight up and out of the cell, along with the royal jelly it is floating in. The larva should be resting on the tip of the tool.
- Carefully lower the tool into a primed queen cup.
- Deposit the larva using a gentle rolling or pushing motion to slide it off the tool and onto the bed of royal jelly.
Understanding the Trade-offs and Pitfalls
The Primary Point of Failure: Damaging the Larva
The most common mistake is injuring or killing the larva during the transfer. A punctured or stressed larva will be rejected by the nurse bees. This is a skill that requires practice, patience, and the right tools.
The Hidden Trap: Grafting Larvae That Are Too Old
It is tempting to graft slightly larger larvae because they are easier to see and handle. This is a critical error. A larva that is even 36 hours old has already been fed a modified worker diet for a period, which compromises its full development as a queen.
A Weak Cell Builder Colony Spells Doom
You can perform a perfect graft, but if the cell builder colony is weak, lacks a high concentration of young nurse bees, or is short on pollen and nectar, it will not have the resources or motivation to build quality queen cells. A powerful cell builder is non-negotiable.
How to Apply This to Your Goal
- If your primary focus is hobby-level self-sufficiency: Master the basic technique with a single bar of 10-15 cells. Your goal is to produce a few high-quality queens to requeen your own hives and make splits, not to achieve a 95% acceptance rate.
- If your primary focus is large-scale or commercial production: Your success depends on systemization and efficiency. Invest in high-quality magnification, create a dedicated grafting station, and perfect your cell builder setup to handle multiple bars of grafts at once.
Ultimately, grafting gives you direct control over the genetic improvement and sustainability of your apiary.
Summary Table:
| Key Factor | Critical Detail | Common Pitfall |
|---|---|---|
| Larva Age | Less than 24 hours old, curled in a "C" shape | Grafting older larvae (>36 hours) leads to poor queens |
| Grafting Tool | Fine, flexible tip; clean and sometimes moistened | Damaging the larva during transfer causes rejection |
| Cell Builder Colony | Strong, populous, and queenless for 4-24 hours | A weak colony lacks resources to build quality cells |
| Workspace Setup | Well-lit, dark room; 3x-4x magnification; LED headlamp | Poor visibility increases risk of larval damage |
Ready to scale your queen production with professional-grade equipment?
HONESTBEE supplies commercial apiaries and beekeeping equipment distributors with the durable, precision tools needed for efficient grafting and large-scale queen rearing. From reliable grafting tools to robust cell builder supplies, our wholesale-focused operations ensure you get the high-quality equipment required for consistent success.
Contact our expert team today to discuss your specific needs and elevate your beekeeping operation.
Visual Guide
Related Products
- Plastic Chinese Queen Grafting Tool for Bee Queen Rearing
- Stainless Steel Queen Grafting Tool for Beekeeping and Bee Queen Grafting
- Stainless Steel Beekeeping Queen Grafting Tool for Honey Bee Rearing
- Black 2 Pack Beekeeper Queen Grafting Tool for Bee Queen Larva Transferring Needle
- Retractable Chinese Queen Rearing Grafting Tools Equipment
People Also Ask
- Why are specialized queen rearing tools necessary to mitigate winter hive losses? Boost Apiary Survival and Recovery
- What is the primary function of a queen grafting tool? Master Precise Larval Transfer for High Queen Acceptance
- What is grafting in queen rearing? Take Control of Your Apiary's Genetics
- What are the benefits of using a queen grafting tool for queen rearing? Master Precision for Superior Bee Genetics
- How do queen rearing tools and queen introduction hardware support commercial apiaries? Manage Queen Failure Effectively


