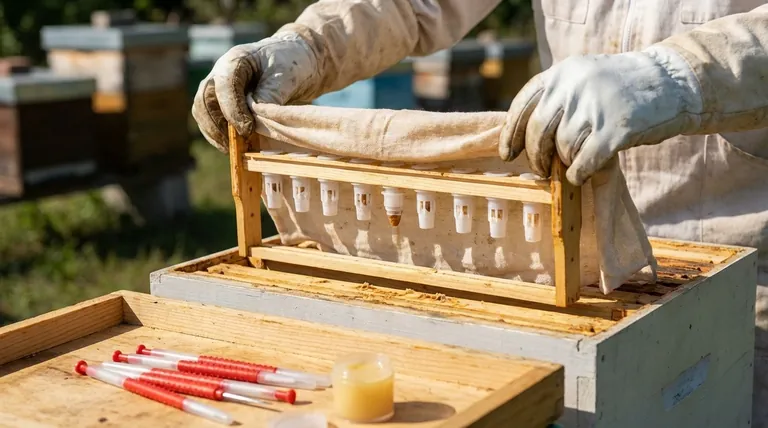
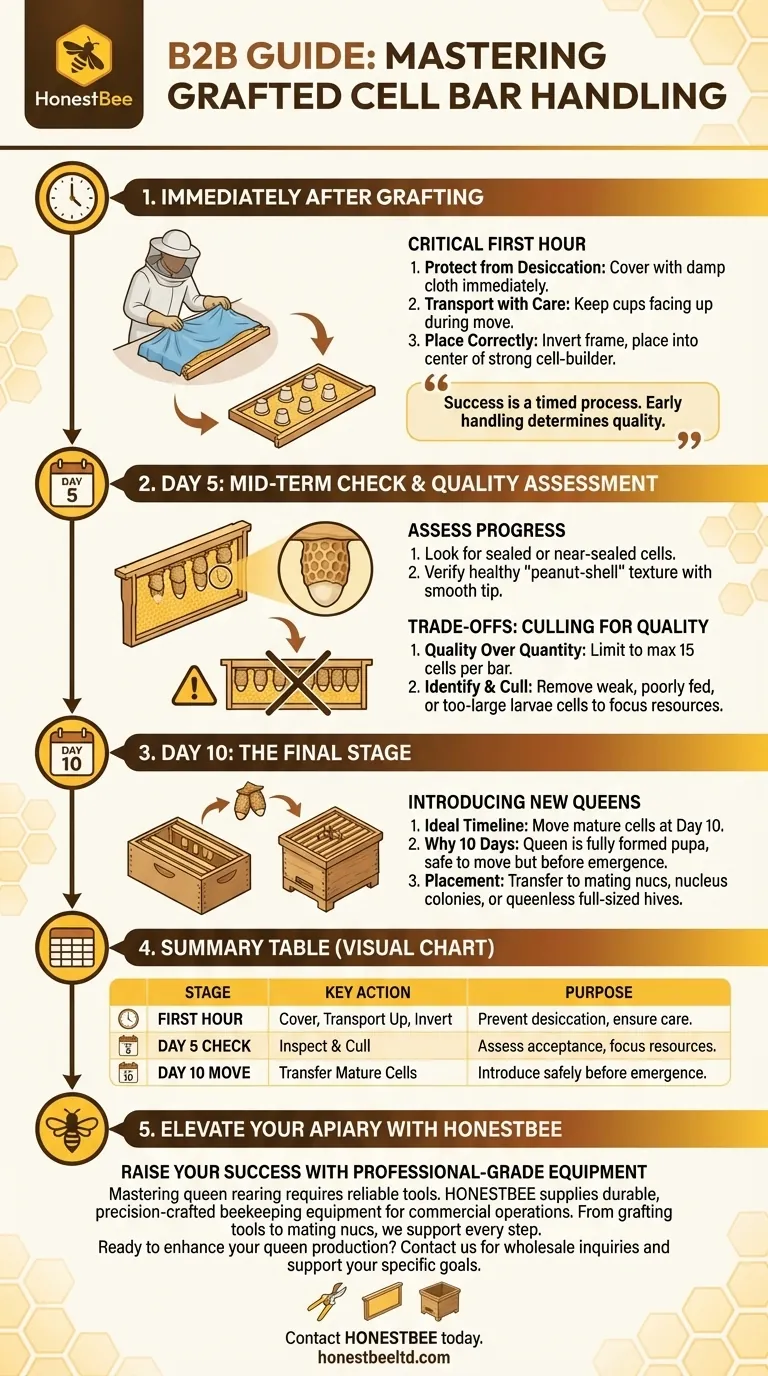
Immediately after grafting, your most critical tasks are to protect the delicate larvae from drying out and to transfer the cell bar frame to the cell-builder colony without delay. This involves covering the frame with a damp cloth, transporting it with the cell cups facing upwards, and then inverting it as you place it into the center of the cell-builder hive.
Success in queen rearing is not a single action but a timed process. How you handle the cells in the hours, days, and week following the graft directly determines the viability and quality of your future queens.
The Critical First Hour: Transfer to the Cell Builder
Properly introducing your grafted cells to their nurse bees is a crucial first step that sets the stage for their development.
Prepare for the Transfer
Before you even begin grafting, your cell cups should have been placed in a hive for at least 24 hours. This allows the bees to clean, polish, and condition the cups, which significantly increases the acceptance rate of your grafts.
Protect from Desiccation
The moment a larva is transferred, it is vulnerable to drying out. Immediately cover the finished cell bars with a clean, damp cloth. This maintains the high humidity necessary for the larva's survival.
Transport with Care
Always carry the frame with the cell cups facing up. This prevents the tiny larvae from falling out of their beds of royal jelly during transport to the cell-builder colony.
Place the Frame Correctly
Once at the cell-builder hive, carefully invert the frame so the cell cups now face down. Lower the frame gently into the center of the colony's brood nest, where the highest concentration of nurse bees can immediately begin caring for the new larvae.
The Mid-Term Check: Assessing Progress
Around five days after grafting, you must inspect the cells to gauge their progress and ensure the colony is producing high-quality queens.
What to Look For at Day 5
By day five, healthy cells should be sealed or on the verge of being sealed by the bees. This is a clear sign of acceptance and proper development.
Anatomy of a Healthy Cell
A well-cared-for queen cell will be fully sculpted with a characteristic pitted or "peanut-shell" texture. The very tip of the cell, however, will be smooth, pale wax. This indicates the bees have finished their work and the pupa is developing inside.
Understanding the Trade-offs: Culling for Quality
One of the most common mistakes is assuming more is better. To raise the best queens, you must be selective.
Quality Over Quantity
The best queens are raised when you cull the cells down to a maximum of 15 per bar. A single, strong cell-builder colony can only feed a limited number of queen larvae optimally.
The Risk of Spreading Resources Thin
If too many cells are left on the bar, the nurse bees may not be able to provide enough royal jelly to every single one. This results in many poorly-fed, undersized, and weaker queens instead of a few exceptional ones.
Identifying Cells to Cull
Remove any cells where the larvae looked slightly larger than the others at the time of grafting, as this indicates they were too old. You should also cull any cells that do not appear to be well-fed or fully drawn out compared to their neighbors.
The Final Stage: Introducing Your New Queens
The final step is moving the mature queen cells from the cell builder into their permanent new homes.
The 10-Day Timeline
Grafted queen cells should be moved and introduced to their destination colonies approximately 10 days after grafting. At this point, the queen is a fully formed pupa inside the cell.
Why 10 Days Is Ideal
This timing provides a crucial buffer. The queen is safe to move but is still a day or two away from emerging. This gives you leeway in case a queen develops faster and emerges early, which would result in her killing all the other queens in their cells.
Where to Place Queen Cells
Mature queen cells can be placed in mating nucs (mini-nucs), larger 2-5 frame nucleus colonies, or queenless full-sized colonies.
Making the Right Choice for Your Goals
Your handling procedure should align with your specific objectives in the apiary.
- If your primary focus is learning the process: Concentrate on keeping the larvae protected from drying out and ensuring the cell-builder colony is strong and queenless.
- If your primary focus is raising high-quality queens: Be rigorous about culling weak or poorly-fed cells at day five to ensure the colony’s resources are directed to the best candidates.
- If your primary focus is expanding your apiary: Carefully schedule your hive splits and nuc creation to align with the 10-day timeline for moving your finished queen cells.
By managing this process with care and precision, you are actively shaping the health and genetic strength of your apiary.
Summary Table:
| Stage | Key Action | Purpose |
|---|---|---|
| First Hour | Cover with damp cloth, transport cups up, invert into cell-builder | Prevent larval desiccation, ensure immediate nurse bee care |
| Day 5 Check | Inspect for sealed, well-sculpted cells; cull weak ones | Assess acceptance, focus resources on the best queens |
| Day 10 Move | Transfer mature cells to mating nucs or queenless colonies | Introduce new queens safely before emergence |
Raise Your Queen Rearing Success with Professional-Grade Equipment
Mastering the delicate process of queen rearing requires not just skill, but also reliable, high-quality tools. Whether you are a commercial apiary focused on producing superior queens or a distributor supplying the beekeeping community, the right equipment is fundamental to your success.
HONESTBEE supplies the durable, precision-crafted beekeeping supplies and equipment that commercial operations and distributors trust. From grafting tools to cell bars and mating nucs, our wholesale-focused operations ensure you get the professional gear needed for every critical step—from grafting to introduction.
Ready to enhance your queen production? Let's discuss how our equipment can support your specific goals.
Contact HONESTBEE today for wholesale inquiries and elevate your beekeeping operation.
Visual Guide
Related Products
- Clear Black Plain Polystyrene Queen Bee Grafting Cell Cups No Lug for Bee Queen Cup
- Premium Nicot Style Cell Bar Holder and Queen Cell Cup Holder System
- JZBZ Langstroth Queen Rearing Frame for Beekeeping
- JZBZ Push-In Queen Cell Cups for Beekeeping
- Retractable Chinese Queen Rearing Grafting Tools Equipment
People Also Ask
- What role do specialized queen rearing tools play in developing mite-resistant honeybee stock? Master Genetic Selection
- Why are cell cups primed before grafting, and what is used for this process? Boost Your Queen Rearing Success
- What are queen cups and how are they used in honey bee queen replacement? The Essential Guide to Queen Rearing
- What is the importance of using high-purity natural beeswax for queen cups? Ensure Scientific Integrity & Health
- What types of cell cups are commonly used in grafting? Plastic vs. Wax for Queen Rearing Success


