For filtering beeswax, the most common and effective material is cheesecloth. You can pour the melted wax directly through several layers of cheesecloth placed in a strainer, or wrap the solid, raw wax in a cheesecloth bundle before melting it in water.
The key to clean beeswax isn't just the filter material, but the process itself. Successful purification relies on using heat and water to separate the pure wax from debris, with the cloth acting as a critical tool for straining out solids.
The Core Principle: Rendering with Water
Before you even think about a filter, you must understand the role of water. The process of melting raw wax with water is called rendering, and it is the foundation of purification.
Why Water is Essential
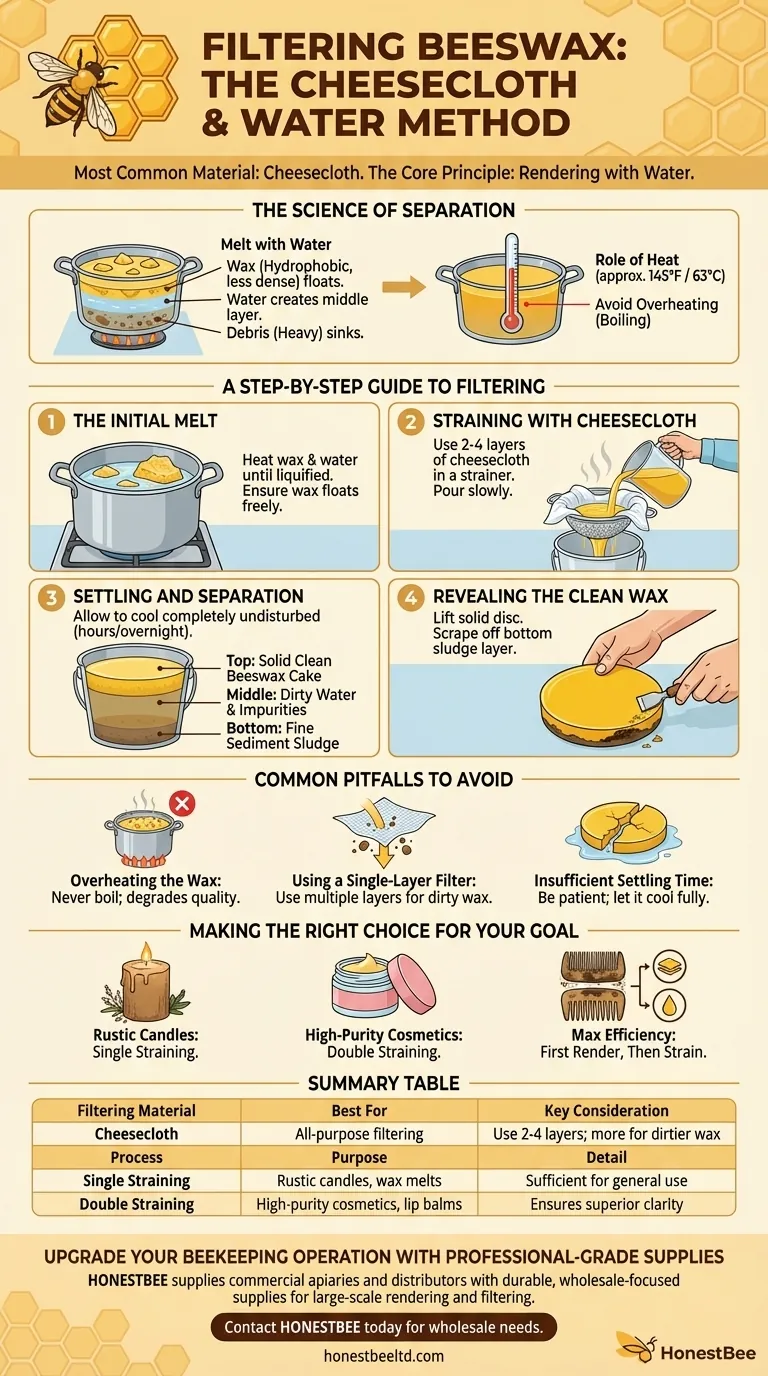
Melted beeswax is hydrophobic (repels water) and less dense than water. This is the key. When you melt raw wax in a pot of water, the pure wax floats, the water creates a middle layer, and most of the heavy debris (dirt, hive sediment) sinks to the bottom.
The Role of Heat
To filter wax, you must first melt it. Beeswax has a melting point of approximately 145°F (63°C). The goal is to keep the wax consistently melted during the straining process without overheating or boiling it, which can darken the color and degrade its quality.
A Step-by-Step Guide to Filtering
This method combines melting, water rendering, and straining to produce a clean, usable block of beeswax.
Step 1: The Initial Melt
Place your raw comb, cappings, or wax chunks into a dedicated pot (do not use for food). Add enough water so that the wax can float freely once melted. Gently heat the mixture until all the wax has liquified.
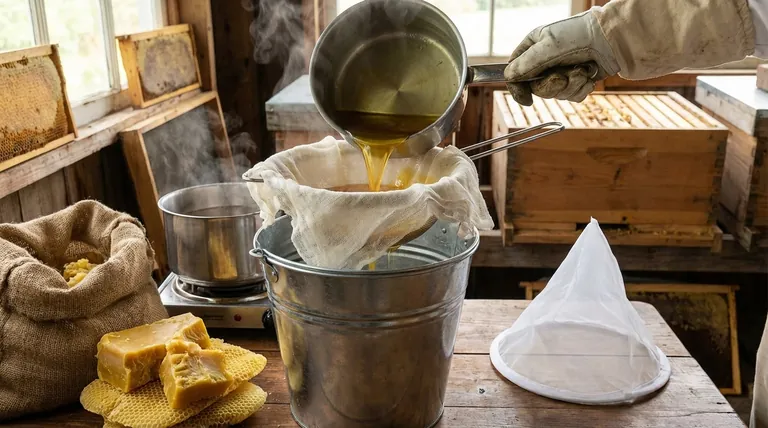
Step 2: Straining with Cheesecloth
Place a colander or large strainer over a clean collection bucket or pot. Line the strainer with 2-4 layers of cheesecloth. The more debris in your raw wax, the more layers you should use.
Slowly and carefully pour the hot wax and water mixture through the cheesecloth-lined strainer. The cloth will catch propolis, cocoons, and other larger solids, while the liquified wax and water pass through into the collection bucket.
Step 3: Settling and Separation
Allow the collection bucket to sit undisturbed for several hours or overnight. As it cools, the mixture will separate into three distinct layers:
- Top Layer: A solid cake of clean beeswax.
- Middle Layer: Dirty water containing dissolved impurities.
- Bottom Layer: A sludge of fine sediment that passed through the filter.
Step 4: Revealing the Clean Wax
Once the wax disc is completely solid, you can easily lift it off the top of the dirty water. The bottom of your wax disc will likely have a thin, sludgy layer of fine debris. Simply scrape this layer off with a hive tool or butter knife to reveal the clean wax underneath.
Common Pitfalls to Avoid
Achieving pure beeswax requires avoiding a few common mistakes that can compromise the quality of your final product.
Overheating the Wax
Never let the wax-water mixture come to a rolling boil. Excessive heat can darken the beeswax and diminish its pleasant natural aroma. A gentle, controlled heat is all that is required.
Using a Single-Layer Filter
For wax from old brood comb or other particularly dirty sources, a single layer of cheesecloth will not be enough. It can tear or allow too much fine debris through. Always use multiple layers for the initial filtering pass.
Insufficient Settling Time
Be patient. If you try to remove the wax cake before it has fully solidified, it can break apart and remix with the dirty water beneath it, undoing your work. Let it cool completely.
Making the Right Choice for Your Goal
The level of filtration depends entirely on your intended use for the beeswax.
- If your primary focus is rustic candles or wax melts: A single, thorough straining through several layers of cheesecloth is typically sufficient.
- If your primary focus is high-purity cosmetics or lip balm: You may need to perform the entire rendering and filtering process a second time with fresh cheesecloth to achieve superior clarity.
- If your primary focus is maximum efficiency with very dirty wax: First, render the wax in water without any filter to let the heaviest debris sink, then re-melt and strain the resulting wax block for a final polish.
By mastering this simple process, you can transform raw, debris-filled comb into a clean and valuable natural resource.
Summary Table:
| Filtering Material | Best For | Key Consideration |
|---|---|---|
| Cheesecloth | All-purpose filtering; ideal for most beekeepers | Use 2-4 layers; more layers for dirtier wax |
| Process | Purpose | Detail |
| Single Straining | Rustic candles, wax melts | Sufficient for general use |
| Double Straining | High-purity cosmetics, lip balms | Ensures superior clarity |
Upgrade Your Beekeeping Operation with Professional-Grade Supplies
Producing high-quality beeswax starts with reliable equipment. HONESTBEE supplies commercial apiaries and beekeeping equipment distributors with the durable, wholesale-focused supplies needed for efficient, large-scale rendering and filtering.
Contact HONESTBEE today to discuss your wholesale needs and learn how our equipment can help you maximize the yield and purity of your beeswax harvest.
Visual Guide
Related Products
- Nylon Honey Strainer Square Filter Cloth for Honey Filters
- Manual Beeswax Flat Sheet Machine for Beeswax Processing
- Conical Nylon Honey Strainer Filter Bag for Beekeeping and Honey Filtration
People Also Ask
- Why is straining an essential step in honey processing? Master the Key to Pure, Market-Ready Honey Harvests
- What are the advantages of using honey strainers? A Simple, Low-Cost Path to Pure Honey
- What size mesh for straining honey? Master the Two-Stage System for Clean, Raw Honey
- What are the functional benefits of using high-mesh Nylon Filter Cloth in honey processing? Enhance Purity and Stability
- What size mesh to filter honey? The Standard Two-Stage System for Clean, Raw Honey


