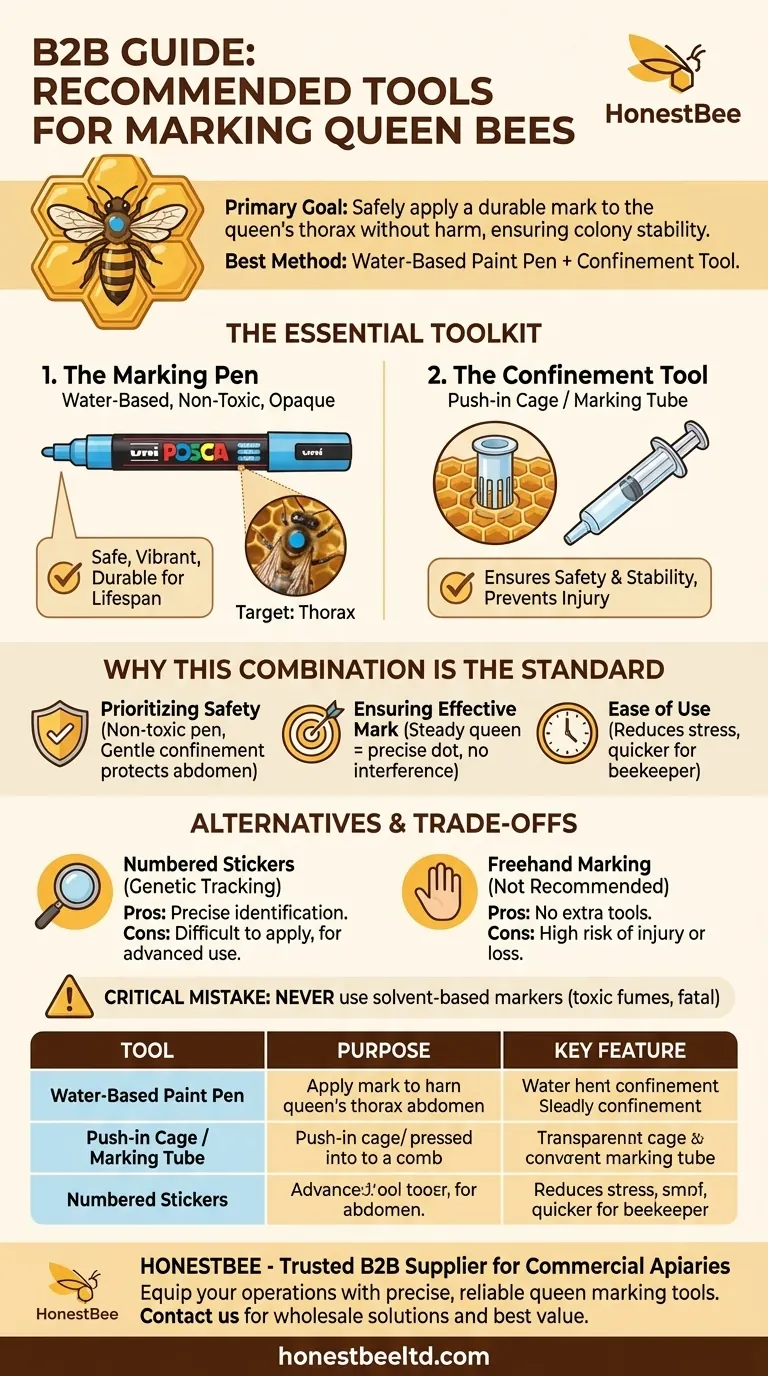
For safely and effectively marking a queen bee, the recommended tools are a water-based, non-toxic paint pen and a dedicated confinement tool, such as a push-in marking cage or a marking tube. This combination provides the highest degree of safety for the queen while ensuring stability for the beekeeper, making the process smooth and reliable.
The primary goal of marking a queen is not simply to apply a color, but to do so without harming her or causing undue stress to the colony. The choice of tools is therefore a matter of risk management, where a non-toxic pen and a gentle confinement cage offer the best results with the least potential for error.

The Essential Toolkit for Queen Marking
The right tools are designed for one purpose: to place a gentle, durable mark on the queen's thorax without causing her injury.
The Marking Pen: Your Primary Tool
The most widely recommended markers are water-based paint pens, with the Uni-Posca brand being a common industry standard.
These pens are chosen for their specific properties: the paint is non-toxic, opaque, and vibrant, making the queen easy to spot. The acrylic paint is also durable enough to last for the queen's entire lifespan.
The Confinement Tool: Ensuring Safety and Stability
While an experienced beekeeper might mark a queen by hand, this carries a high risk of dropping or injuring her. Using a confinement tool is the professional standard for safety and precision.
The two most common options are the push-in cage and the marking tube. The push-in cage is pressed gently into the comb over the queen, trapping her against the foundation. The marking tube allows you to place the queen inside and use a soft foam plunger to guide her gently against a screen for easy marking.
Why This Combination is the Standard
The pairing of a specific type of pen with a confinement cage is about maximizing safety and effectiveness.
Prioritizing Queen Safety
The queen is the single most important individual in the hive. A water-based, non-toxic pen ensures she is not poisoned by the mark. A confinement cage immobilizes her gently, preventing the beekeeper from accidentally squeezing her abdomen, which could damage her ovaries and end her laying career.
Ensuring an Effective Mark
A steady queen is easy to mark accurately. The goal is a small, neat dot on the center of her thorax (the middle section of her body). A precise mark is more durable and less likely to interfere with her movement or acceptance by the hive.
Ease of Use for the Beekeeper
For both beginners and seasoned professionals, this method removes stress and uncertainty. The cage secures the queen, allowing you to focus solely on applying the paint, resulting in a quicker and calmer experience for both the bee and the beekeeper.
Understanding the Trade-offs and Alternatives
While the pen and cage method is the standard, it's important to understand the alternatives and their specific use cases.
Paint Pens vs. Numbered Stickers
For breeders or researchers tracking specific genetic lines, numbered stickers are an alternative to paint. These tiny, pre-printed discs provide precise identification for individual queens.
However, they are more difficult to apply than a simple paint dot and are typically reserved for high-value breeding stock where detailed record-keeping is paramount. For general identification, a paint pen is far more practical.
Cages vs. Freehand Marking
Marking a queen "freehand" by holding her between your thumb and forefinger is possible but requires significant confidence and dexterity. The risk of dropping her outside the hive or applying too much pressure is substantial.
Using a cage effectively eliminates these risks, making it the superior method for nearly all situations, especially when you consider the value of a proven, mated queen.
The Critical Mistake: Using the Wrong Paint
Never use solvent-based markers, such as standard permanent markers or nail polish. The chemical fumes can be toxic and fatal to the queen, and the scent may cause the other bees in the hive to reject and kill her.
Making the Right Choice for Your Goal
Your goal determines the exact tools you should use.
- If your primary focus is safety and you are new to the process: A queen marking tube and a water-based paint pen provide the most secure and foolproof method.
- If your primary focus is quickly marking a queen in the field: A push-in cage is slightly faster than a tube and is an excellent choice for routine inspections.
- If your primary focus is advanced genetic tracking: Numbered stickers are the correct tool, but be sure to practice the application method before working with a valuable queen.
By choosing the right tools, you transform a potentially stressful task into a controlled and confident part of responsible hive management.
Summary Table:
| Tool | Purpose | Key Feature |
|---|---|---|
| Water-Based Paint Pen | Apply a durable, visible mark | Non-toxic, vibrant, long-lasting |
| Push-in Cage / Marking Tube | Gently confine the queen | Prevents injury, ensures stability |
| Numbered Stickers (Alternative) | For advanced genetic tracking | Provides individual identification |
Ensure the safety and productivity of your apiary with professional-grade queen marking tools from HONESTBEE.
As a trusted supplier for commercial apiaries and beekeeping equipment distributors, we provide the precise, reliable equipment you need for efficient and safe hive management. Our wholesale-focused operations ensure you get the best value on the tools that protect your most valuable asset—your queen bees.
Contact HONESTBEE today to discuss your equipment needs and keep your operations running smoothly.
Visual Guide
Related Products
- One Hand Yellow Queen Marking Catcher Tube Cage Beekeeper Tool Accessory for Queen Bee
- Queen Bee Marking Tube Cage Bottle Catcher Holder with Clear Plastic Plunger Marker
- Transparent Plastic Bee Catcher Queen Marker Tube Cage Beekeeping Tool Equipment
- Queen Bee Marking Pen POSCA Queen Marking Pens for Beekeeping Bee Markers
- Queen Bee Marking Pen UNI Medium Point for Queen and Bee Marking
People Also Ask
- What tools are commonly used for marking queen bees? A Guide to Safe and Effective Marking
- What tools are recommended for marking a Queen bee? Ensure a Safe and Successful Mark
- What are the specific advantages of using international standard marking tools in queen bee production and management?
- What equipment is needed to mark a queen bee? A Simple 3-Tool Guide for Every Beekeeper
- What is the significance of using queen marking tools in apiary performance monitoring? Optimize Your Hive Productivity


