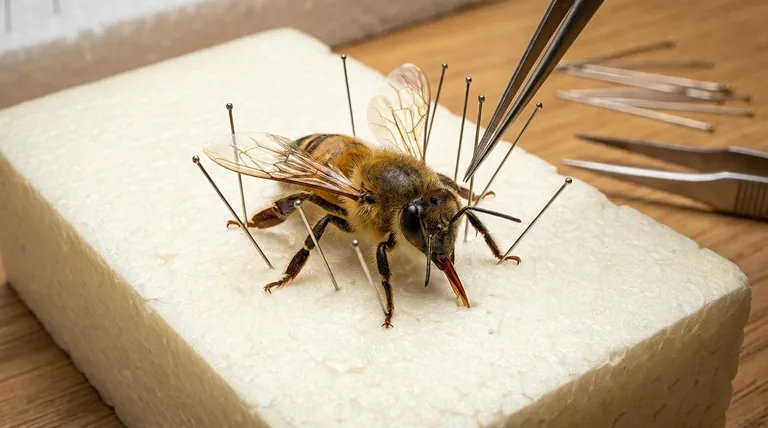
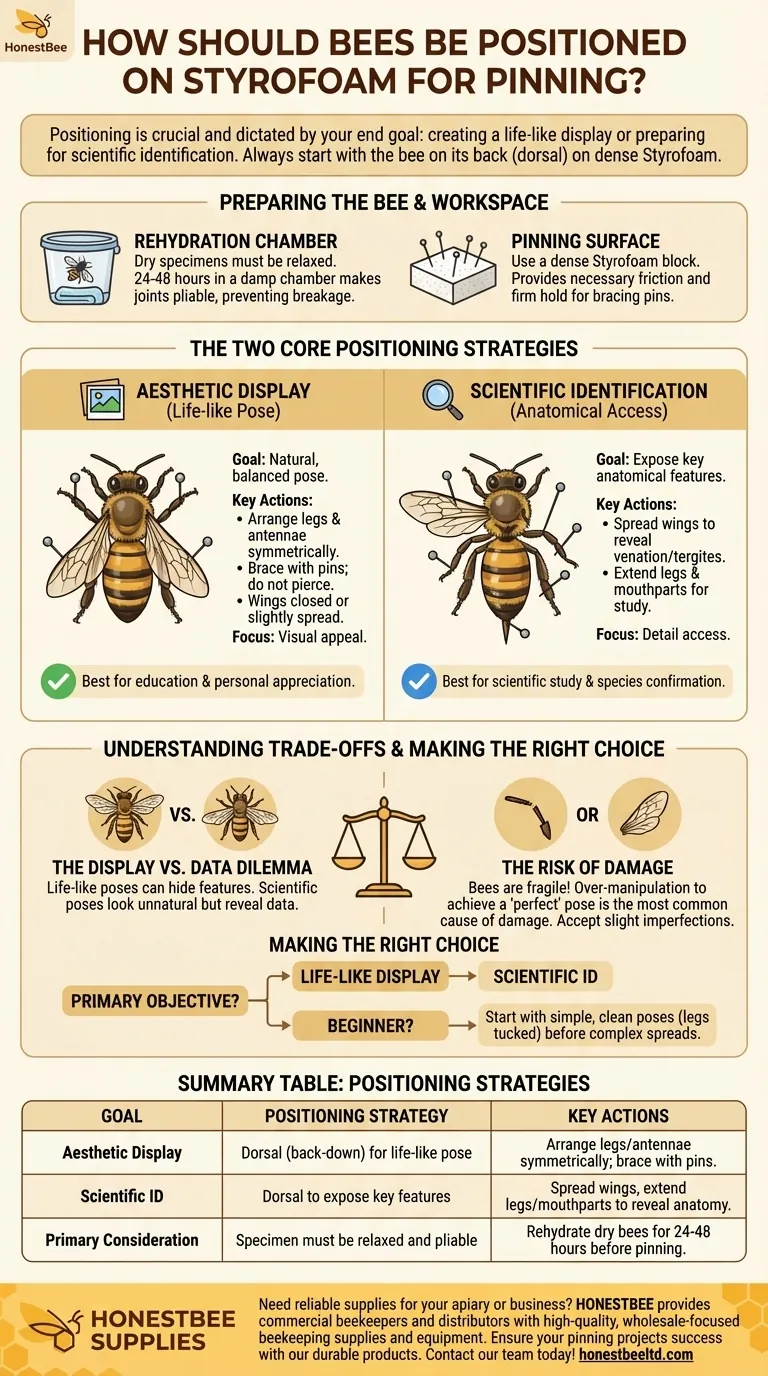
To properly position a bee for pinning, you should place it on its back on a flat, dense piece of Styrofoam. This dorsal (back-down) position gives you stable and direct access to arrange the legs, antennae, and wings, which you will secure with insect pins.
The ideal position for your bee is not a single standard but is dictated entirely by your end goal: creating a life-like display or preparing a specimen for scientific identification.
Preparing the Bee and Workspace
Before positioning the bee, ensure it is properly relaxed. A rigid, dry specimen will break if you try to move its limbs. A relaxed bee is pliable, allowing you to move its parts without causing damage.
The Rehydration Chamber
If your bee is dry and brittle, place it in a sealed container with a damp paper towel (not touching the bee) for 24-48 hours. This process, called rehydration, makes the joints flexible and ready for manipulation.
Your Pinning Surface
Use a dense Styrofoam block, often called a pinning block. Its surface provides the necessary friction to hold the bee in place while being firm enough to securely hold the pins you will use to brace the legs and wings.
The Two Core Positioning Strategies
Your objective determines how you will arrange the bee on the Styrofoam. The two primary approaches serve very different purposes.
Positioning for Display (Aesthetic)
This method aims to create a "life-like" pose, as if the bee were resting or walking.
Place the bee on its back. Use fine-tipped forceps to gently arrange the legs symmetrically. Brace them in place with pins on either side of the leg segments—do not pierce the legs themselves.
The wings can be left closed or spread slightly for a more dynamic look. The antennae should be positioned forward in a natural, symmetrical curve.
Positioning for Identification (Scientific)
This method prioritizes access to key anatomical features used for species identification. Aesthetics are secondary.
Here, you may need to intentionally spread one set of wings completely to reveal the veination pattern and the top of the abdomen (tergites).
You might also pull one mid-leg forward to expose structures on the underside of the thorax. The mouthparts (proboscis) may also need to be extended and pinned out for detailed examination. This pose often looks unnatural but is invaluable for study.
Understanding the Trade-offs
Pinning is a delicate process where choices have consequences. Understanding the compromises is key to achieving your desired outcome.
The Display vs. Data Dilemma
A perfectly life-like pose can obscure the very features needed to confirm a bee's species. For example, tucking the legs naturally can hide important spurs or pollen baskets.
Conversely, a specimen pinned for scientific study, with its parts splayed out, may look awkward or damaged to a casual observer, making it less suitable for a purely aesthetic display.
The Risk of Damage
Bees are fragile. Their antennae, the tarsal claws on their feet, and the delicate membranes of their wings are easily broken.
Over-manipulating the specimen to achieve a "perfect" pose is the most common cause of damage. It is often better to accept a slightly imperfect position than to risk breaking a leg or tearing a wing.
Making the Right Choice for Your Goal
Your pinning strategy should be a conscious decision based on your primary objective.
- If your primary focus is a life-like display: Position the bee symmetrically on its back, creating a balanced and natural pose with its legs and antennae.
- If your primary focus is scientific identification: Position the bee to clearly expose key features like wing veins, leg structures, and mouthparts, even if it compromises the aesthetic.
- If you are a beginner: Start with common bees and aim for a simple, clean pose with the legs tucked before attempting a more complex wing-spread position.
Ultimately, proper positioning ensures your pinned bee serves its intended purpose, whether for education, scientific contribution, or personal appreciation.
Summary Table:
| Goal | Positioning Strategy | Key Actions |
|---|---|---|
| Aesthetic Display | Dorsal (back-down) for a life-like pose | Arrange legs and antennae symmetrically; brace with pins. |
| Scientific ID | Dorsal to expose key features | Spread wings, extend legs/mouthparts to reveal anatomy. |
| Primary Consideration | Specimen must be relaxed and pliable | Rehydrate dry bees for 24-48 hours before pinning. |
Need reliable supplies for your apiary or beekeeping business? HONESTBEE provides commercial beekeepers and equipment distributors with high-quality, wholesale-focused beekeeping supplies and equipment. Ensure your pinning projects—and all your beekeeping operations—are a success with our durable products. Contact our team today to discuss your needs!
Visual Guide
Related Products
- Queen Bee Marking Pen POSCA Queen Marking Pens for Beekeeping Bee Markers
- HONESTBEE Professional Frame Wiring Board and Jig
- Professional Frame Preparation: The HONESTBEE Electric Wire Embedder
- Professional Bee Frame Machine for Side Bar Shaping
- HONESTBEE Adjustable Voltage Wire Embedder with Digital Display
People Also Ask
- Why are Posca pens commonly used for marking queen bees? The Safest, Most Durable Method for Beekeepers
- What role do specialized marking pens and color-coding systems play in honeybee tracking? Enhance Research Precision
- What is the purpose of a queen marking pen in beekeeping? Essential for Efficient Hive Management
- How should a new paint pen be primed before marking a queen bee? Essential Tips for Safe & Clear Markings
- What specifications are required for a high-quality queen bee marking pen? Ensure Safety and Precision for Your Colony