At its core, grafting is the delicate manual process of transferring very young female bee larvae from their worker cells into artificial queen cell cups. This technique allows a beekeeper to select the genetic material for new queens and raise many of them simultaneously. The successfully transferred larvae are then placed into a strong, queenless "cell-builder" colony, which is biologically primed to raise them as new queens.
The success of grafting hinges on two critical factors: the precise, gentle handling of larvae that are the correct age, and creating an ideal social environment in a hive that is desperate to raise a new queen. The physical steps are simple, but the biological context is everything.
The Foundation: Preparation and Selection
Before you ever pick up a grafting tool, success is determined by proper preparation. This phase is about selecting the right genetics and creating the perfect environment for raising new queens.
Step 1: Select a "Breeder" Hive
Your first step is to choose a source colony. This "breeder hive" should exhibit the traits you want to propagate, such as gentleness, high honey production, or disease resistance. The larvae from this hive will become your next generation of queens.
Step 2: Prepare the Cell-Builder Colony
A cell-builder is a strong, populous hive that is made "queenless." Without a queen, the nurse bees' instinct is to immediately begin raising a new one. By providing them with your grafted larvae, you are giving them the candidates they are biologically programmed to care for.
Step 3: Ensure a Supply of the Youngest Larvae
The ideal larvae for grafting are less than 24 hours old. They will be tiny, C-shaped, and floating in a generous pool of royal jelly. To ensure you have a supply of larvae of a known age, you can briefly confine the queen from your breeder hive to an empty frame for 24 hours.
Step 4: Ready Your Equipment
Prepare your cell bars by attaching empty queen cell cups. To improve the success rate, many beekeepers "prime" each cup with a tiny drop of diluted royal jelly. This prevents the larva from drying out and can make the transfer easier.
The Core Technique: Transferring the Larva
This is the most delicate part of the process and requires a steady hand, good light, and patience. Many operators over 40 find that magnification (like a 3x-4x headset) and an LED headlamp are essential.
Step 1: Bring Larvae to a Well-Lit Area
After allowing your cell-builder colony to settle for several hours, retrieve the frame containing your target larvae from the breeder hive. Gently brush all the bees off and take the frame to a sheltered, well-lit workspace to prevent the larvae from drying out or chilling.
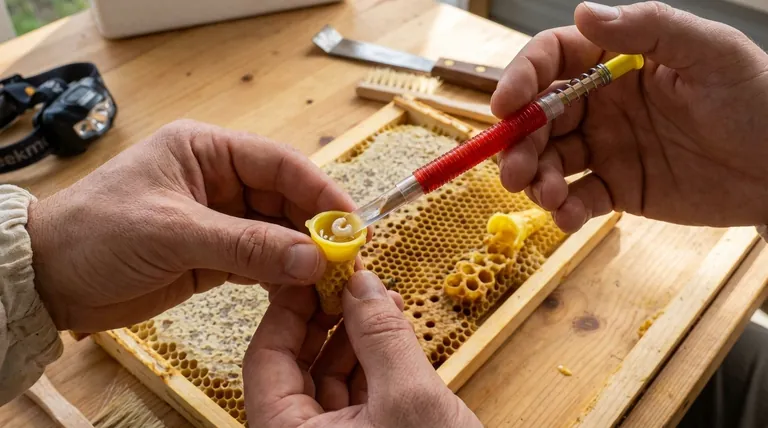
Step 2: The Gentle Scoop
Position your grafting tool behind the outer curve of the C-shaped larva. The goal is to slide the tool underneath both the larva and its bed of royal jelly. Lift straight up, gently and slowly.
Step 3: The Careful Placement
Move the tool over the primed queen cell cup. Gently deposit the larva by drawing the tool's tip across the base of the cell. The surface tension of the priming liquid will help pull the larva off the tool and settle it into its new home.
Understanding the Trade-offs and Common Pitfalls
While the process seems straightforward, small mistakes can lead to low acceptance rates. Understanding these common issues is key to troubleshooting.
The Critical Role of Larval Age
Grafting a larva that is too old is the most common reason for failure. A larva older than about 36 hours has already had its diet changed from pure royal jelly. Even if the bees accept it, it will develop into an intercaste—somewhere between a worker and a queen—and will not be viable.
Environmental Stress is Lethal
The larvae are incredibly fragile. If they are allowed to dry out from wind or direct sun, or if they become chilled, they will die. Work quickly but carefully, and never leave your frame of larvae exposed for long periods.
The Hive's Acceptance is Not Guaranteed
Even a perfect graft can be rejected. The cell-builder colony must be strong, well-fed, and truly "hopelessly queenless." If they have any other option to raise a queen (like an existing queen cell), they may ignore your grafts.
Final Step: Incubation in the Hive
Once you have grafted a full bar of cells (a common setup is three bars of 15-18 cells each), it's time to let the bees take over.
Place the Grafted Cells
Carefully place the frame holding your cell bars into the center of the queenless cell-builder colony. It is typically placed between a frame of pollen and a frame of open brood, ensuring the nurse bees will find and care for the new queen cells immediately.
Check for Acceptance
After 24 hours, you can briefly inspect the hive. The bees will have accepted the grafts if they have started to draw out the edges of the plastic cups with fresh white wax and have added more royal jelly.
Making the Right Choice for Your Goal
- If your primary focus is learning the physical technique: Start by grafting just a few cells and don't worry about the acceptance rate. Concentrate solely on mastering the gentle scooping and placing motion.
- If your primary focus is maximizing queen production: Ensure your cell-builder is packed with nurse bees, is verifiably queenless, and that your larvae are the absolute perfect age (12-24 hours old).
- If you struggle with eyesight or a steady hand: Do not hesitate to use magnification and a headlamp. Priming the cells is also highly recommended, as it makes the transfer significantly more forgiving.
Mastering these steps transforms you from a beekeeper into a queen breeder, giving you ultimate control over the health and genetics of your apiary.
Summary Table:
| Step | Key Action | Critical Factor |
|---|---|---|
| 1. Preparation | Select breeder hive & prepare cell-builder | Strong, queenless colony |
| 2. Larva Selection | Identify larvae <24 hours old | Correct age is crucial for success |
| 3. Grafting | Gently transfer larva to primed cup | Precise, gentle handling |
| 4. Incubation | Place cells in cell-builder hive | Hive must be hopelessly queenless |
Ready to elevate your queen-rearing operation?
Mastering grafting is essential for controlling the genetics and health of your commercial apiary. HONESTBEE supplies the high-quality, durable beekeeping supplies and equipment—from precision grafting tools to cell bars and cups—that commercial apiaries and distributors rely on for successful, large-scale queen production.
Contact our expert team today to discuss the right equipment for your queen breeding goals.
Visual Guide

Related Products
- Plastic Beekeeping Honey Bee Larvae Grafting Tools for Queen Rearing and Chinese Grafting
- Black 2 Pack Beekeeper Queen Grafting Tool for Bee Queen Larva Transferring Needle
- Retractable Chinese Queen Rearing Grafting Tools Equipment
- Stainless Steel Queen Grafting Tool for Beekeeping and Bee Queen Grafting
- Stainless Steel Beekeeping Queen Grafting Tool for Honey Bee Rearing
People Also Ask
- What is the proper technique for grafting a honey bee larva? Master Precision Queen Rearing Techniques
- How do larvae grafting tools and royal jelly production kits contribute to a diversified bee product strategy?
- What is the significance of a Larvae Grafting Tool in Royal Jelly production? Unlock Maximum Hive Yield
- What is the primary function and technical requirement of a larvae grafting tool? Master Precision Queen Rearing
- What is the grafting method of queen rearing? Master Controlled Queen Production for Your Apiary


