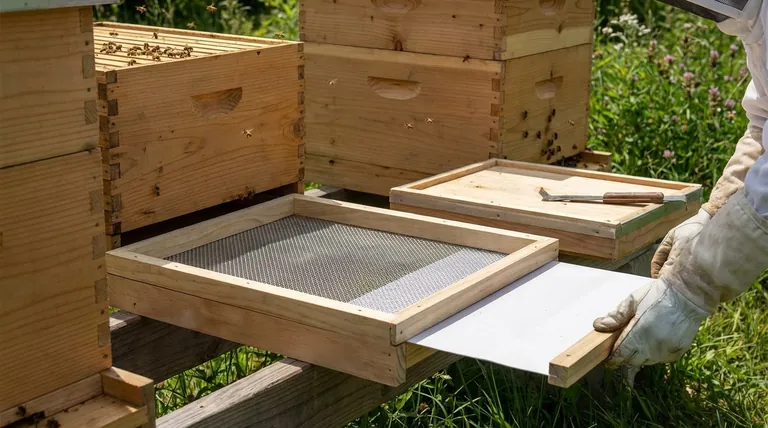
To install a wire mesh floor, you must first replace your hive's existing solid bottom board with a new one that has a mesh screen integrated into it. After removing the old board, you will place the new screened bottom board on your hive stand, secure wire mesh with a hole size of approximately 2.5mm (often called #8 hardware cloth) to its frame, and then place your hive bodies on top. A removable tray is typically slid in underneath the mesh to catch debris or to close off the floor for winter.
A screened bottom board is more than just a component; it is a strategic upgrade for your hive's health. While the installation is straightforward, understanding its role in ventilation and pest management is the key to using it effectively.
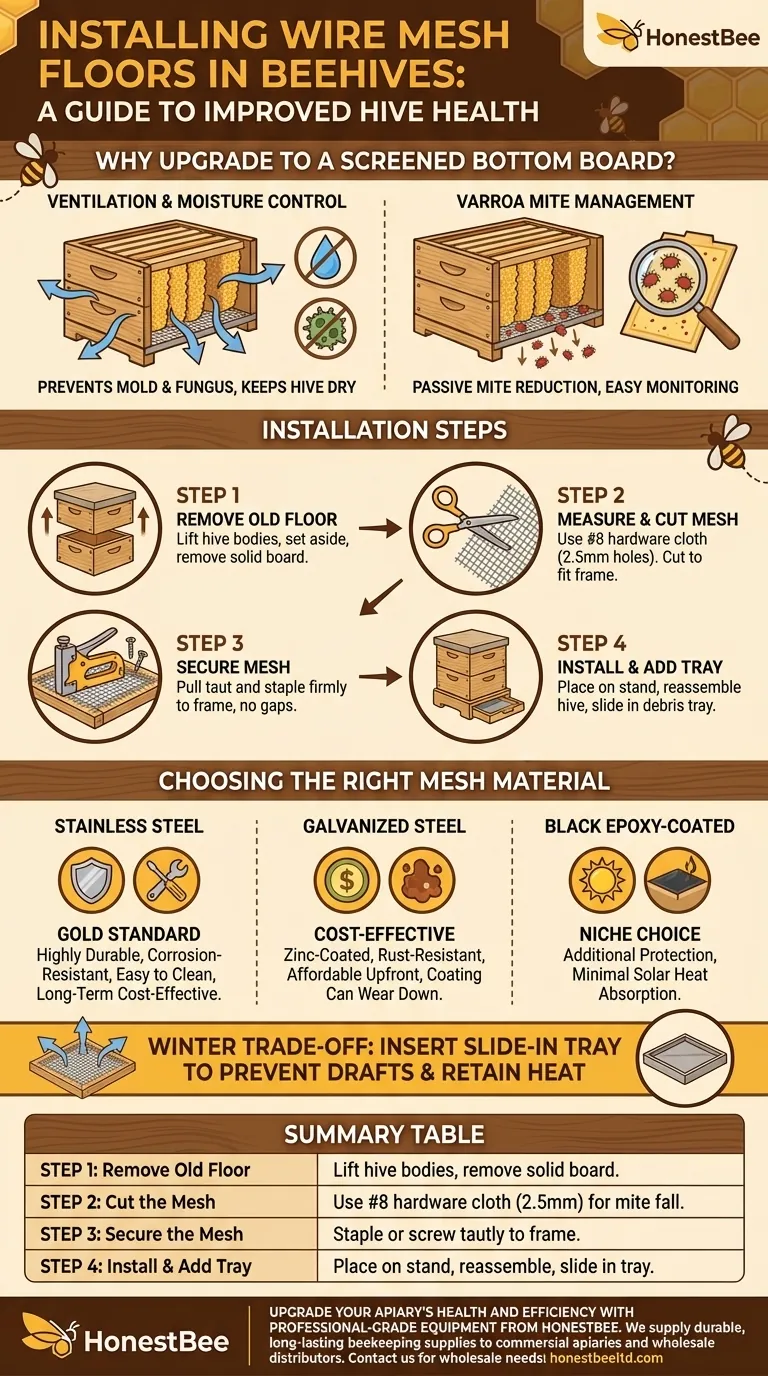
Why Upgrade to a Screened Bottom Board?
Moving from a solid floor to a screened, or "open mesh," floor is one of the most impactful changes a beekeeper can make. It directly addresses several chronic issues that can weaken a colony.
The Critical Role of Ventilation
Bees generate significant heat and water vapor. In a hive with a solid floor, this moisture can condense on the inner walls and lid, especially in cool weather.
This excess moisture promotes the growth of mold and fungus, creating an unhealthy environment. A screened bottom board allows this damp air to escape, ensuring constant, gentle airflow that keeps the hive interior dry.
A Key Tool for Varroa Mite Management
The Varroa destructor mite is a primary threat to honeybee colonies worldwide. These mites occasionally fall off their bee hosts during grooming or movement.
With a screened floor, a significant portion of these mites fall completely out of the hive, unable to climb back in. This provides a constant, passive method of reducing the mite population within the hive, complementing other integrated pest management strategies.
Simplified Hive Maintenance
A screened bottom board allows hive debris—wax cappings, pollen, and other waste—to fall through the mesh. This self-cleaning action reduces the buildup of material that can harbor pests and pathogens.
Furthermore, by placing a removable, sticky board or inspection tray underneath the mesh for a 24-hour period, you can easily monitor the Varroa mite drop. This gives you a clear, quantifiable measure of the infestation level in your colony without having to open the hive.
How to Install Your Screened Bottom Board
While you can purchase pre-made screened bottom boards, building your own allows for customization. The process involves creating a frame that supports both the mesh and the hive bodies above it.
Step 1: Remove the Old Floor
Carefully lift your stack of hive bodies (brood boxes and supers) off the existing solid bottom board and set them aside. You may need a partner for this, as a full hive is very heavy. Remove the old bottom board from your hive stand.
Step 2: Measure and Cut Your Mesh
The most commonly used mesh is #8 hardware cloth, which has 8 squares per inch and a hole size of about 2.5mm. This is large enough for mites and debris to fall through but too small for bees to pass.
Cut the mesh to fit the opening in your new bottom board frame, leaving a slight overlap to staple it securely.
Step 3: Secure the Mesh to the Frame
Place the cut mesh over the opening in your bottom board. Pull it taut to ensure it doesn't sag under the weight of the bees.
Secure the mesh firmly to the wooden frame using a heavy-duty staple gun or pan-head screws with washers. Place staples every few inches to prevent any gaps.
Step 4: Install the Board and Debris Tray
Place your new screened bottom board on the hive stand. Carefully place your hive bodies back on top of it.
Finally, slide your removable inspection board or debris tray into the slot underneath the wire mesh. This tray is used for monitoring mite fall and can be inserted during winter to provide insulation.
Choosing the Right Wire Mesh Material
The material you choose will impact the longevity and maintenance requirements of your floor.
Stainless Steel: The Gold Standard
Stainless steel is the most durable and corrosion-resistant option. It will not rust, is easy to clean with a hive tool or pressure washer, and will last for many years, making it the most cost-effective choice in the long term.
Galvanized Steel: The Cost-Effective Alternative
Galvanized wire mesh is coated in zinc to resist rust and is a more affordable upfront option. While durable, the zinc coating can wear down over time, especially in very wet climates or if scraped aggressively during cleaning.
Black Epoxy-Coated Mesh: A Niche Choice
This type of mesh has an additional layer of protection against rust. Some beekeepers believe the black color absorbs solar heat, helping to warm the hive in cooler weather, though this effect is minimal. Its primary benefit remains corrosion resistance.
Understanding the Trade-offs
A screened bottom board is highly beneficial, but it's important to understand its operational limitations.
The Challenge of Cold Climates
The primary benefit of a screened floor—ventilation—becomes a liability in harsh winters. The open mesh can create a draft that makes it harder for the bee cluster to stay warm.
For this reason, it is critical to insert the solid slide-in tray during the winter months. This effectively converts your screened floor back into a solid floor, retaining heat while still allowing for easy cleaning in the spring.
Potential for "Bearding"
In extremely hot weather, the increased airflow may not be enough to cool the hive. You may see more bees clustering on the outside of the hive entrance, a behavior known as "bearding." This is a natural cooling mechanism and is generally not a cause for alarm.
Making the Right Choice for Your Hive
Your decision to use and how to implement a screened bottom board should align with your specific beekeeping goals.
- If your primary focus is Varroa mite control: A screened bottom board is an essential passive tool, but it must be used with an inspection tray to monitor mite levels and combined with active treatments when necessary.
- If your primary focus is moisture reduction: A screened floor is the most effective way to combat condensation and mold, particularly in humid or wet climates.
- If your primary focus is long-term durability: Invest in a high-quality bottom board using stainless steel mesh for a low-maintenance solution that will last the life of your hive.
By understanding its function as a tool for hive health, the screened bottom board becomes a cornerstone of modern, responsible beekeeping.
Summary Table:
| Step | Key Action | Important Detail |
|---|---|---|
| 1 | Remove Old Floor | Lift hive bodies and set aside the solid bottom board. |
| 2 | Cut the Mesh | Use #8 hardware cloth (2.5mm holes) for optimal mite fall. |
| 3 | Secure the Mesh | Staple or screw mesh tautly to the new bottom board frame. |
| 4 | Install & Add Tray | Place board on stand, reassemble hive, and slide in debris tray. |
Upgrade your apiary's health and efficiency with professional-grade equipment from HONESTBEE.
We supply durable, long-lasting beekeeping supplies—including high-quality screened bottom boards with stainless steel mesh—to commercial apiaries and equipment distributors through our wholesale-focused operations. Our products are designed to support effective Varroa mite management and superior hive ventilation, helping you maintain stronger, more productive colonies.
Contact our team today to discuss your wholesale needs and discover how HONESTBEE can be your trusted partner in beekeeping success.
Visual Guide
Related Products
- Australian Pine Wood Langstroth Screen Bottom Board for Wholesale
- Langstroth Screen Bottom Board for Beekeeping Wholesale
- Solid Bottom Board Australian Pine Wood Langstroth Bottom Board for Wholesale
- Langstroth Solid Bottom Board for Beekeeping
People Also Ask
- What is the primary function of a screen bottom board? Achieve Accurate Varroa Mite Assessment in Your Apiary
- Which hive components are most effective for optimizing ventilation during summer beekeeping? Boost Colony Health
- What is the function of screening bottom boards in large-scale beekeeping management? Boost Colony Health with Data
- What are the advantages of a screened bottom board? Boost Hive Health with Superior Ventilation & Pest Control
- What is the primary function of screened bottom boards in the mechanical control of Varroa destructor? A Core IPM Tool


