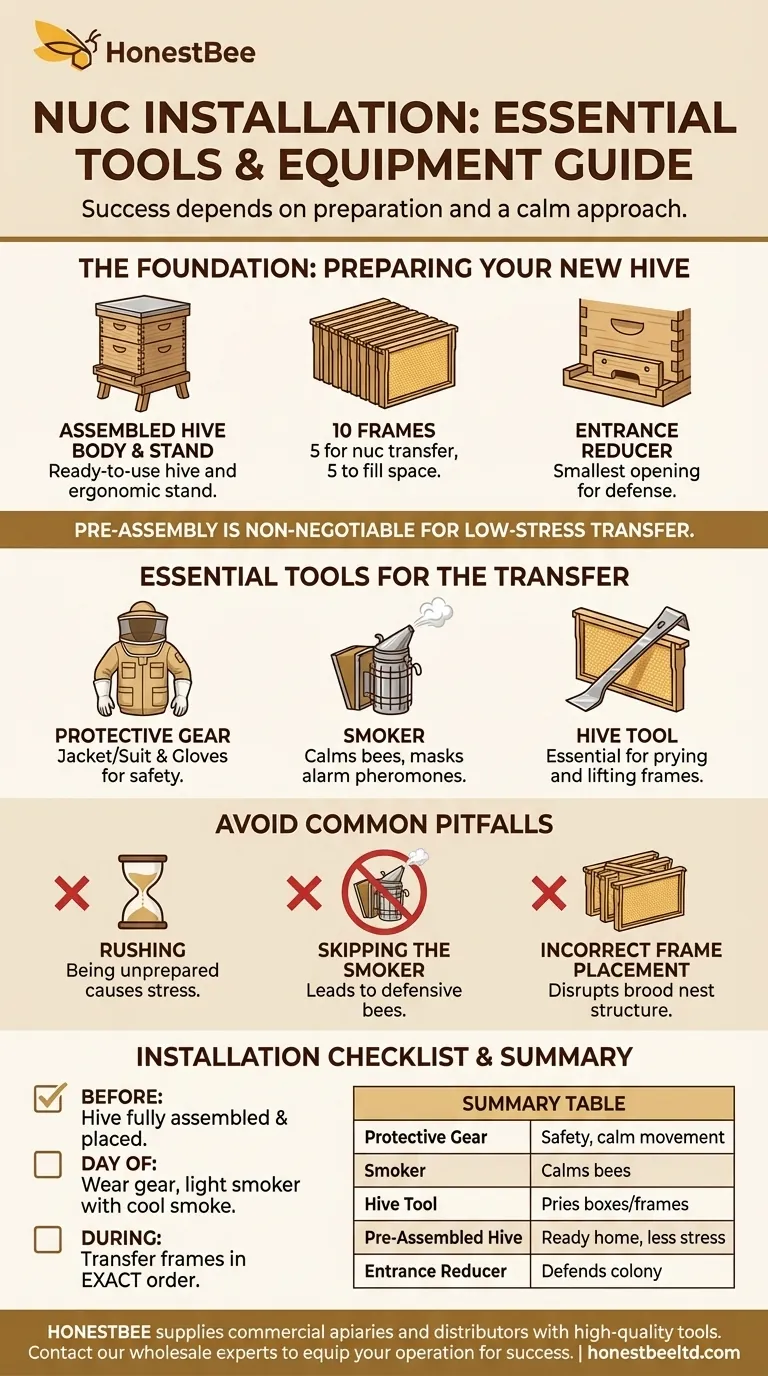
To install a nucleus colony successfully, you need a small, specific set of tools and a fully prepared hive. The essential items are your protective gear (a bee jacket or suit and gloves), a smoker to calm the bees, and a hive tool for manipulating frames. Crucially, your new hive body, frames, and stand must be assembled and positioned in their final location before you begin the transfer.
The most critical factor for a smooth nuc installation is not the complexity of your tools, but the quality of your preparation. A calm, methodical transfer into a pre-assembled hive minimizes stress on the bees and ensures the colony can establish itself quickly.
Preparing Your New Hive: The Foundation
The work of installing a nuc begins before the bees even arrive. Having their new home ready is non-negotiable for a low-stress transfer.
The Assembled Hive Body
Your primary piece of equipment is the hive itself. This typically includes a bottom board, a deep hive body (or "brood box"), and ten frames (if using a standard Langstroth hive).
Ensure all components are assembled and painted or sealed well in advance. You will be placing the five frames from the nuc into this box, so have the other five frames ready to fill the remaining space.
The Hive Stand
A hive stand elevates the hive off the ground. This protects the bottom board from moisture and decay, improves ventilation, and makes it harder for pests like ants to gain access.
It also raises the hive to a more ergonomic working height for you, saving your back during future inspections.
An Entrance Reducer
Most new hives come with an entrance reducer, a small wooden cleat with different-sized notches. For a new nuc, you should use the smallest opening.
This makes the entrance easier for the small colony to defend against robber bees from other hives, which might try to steal their resources.
Essential Tools for the Transfer
With the hive prepared, you only need three tools on hand for the actual installation process.
Protective Gear: Your First Line of Defense
This is the most important equipment for your own safety and confidence. A ventilated bee jacket with a hood and veil is the minimum. Goatskin gloves offer a good balance of protection and dexterity.
Wearing proper gear allows you to move slowly and deliberately, which keeps the bees calmer than if you were moving quickly and nervously.
The Smoker: Your Tool for Calm
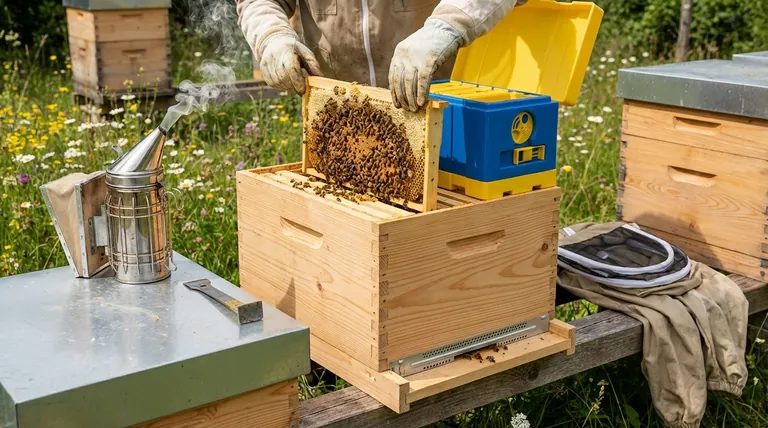
A smoker is not for harming bees. When puffed gently into the hive, the smoke masks the bees' alarm pheromone, which they release to signal danger.
This interruption prevents a chain reaction of defensiveness and encourages the bees to gorge on honey, making them more docile and less inclined to sting. A cool, white smoke is the goal.
The Hive Tool: The Beekeeper's Multi-tool
Bees use a sticky substance called propolis to seal every crack in their hive. A hive tool is a small, specialized pry bar used to separate hive bodies and gently lift frames that are glued down with propolis.
It is indispensable for prying open the nuc box and carefully transferring the frames without jarring or crushing bees.
Common Pitfalls to Avoid
Success often comes from avoiding common mistakes. Understanding these pitfalls will prepare you for a smoother installation.
Rushing the Process
The single biggest mistake is being unprepared. If your hive isn't assembled and in place when you get your bees, the entire process becomes stressful. The bees will be confined to their travel box longer than necessary, and you will be rushed.
Skipping the Smoker
Many new beekeepers are hesitant to use a smoker. Failing to use one, however, allows alarm pheromones to spread quickly, turning a calm installation into a defensive and unpleasant event for both you and the bees.
Incorrect Frame Placement
When you transfer the frames from the nuc to the new hive, keep them in the exact same order and orientation. The queen lays her eggs in a specific pattern, and the bees organize their resources (pollen and honey) around this brood nest. Disrupting this order forces the colony to waste energy reorganizing their home.
A Checklist for a Successful Installation
Use this simple checklist to guide your actions and ensure you have everything in order for the big day.
- Before your nuc arrives: Ensure your hive body, frames, and stand are fully assembled and placed in their final, permanent location.
- On installation day: Prioritize wearing your full protective gear and have your smoker lit and producing cool, white smoke before you even open the nuc box.
- During the transfer: Move slowly and deliberately, placing the frames in the new hive in the same sequence they had in the nuc to preserve the structure of the brood nest.
With the right preparation and a calm approach, you can confidently guide your new colony into its home.
Summary Table:
| Essential Item | Purpose |
|---|---|
| Protective Gear (Jacket/Suit, Gloves) | Ensures beekeeper safety and allows for calm, deliberate movement. |
| Smoker | Calms bees by masking alarm pheromones, preventing defensive behavior. |
| Hive Tool | Pries open nuc boxes and lifts frames sealed with propolis. |
| Pre-Assembled Hive (Body, Frames, Stand) | Provides an immediate, ready home for the colony, minimizing stress. |
| Entrance Reducer | Helps the small colony defend its new hive from pests and robber bees. |
Ready to equip your apiary for success? HONESTBEE supplies commercial apiaries and beekeeping equipment distributors with the high-quality, durable tools mentioned in this guide—from reliable smokers and hive tools to complete hive setups. Let us help you ensure every nuc installation is a smooth and successful one. Contact our wholesale experts today to discuss your equipment needs and streamline your beekeeping operations.
Visual Guide
Related Products
- 5 Frame Wooden Nuc Box for Beekeeping
- Automatic Heat Preservation 6 Frame Pro Nuc Box for Honey Bee Queen Mating
- 5 Frame Langstroth Poly Nuc Corrugated Plastic Nuc Boxes
People Also Ask
- What is the procedure for moving bees from a 5-frame nuc to a 10-frame hive? 6 Steps for a Successful Colony Transfer
- What frames should be moved into the queenless hive when requeening with a nuc? Ensure a Successful Queen Introduction
- What is the primary function of five-frame nuclei boxes? Master Early Colony Establishment for Stronger Hives
- What roles do five-frame nucleus boxes and ten-frame Langstroth hive boxes play in colony standardization?
- What is the most common type of standard nuc? The 5-Frame Nuc Explained


