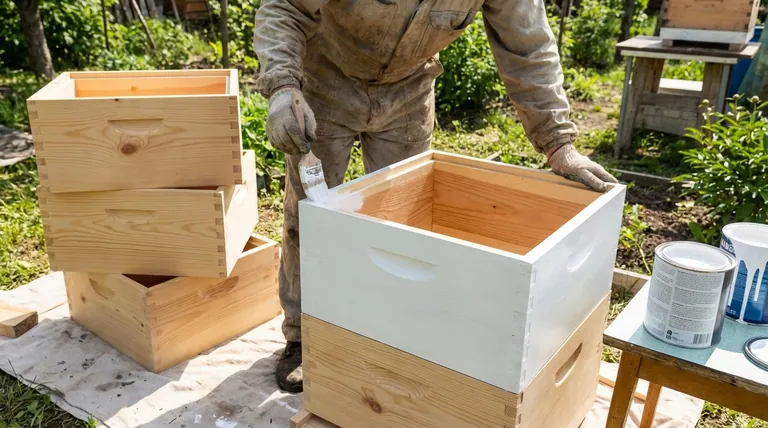
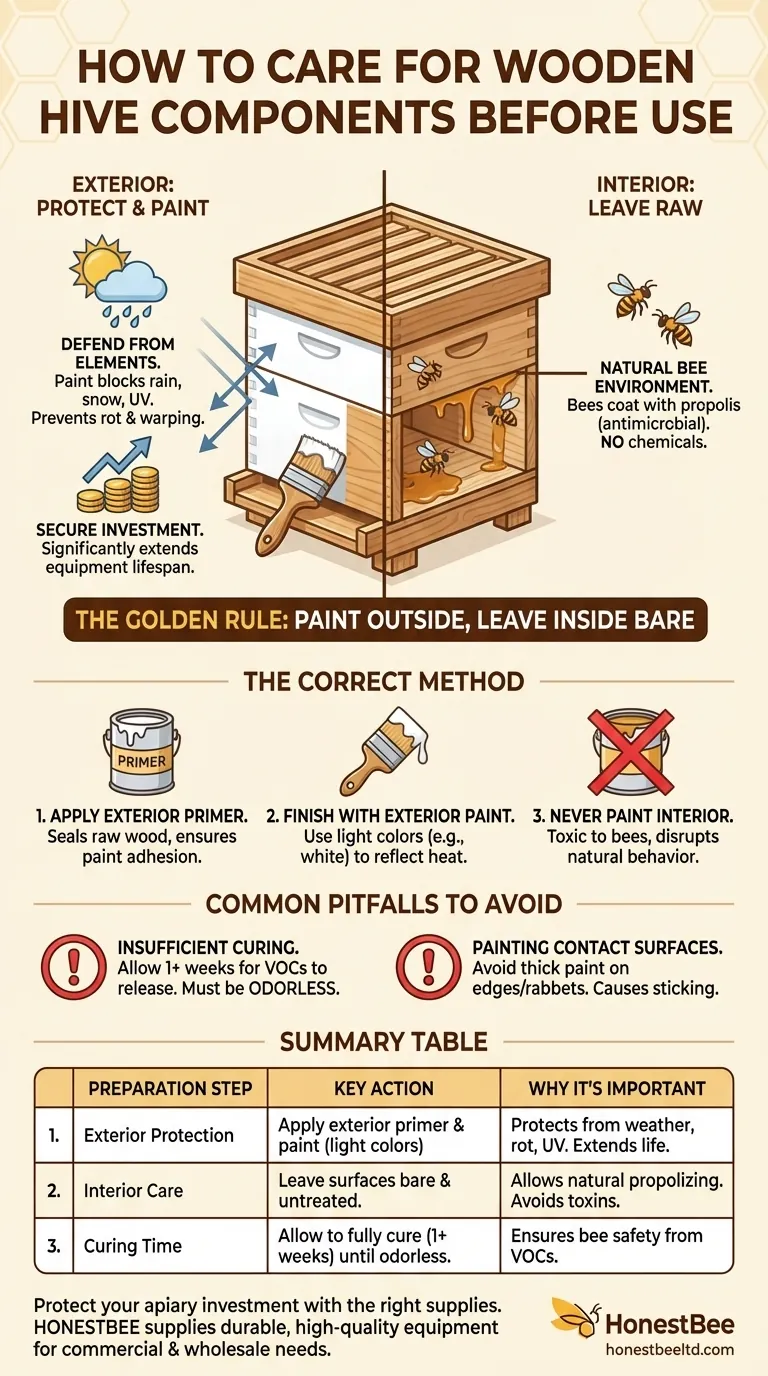
The most critical step in caring for new wooden beehive components is to protect them from the elements before they are put into use. This is best accomplished by applying an exterior-grade primer and paint to all outside surfaces, which significantly extends the life of the wood. Crucially, the interior surfaces of the hive must be left completely bare and untreated.
The core principle of hive preparation is a balance: protect the wood from external weather while preserving a natural, safe interior environment for the bees. Painting the outside achieves the first goal, and leaving the inside raw achieves the second.
Why Exterior Protection is Non-Negotiable
Untreated wood, especially pine which is common for hive bodies, is highly susceptible to damage from moisture and sun. Proper preparation is not an optional step; it is essential for the longevity of your equipment.
The Impact of Weather on Wood
Rain, snow, and humidity are quickly absorbed by bare wood, leading to rot, warping, and decay. Sunlight and UV exposure cause the wood to become brittle and crack over time. A protected hive can last for many years, while an unprotected one may fail in just a few seasons.
Protecting Your Financial Investment
Beehive components represent a significant investment. Taking the time to properly prime and paint new equipment is the single most effective action you can take to ensure you get the maximum possible lifespan from your purchase.
The Correct Method for Hive Preparation
The goal is to create a durable barrier on the outside of the hive without introducing any harmful substances to the inside where the bees live.
Step 1: Apply an Exterior Primer
Always begin with a high-quality exterior primer. Primer is designed to seal the raw wood and create the perfect surface for the top coat of paint to adhere to. This step prevents the paint from peeling and ensures a much more durable finish.
Step 2: Finish with Exterior Paint
After the primer has dried completely, apply one or two coats of a durable exterior paint. Lighter colors, especially white, are strongly recommended. Dark colors absorb heat from the sun, which can cause the hive to overheat in the summer, stressing the colony.
The Critical Rule: Leave the Interior Raw
Never apply paint, primer, stain, or sealant of any kind to the inside surfaces of the hive. The bees will manage the interior themselves by coating it with a thin layer of propolis, a natural resinous substance that has antimicrobial properties. Introducing paint inside the hive can be toxic to the bees and interfere with this natural behavior.
Common Pitfalls to Avoid
Applying protection seems straightforward, but a few common mistakes can compromise bee safety or the durability of the hive.
Insufficient Curing Time
Paint needs time to "cure," not just dry to the touch. During the curing process, volatile organic compounds (VOCs) are released. You must allow the paint to cure completely—often for a week or more in a well-ventilated area—before introducing bees. The components should have no lingering chemical smell.
Painting Contact Surfaces
Avoid applying thick coats of paint to the edges or "rabbets" where the hive boxes and frames make contact. A heavy paint buildup in these areas can make it extremely difficult to separate the boxes for inspections. A light, single coat is usually sufficient.
Making the Right Choice for Your Goal
Your approach to painting can be tailored to prioritize specific outcomes for your apiary.
- If your primary focus is maximum durability: Apply one full coat of exterior primer followed by two top coats of high-quality exterior latex paint.
- If your primary focus is bee health and safety: Leave the interior and all frame contact points completely bare and allow the exterior paint to fully cure until it is odorless.
- If your primary focus is colony temperature regulation: Choose white or a very light pastel color to reflect solar radiation and help keep the hive cool during hot weather.
Properly preparing your woodenware from the start ensures a long-lasting hive and a healthy home for your bees.
Summary Table:
| Preparation Step | Key Action | Why It's Important |
|---|---|---|
| Exterior Protection | Apply exterior primer and paint (light colors recommended). | Protects wood from weather, rot, and UV damage, extending hive lifespan. |
| Interior Care | Leave all interior surfaces completely bare and untreated. | Allows bees to naturally propolize the wood; avoids exposing them to toxins. |
| Curing Time | Allow paint to fully cure (1+ weeks) until odorless. | Ensures all VOCs are released before bees are introduced for their safety. |
Protect your apiary investment with the right supplies from the start. HONESTBEE supplies durable, high-quality beekeeping equipment and supplies to commercial apiaries and beekeeping equipment distributors through our wholesale-focused operations. Ensure your hives are built to last—contact our team today to discuss your bulk supply needs and maximize the longevity of your operation.
Visual Guide
Related Products
- Wooden Bee Hive Frames for Beekeeping and Wholesale
- HONESTBEE Wired and Assembled Wooden Bee Frames Foundation for a Thriving Hive
- Wholesales Dadant Size Wooden Bee Hives for Beekeeping
- Assembled Wooden Bee Frames with Plastic Foundation for Durability and Convenience by HONESTBEE
- Solid Bottom Board Australian Pine Wood Langstroth Bottom Board for Wholesale
People Also Ask
- How does balancing the number of frames impact hive productivity? Optimize Your Apiary's Biological Output
- What is the purpose of frames and combs in a beehive? The Foundation of Modern Beekeeping
- How are plastic frames different from traditional wooden frames? Choose the Right Frame for Your Apiary
- How do wooden and plastic hive frames compare in terms of durability? Wood vs. Plastic Longevity & Repairability
- What are the differences between wooden and plastic frames in beehives? Choose the Best for Your Apiary