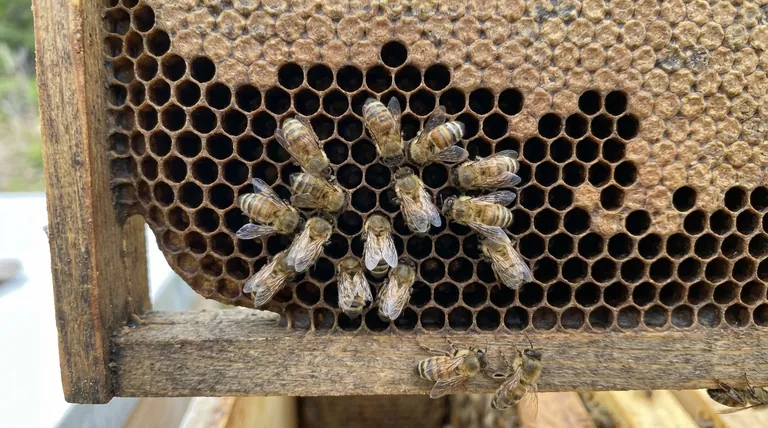
The most definitive sign of a bee colony dying from starvation is finding a cluster of dead bees with their heads tucked deep inside the cells of the honeycomb. This behavior, combined with a distinct lack of honey stores and an absence of torn wax cappings, points directly to starvation as the cause of death, not robbing.
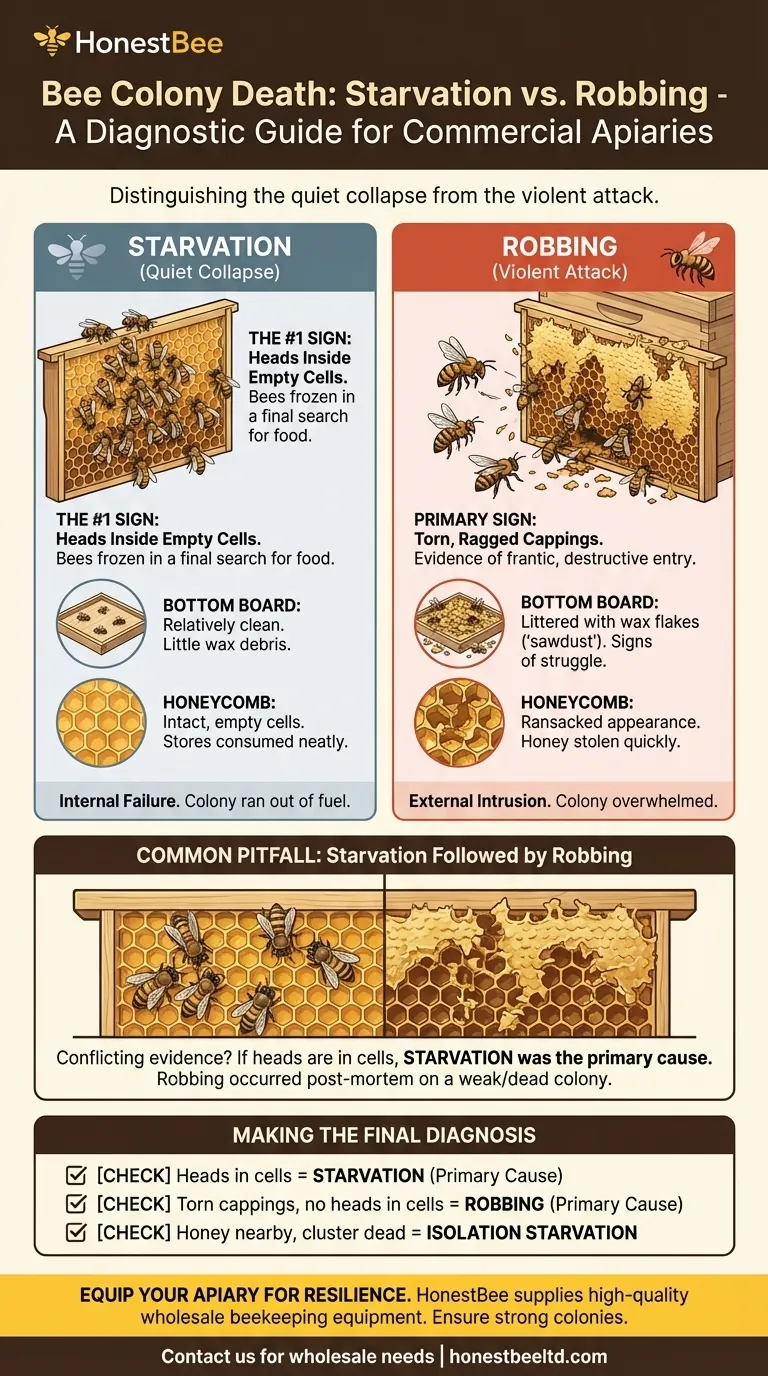
Distinguishing between starvation and robbing requires a careful hive autopsy. The key difference lies in the evidence left behind: starvation is a quiet, internal collapse leaving bees frozen in a final, desperate search for food, while robbing is a violent, external attack that leaves the hive in disarray with signs of a struggle.
The Primary Indicator: Position of the Bees
The most telling piece of evidence in any hive inspection is the state and position of the dead bees themselves. This provides a clear picture of the colony's final moments.
Heads Inside Empty Cells
When a colony starves, the bees will crawl into empty honeycomb cells searching for the last drops of nectar or pollen. They die in this position, with their heads and thoraxes inside the cells.
Finding a large cluster of bees in this state is a conclusive sign of starvation. They were a cohesive unit that simply ran out of fuel.
A Lack of Fighting
A starved-out hive will have very few, if any, dead bees on the bottom board or the ground outside. The colony simply grew too weak to function and perished together inside the hive.
Analyzing the Comb: The Story in the Wax
The condition of the honeycomb itself tells you whether the honey was consumed by its rightful owners or stolen by invaders.
Intact, Empty Honey Cells
In a starved hive, the wax cells will be uncapped, but the comb structure itself will be clean and intact. The bees consumed their stores neatly before running out.
You will see empty cells where the winter cluster was located, surrounded by frames of honey that were just out of their reach in the cold.
Ragged, Torn Cappings
A robbed-out hive looks very different. Robbing bees are frantic and destructive. They will tear and shred the wax cappings to get to the honey quickly.
You will find ragged, ripped-open cells, a clear sign of a violent intrusion. The hive will look messy and ransacked.
Examining the Debris: Clues on the Bottom Board
The bottom board of the hive acts as a crime scene floor, collecting evidence that reveals what happened.
A Clean Bottom Board
A colony that starved will have a relatively clean bottom board. You will primarily find bees that have fallen from the cluster, but very little wax debris.
A Mess of Wax Flakes
Robbing, in contrast, leaves a significant mess. The bottom board will be littered with a large quantity of chewed wax capping flakes, appearing like sawdust. This is the debris from the robbers tearing open the honey cells. You may also find more dead bees from fighting.
Common Diagnostic Pitfalls
The most common point of confusion is when a hive starves first and is then robbed after it has died. A weak or dead colony is an easy target for opportunistic robbers from neighboring hives.
Starvation Followed by Robbing
In this scenario, you will find conflicting evidence. You will see the definitive sign of starvation—bees with their heads in cells—but you will also see signs of robbing, such as torn wax cappings and debris on the bottom board.
Making the Final Diagnosis
When you see both signs, the primary cause of death was starvation. The robbing occurred post-mortem. The bees with heads in cells tell you the colony was already dead or dying when the robbers arrived to clean out the remaining honey. A healthy, strong colony would have defended itself.
How to Make an Accurate Diagnosis
Conduct a systematic inspection of the deadout to determine the true cause and learn for the future.
- If you find a large cluster of bees with their heads inside empty cells: The primary cause of death was starvation, even if you see secondary signs of robbing.
- If you find torn, ragged wax cappings and a lot of wax debris on the bottom board, but the bees are simply piled up and not in cells: The colony was likely robbed out while it was still alive but too weak to defend itself.
- If you find frames of honey just inches away from the dead cluster: This indicates the colony starved because it was too cold to break cluster and move to available food, a phenomenon known as isolation starvation.
By correctly identifying the cause of a colony's death, you gain the critical knowledge needed to prevent it from happening to your other hives.
Summary Table:
| Sign | Starvation | Robbing |
|---|---|---|
| Bee Position | Heads inside empty cells | Dead bees piled randomly, signs of fighting |
| Honeycomb Condition | Intact, empty cells | Ragged, torn wax cappings |
| Bottom Board Debris | Relatively clean | Littered with wax flakes |
| Primary Cause | Lack of food | Violent attack from other bees |
Equip your apiary to prevent colony loss. Accurate diagnosis is the first step; proper equipment is the next. HONESTBEE supplies durable, high-quality beekeeping supplies and equipment to commercial apiaries and distributors through our wholesale-focused operations. Ensure your hives are well-prepared for winter and strong enough to defend against robbing. Contact our expert team today to discuss your wholesale needs and build stronger, more resilient colonies.
Visual Guide