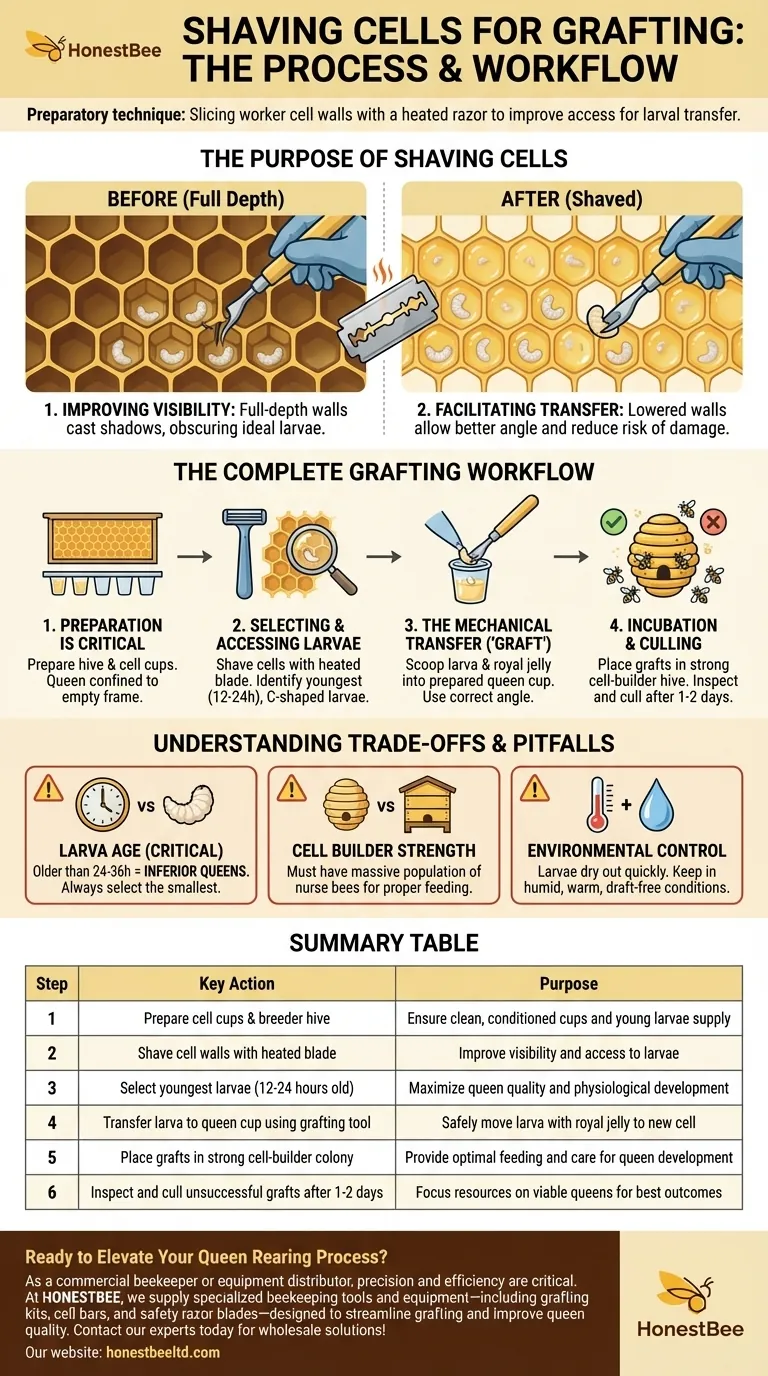
Shaving the cells for grafting is a preparatory technique where a beekeeper slices the wax walls of worker brood cells down to about half their depth. This is done using a heated safety razor blade with the protective rake removed. The primary purpose is to improve visibility and provide unobstructed access to the tiny, newly-hatched larvae at the bottom of the cells, making them easier to transfer during the grafting process.
While shaving cell walls can make the mechanical act of transferring larvae easier, true success in queen rearing hinges on the entire process: selecting the youngest possible larvae, maintaining a pristine environment, and placing the grafts into an exceptionally strong and well-fed "cell-builder" colony.

The Purpose of Shaving Cells
Shaving the cells is an optional but helpful step that directly addresses the physical challenges of accessing the microscopic larvae required for grafting.
Improving Visibility
The full-depth walls of a worker cell can cast shadows, making it difficult to spot the ideal larvae. By trimming the walls, you allow more light to enter the cell, making it easier to identify the youngest larvae (12-24 hours old) floating in their beds of royal jelly.
Facilitating the Transfer
With the cell walls lowered, it is much easier to maneuver a grafting tool. You can approach the larva at the correct angle without the cell rim getting in the way, reducing the risk of accidentally touching or damaging the fragile larva during extraction.
The Complete Grafting Workflow
Shaving is just one small part of a multi-stage process. Success depends on executing each step with precision and care.
Step 1: Preparation is Critical
Before you even think about transferring a larva, you must prepare the hive and equipment. This involves attaching plastic or wax cell cups to a frame (a "cell bar") and placing this bar in a hive for at least 24 hours. The bees will clean, polish, and condition the cups, which increases acceptance rates.
To ensure a supply of larvae of the correct age, the queen in the selected "breeder" hive is often confined to a single frame of empty drawn comb for 24 hours.
Step 2: Selecting and Accessing the Larvae
This is where shaving the cells comes into play. After removing the frame of larvae from the breeder hive (gently brushing off the bees), you can perform the shaving technique.
Using a safety razor blade dipped in hot water, you cleanly slice the tops off the cells. Then, using good lighting (like an LED headlamp) and magnification, you can identify the smallest, C-shaped larvae floating in a generous pool of royal jelly. These are the ones you want.
Step 3: The Mechanical Transfer (The "Graft")
The "graft" is the physical act of moving a larva from its original worker cell to a prepared queen cup.
Using a specialized grafting tool, you slide the tip down the side of the cell wall and gently scoop underneath the larva, lifting it along with its bed of royal jelly. The tool should follow the natural curve of the cell to avoid harming the larva.
You then carefully deposit the larva into the center of a prepared queen cup. The surface tension of the royal jelly helps the larva slide off the tool and settle onto the bottom of the cup. Some beekeepers "prime" the cups with a tiny drop of diluted royal jelly to facilitate this transfer.
Step 4: Incubation and Culling
Once a bar is filled with grafted cells (typically 15-20), it is placed immediately into a powerful "cell-builder" colony. This is a hive that is queenless and overflowing with young nurse bees, which are primed to feed and care for the developing queens.
After a day or two, you should inspect the grafts. Cull any cells that the bees have not accepted, as well as any where the larva looks larger than the others (indicating it was too old when grafted) or does not seem to be well-fed. This quality control ensures resources are focused on the most viable queens.
Understanding the Trade-offs and Pitfalls
Grafting is a delicate procedure where small details have a large impact on the outcome.
The Critical Importance of Larva Age
This is the single most important factor. No amount of perfect technique can compensate for choosing a larva that is too old. Queens raised from larvae older than 24-36 hours will be physiologically inferior. Always select the smallest larvae you can see.
The Strength of the Cell Builder
A common point of failure is a weak cell-builder colony. If the hive does not have a massive population of nurse bees and abundant stores of pollen and nectar, it will not be able to properly feed the developing queen larvae, resulting in poorly developed queens or complete failure.
Environmental Control
Larvae are incredibly fragile and can dry out and die in minutes. The grafting process should be done quickly in a humid, warm, and draft-free environment. Avoid direct sunlight.
Making the Right Choice for Your Goal
Your approach to techniques like cell shaving may depend on your experience and objectives.
- If your primary focus is learning the basics: Start without shaving the cells to master the fundamental scooping technique and the feel of the grafting tool.
- If your primary focus is increasing efficiency: Adopt the cell shaving technique once you are comfortable, as it can speed up the process of finding and accessing ideal larvae.
- If your primary focus is maximizing queen quality: Concentrate on selecting the youngest possible larvae and ensuring your cell-builder hive is exceptionally strong and well-fed.
Mastering these details transforms queen grafting from a daunting task into a predictable and rewarding part of beekeeping.
Summary Table:
| Step | Key Action | Purpose |
|---|---|---|
| 1 | Prepare cell cups & breeder hive | Ensure clean, conditioned cups and young larvae supply |
| 2 | Shave cell walls with heated blade | Improve visibility and access to larvae |
| 3 | Select youngest larvae (12-24 hours old) | Maximize queen quality and physiological development |
| 4 | Transfer larva to queen cup using grafting tool | Safely move larva with royal jelly to new cell |
| 5 | Place grafts in strong cell-builder colony | Provide optimal feeding and care for queen development |
| 6 | Inspect and cull unsuccessful grafts after 1-2 days | Focus resources on viable queens for best outcomes |
Ready to Elevate Your Queen Rearing Process?
As a commercial beekeeper or equipment distributor, precision and efficiency are critical to your operation’s success. At HONESTBEE, we supply specialized beekeeping tools and equipment—including grafting kits, cell bars, and safety razor blades—designed to streamline grafting and improve queen quality.
Let us help you achieve consistent, high-yield results with durable, purpose-built supplies. Contact our experts today to discuss wholesale solutions tailored to your apiary’s needs!
Visual Guide
Related Products
- Stainless Steel Queen Grafting Tool for Beekeeping and Bee Queen Grafting
- Plastic Beekeeping Honey Bee Larvae Grafting Tools for Queen Rearing and Chinese Grafting
- Retractable Chinese Queen Rearing Grafting Tools Equipment
- Stainless Steel Beekeeping Queen Grafting Tool for Honey Bee Rearing
- Plastic Chinese Queen Grafting Tool for Bee Queen Rearing
People Also Ask
- What is the purpose of a queen grafting tool in beekeeping? Master Larva Transfer for Selective Breeding
- What is the step-by-step process for using a queen grafting tool? Master Larva Transfer for Better Queen Rearing
- What is the recommended method for storing beekeeping tools? Expert Vertical Storage Solutions for Your Apiary
- What is the primary function of a queen grafting tool? Master Precise Larval Transfer for High Queen Acceptance
- What tools are commonly used for grafting? Master Queen Rearing with the Right Tool