Installing a nucleus hive, or "nuc," is the process of transferring a small, established bee colony into a full-sized hive. This involves carefully preparing the new hive, selecting an optimal location and time, moving the frames of bees and brood, and providing initial resources to ensure the colony thrives in its new home.
The goal of a successful nuc installation is not just to move bees from one box to another. It is to manage a delicate transition, minimizing colony stress to encourage rapid population growth and establishment.
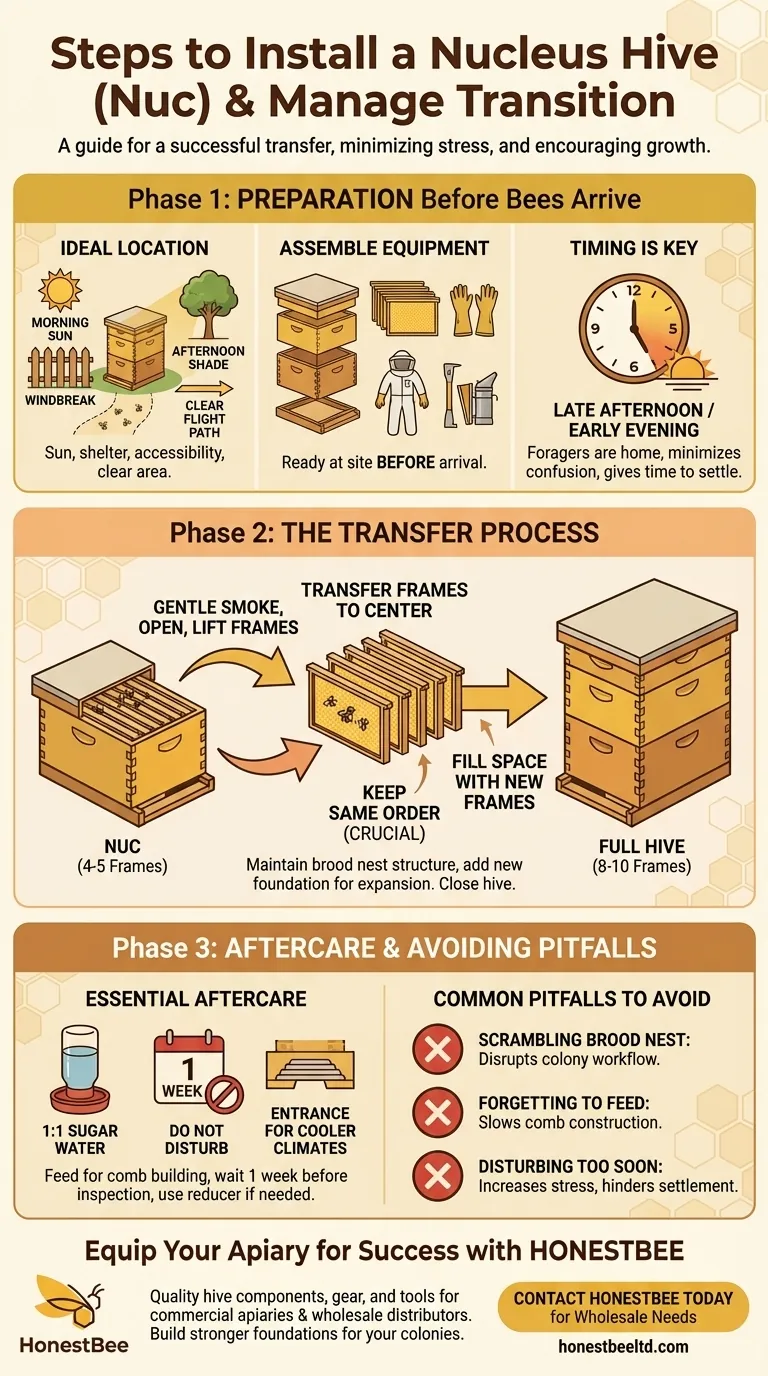
Phase 1: Preparation Before the Bees Arrive
Proper preparation is the most critical factor for a smooth installation. Getting the location and equipment right beforehand allows you to focus entirely on the bees during the transfer.
Choosing the Ideal Hive Location
The spot you choose has a long-term impact on colony health. The location should provide morning sun to encourage early foraging activity.
It also needs a windbreak from prevailing winds and some afternoon shade in hot climates. Ensure the hive is easily accessible for you to perform inspections without difficulty.
Finally, clear the immediate area of tall grass or obstructions to ensure a clear flight path for the bees and to deter pests like hive beetles or mice.
Assembling Your Equipment
Have all your equipment ready and assembled at the chosen site before your nuc arrives. You will need:
- A complete hive: This includes a bottom board, a deep hive body (the "brood box"), an inner cover, and an outer telescoping cover.
- Frames: Your nuc will come with 4-5 frames. You will need enough new frames with foundation to fill the rest of your 8 or 10-frame hive body.
- Protective Gear: A bee veil or full suit and gloves are essential.
- Tools: A hive tool for prying frames apart and a smoker to calm the bees.
Timing the Installation
The best time to install a nuc is in the late afternoon or early evening.
At this time, most of the foraging bees have returned home for the day. Transferring them now minimizes the number of bees that get confused and try to fly back to the nuc's original location. This also gives the entire colony the evening to settle and orient themselves to their new home before beginning work the next morning.
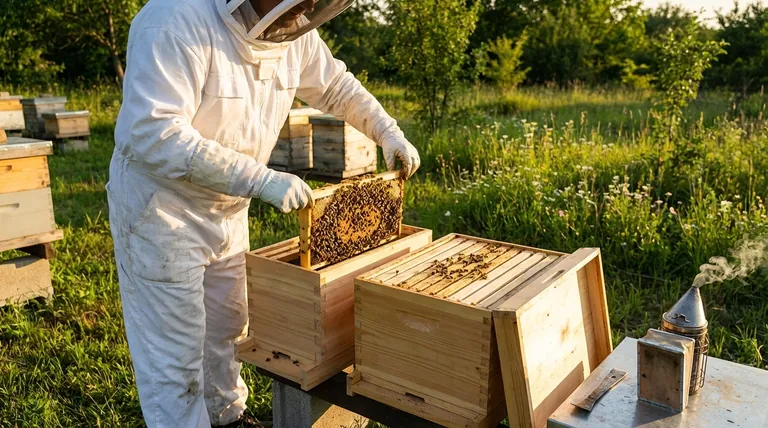
Phase 2: The Transfer Process
Handle the bees calmly and deliberately. Your goal is to move the colony's core structure—the brood nest—with as little disturbance as possible.
Opening and Inspecting the Nuc
Place your nucleus hive directly beside the new, open hive body. Give a few gentle puffs of smoke into the nuc entrance and wait a minute.
Open the nuc lid and carefully use your hive tool to loosen the frames. Your goal is to lift them out one by one without rolling or crushing bees.
Transferring the Frames
Transfer the frames from the nuc into the center of your new hive body.
Crucially, keep the frames in the exact same order as they were in the nuc. The queen lays eggs in a specific pattern, and the bees organize their honey and pollen stores around this brood nest. Maintaining this order is vital to avoid disrupting the colony's workflow.
Filling the Remaining Space
Once the nuc frames are centered in the new hive, add your new frames with foundation to fill the empty space on either side. These new frames give the bees room to expand.
Close up the hive by placing the inner cover and then the outer cover on top. You can place the now-empty nuc box in front of the hive entrance overnight so any straggler bees can find their way into their new home. Remove it the next day.
Common Pitfalls to Avoid
A successful installation depends on avoiding a few common mistakes that can set a new colony back significantly.
Scrambling the Brood Nest
The most common error is failing to maintain the original order of the frames. Re-arranging the brood frames forces the bees to expend significant energy reorganizing their nest, which slows down queen laying and colony growth.
Forgetting to Feed
A new nuc in a large box has a massive construction project ahead of it: drawing out wax comb on all the new frames. This requires an enormous amount of energy.
Unless there is a very strong natural nectar flow, you must feed your new colony a 1:1 sugar-water solution. This provides the fuel they need for rapid comb building and expansion.
Disturbing the Colony Too Soon
After installation, resist the urge to inspect the hive for at least a week. Give the bees time to settle, orient, and begin their work without interruption. A brief check to refill their feeder is all that should be needed.
Making the Right Choice for Your Goal
Your immediate actions after installation can help steer the colony toward specific outcomes.
- If your primary focus is rapid expansion: Feed the colony consistently with 1:1 sugar water until they have drawn out all the frames in the first brood box.
- If your primary focus is minimizing colony stress: Perform the installation calmly in the late afternoon, keep the brood frames in their original order, and do not open the hive for a full week.
- If you live in a cooler climate or it's early spring: Use an entrance reducer to make the hive entrance smaller. This helps the small colony defend itself from robber bees and maintain a stable internal temperature more easily.
By following these principles, you are giving your new colony the best possible start for a productive future.
Summary Table:
| Installation Phase | Key Action | Purpose |
|---|---|---|
| Phase 1: Preparation | Choose a sunny, sheltered location with a clear flight path. | Minimizes stress and sets the colony up for long-term health. |
| Phase 2: Transfer | Move frames from the nuc to the new hive, keeping them in the same order. | Preserves the brood nest structure and prevents disruption to the colony. |
| Phase 3: Aftercare | Provide a 1:1 sugar-water solution and avoid inspections for at least a week. | Fuels rapid comb building and allows the colony to settle without disturbance. |
Equip Your Apiary for Success with HONESTBEE
A smooth nuc installation relies on quality equipment. HONESTBEE supplies durable, beekeeper-approved hive components, protective gear, and essential tools to commercial apiaries and beekeeping equipment distributors through our wholesale-focused operations.
Let us help you build a stronger foundation for your colonies. Our products are designed to support the delicate transitions that lead to productive and healthy hives.
Contact HONESTBEE today to discuss your wholesale supply needs and elevate your beekeeping operations.
Visual Guide
Related Products
- 5 Frame Wooden Nuc Box for Beekeeping
- Automatic Heat Preservation 6 Frame Pro Nuc Box for Honey Bee Queen Mating
- 4 Frame Plastic Nuc Boxes for Beekeeping Bee Nuc Box
- Steel Round Disc Entrance Reducer for Flexzion Bee Hive Nuc Box Gate
- Styrofoam Mini Mating Nuc Box with Frames Feeder Styrofoam Bee Hives 3 Frame Nuc Box
People Also Ask
- What frames should be moved into the queenless hive when requeening with a nuc? Ensure a Successful Queen Introduction
- What are the options for adding frames to a nuc after taking two frames from the parent colony?
- What is the typical composition of frames in a nuc? A 5-Frame Blueprint for a Thriving Hive
- What roles do five-frame nucleus boxes and ten-frame Langstroth hive boxes play in colony standardization?
- What is the most common type of standard nuc? The 5-Frame Nuc Explained