Rendering beeswax is the fundamental process of purification. It involves gently melting raw honeycomb or cappings to separate the pure wax from impurities like residual honey, propolis, and other hive debris. The melted wax is then filtered and allowed to cool, hardening into a clean, usable block.
The key to successful beeswax rendering is slow, controlled heat and effective filtration. Rushing the process with high, direct heat will scorch the wax, permanently darkening its color and imparting a burnt smell that compromises its quality for any future use.
The Principle: Separation by Heat and Density
To render wax effectively, you must understand the simple physics at play. The goal is not just to melt the wax, but to create a situation where the pure wax naturally separates from everything else.
What You Are Removing
Raw comb from a beehive contains more than just wax. The rendering process is designed to remove impurities such as leftover honey, pollen, propolis (bee glue), and tiny bits of organic hive debris.
Why Gentle Heat is Non-Negotiable
Beeswax has a relatively low melting point but is also flammable and easily damaged by excessive temperatures. A double boiler is the ideal tool for this task.
Using a double boiler, or a pot set inside a larger pot of simmering water, ensures the wax receives indirect, gentle heat. This prevents scorching and maintains the wax's natural color and pleasant aroma.
The Role of Water in Separation
Many rendering methods involve adding water to the raw comb during the melting phase. This serves two critical purposes.
First, the hot water helps dissolve any remaining honey, allowing it to separate from the wax. Second, as the mixture cools, the pure, lighter beeswax solidifies and floats on top, while the water and heavier, waterlogged debris settle to the bottom.
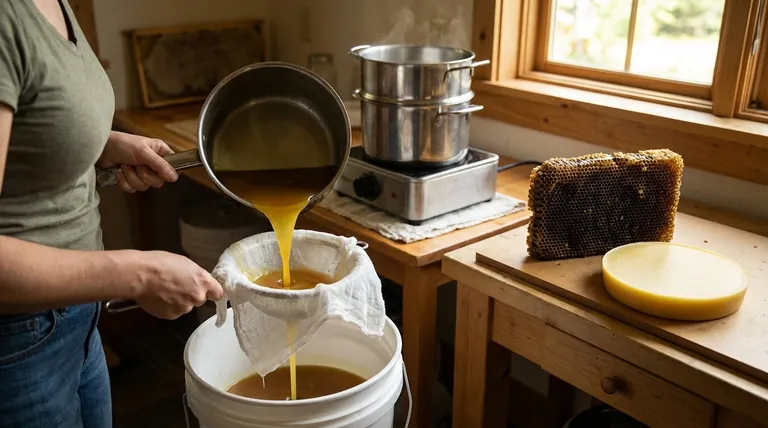
The Step-by-Step Rendering Process
While there are variations, the core method follows a consistent, logical progression. For this process, you will need a dedicated pot (not one from your main kitchen set), a strainer, cheesecloth, and a collection container.
Step 1: Gently Melt the Comb
Place your raw comb or cappings into the top pot of a double boiler. Add enough water to cover the bottom of the pot and help the melting process.
Apply low, steady heat. Allow the wax to melt completely and slowly, stirring occasionally to break up any large clumps. Do not let the water boil vigorously.
Step 2: Strain the Mixture
Line a strainer with several layers of cheesecloth and place it over your collection container (a bucket or another dedicated pot works well).
Carefully and slowly pour the hot liquid mixture of wax and water through the cheesecloth-lined strainer. The cheesecloth will catch the solid debris while allowing the liquid wax and water to pass through.
Step 3: Cool and Harden
Set the collection container aside in a safe, undisturbed place and allow it to cool completely. This may take several hours or even overnight.
As it cools, the pure wax will rise to the top and solidify into a clean, hard disc. The dirty water and a layer of fine sediment will be trapped underneath.
Step 4: Separate the Final Product
Once the wax disc is completely hard, you can easily lift it out of the container. The dirty water and "slumgum" (the layer of debris at the bottom) can be discarded.
The bottom of your wax disc may have a soft, discolored layer of fine impurities. Simply scrape this layer off with a hive tool or knife to reveal the pure, clean beeswax beneath. For an even purer final product, you can repeat the entire process in a second rendering.
Common Pitfalls to Avoid
Success in rendering beeswax often comes down to avoiding a few common mistakes that can waste your time and ruin your valuable wax.
Scorching the Wax
This is the most critical error. Applying direct, high heat to a pot of wax is a fire hazard and is the fastest way to ruin it. Always use a double boiler and maintain low, gentle heat.
Ineffective Filtering
Using a filter with a mesh that is too coarse will allow fine debris to pass through, resulting in a lower-quality final product. Conversely, a filter that is too fine can clog quickly. Several layers of cheesecloth provide an excellent balance.
Using Good Kitchen Equipment
Beeswax is notoriously difficult to clean from pots, utensils, and drains. It is highly recommended to use dedicated equipment for wax processing, which you can often find inexpensively at thrift stores. Never pour wax-infused water down a household drain.
Making the Right Choice for Your Goal
The required purity of your rendered beeswax depends entirely on its intended use.
- If your primary focus is cosmetic-grade wax (for lip balms or lotions): Plan on a double rendering process, melting and filtering the wax a second time to achieve the highest level of purity.
- If your primary focus is candle making: A single, thorough rendering is usually sufficient, but ensure all fine debris is removed, as it can otherwise clog the wick during burning.
- If your primary focus is utility uses (like furniture polish or waterproofing tools): A single rendering is perfectly adequate, as minor cosmetic imperfections in the wax will not affect its protective performance.
By applying patience and controlled heat, you can transform a raw, messy hive product into a pure and valuable material for countless projects.
Summary Table:
| Step | Key Action | Purpose |
|---|---|---|
| 1. Melt | Use a double boiler with low, gentle heat. | Prevents scorching; preserves color and aroma. |
| 2. Strain | Pour mixture through cheesecloth-lined strainer. | Removes solid debris like propolis and hive bits. |
| 3. Cool | Let the container sit undisturbed. | Allows pure wax to solidify on top of water and sediment. |
| 4. Separate | Lift the hardened wax disc; scrape off the bottom layer. | Yields a clean, pure block of beeswax ready for use. |
Transform Your Beekeeping Harvest into Premium Products
Mastering the rendering process is the first step to unlocking the full value of your beeswax. Whether you're a commercial apiary producing wax for cosmetics or a distributor supplying candle makers, having the right equipment is crucial for efficiency and quality.
HONESTBEE supplies the durable, wholesale-focused beekeeping supplies and equipment you need to scale your rendering operations. From high-capacity melting tanks to professional-grade filters, our products are designed for beekeepers who demand reliability and results.
Contact our team today to discuss your specific needs. Let us help you equip your operation for maximum yield and purity.
Visual Guide

Related Products
- Assembled Wooden Bee Frames with Beeswax Foundation Ready to Use by HONESTBEE
- Fully Automatic Beeswax Embossing Machine Foundation Mill
- Economy Manual Beeswax Embossing Mill Wax Foundation Machine Roller
- Notebook Style Beeswax Foundation Mould Wax Foundation Mold
- Colorful Silicone Beeswax Foundation Mold Mould for Beekeeping
People Also Ask
- Can beekeepers switch between wooden and plastic frames? Optimize Your Hive's Performance
- What types of bee frames can be cleaned and returned to service? A Guide to Safe Apiary Refurbishment
- When should frames with new foundation be given to colonies? Master Timing for a Thriving Hive
- Do you have to wire bee frames? Essential Guide to Frame Strength & Honey Harvesting
- When should I throw away my bee frames? A Guide to Proactive Hive Health


