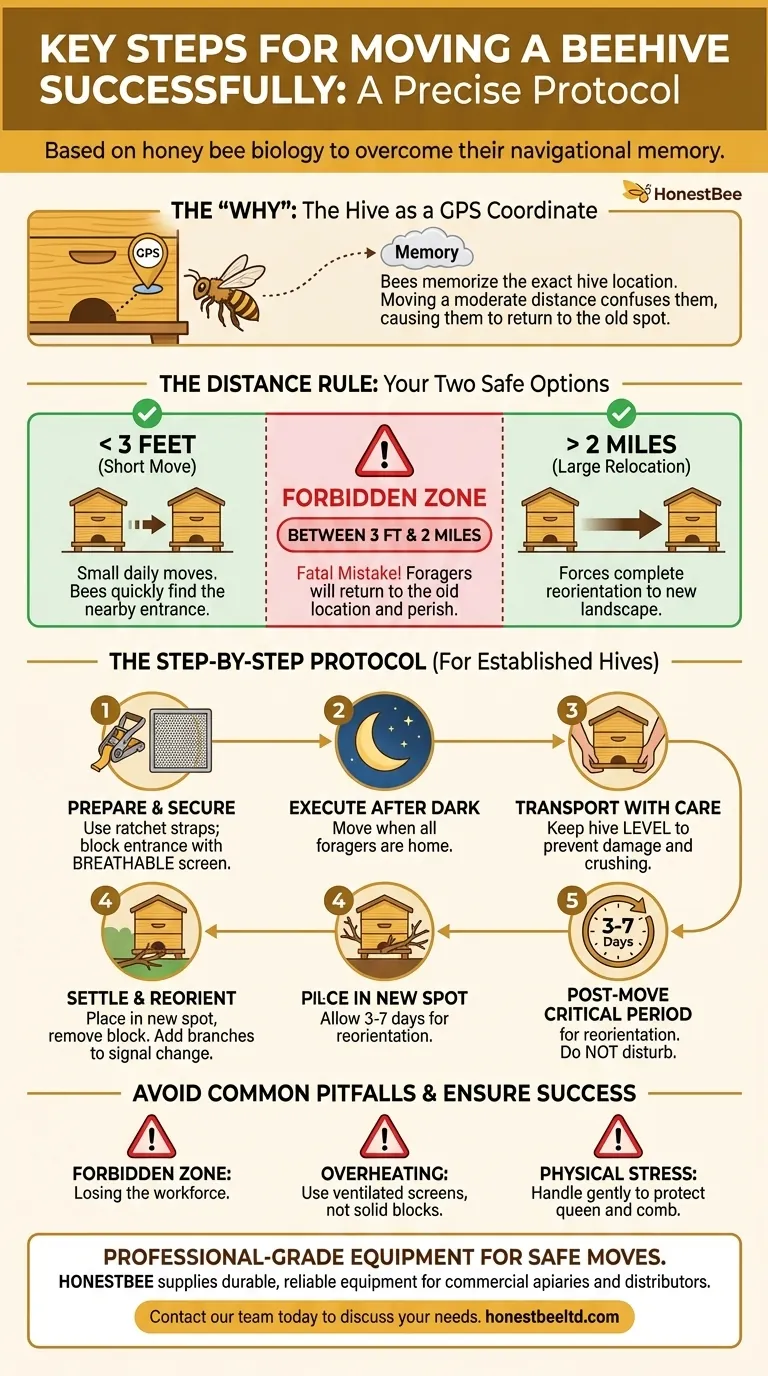
To move a beehive successfully, you must follow a precise protocol dictated by honey bee biology. The core steps involve choosing the correct distance—either less than three feet or more than two miles—securing the hive, moving it after dark when all the bees are home, and allowing the colony several days to reorient themselves in the new location.
The central challenge in moving a beehive is overcoming the colony's navigational memory. Bees treat their hive's entrance as a fixed GPS coordinate, and success hinges on either making a move so small they don't notice or so large that they are forced to reset their internal map entirely.
Why Moving a Hive Requires Precision
Understanding the "why" behind the rules is critical for preventing colony loss. The process isn't arbitrary; it's designed to work with the bees' natural instincts, not against them.
The Hive as a "GPS" Coordinate
Foraging bees memorize the exact location of their hive entrance. They use this fixed point to navigate and return home after foraging trips.
If you move the hive a moderate distance (e.g., 50 feet), the returning foragers will fly to the exact spot where the hive used to be. Confused and unable to find their home, they will cluster in the old location and eventually perish.
The Step-by-Step Hive Relocation Protocol
Follow these steps methodically to ensure a safe and successful move for your colony. This protocol applies to established hives, not temporary swarms.
Step 1: Adhere to the Distance Rule
You have only two safe options for distance:
- Less than 3 feet: A very short move can be done at any time. The bees will quickly find the entrance just a few feet away.
- More than 2 miles: This distance is far enough to force the bees to abandon their old flight paths and reorient completely to the new landscape.
Step 2: Prepare and Secure the Hive
Before the move, ensure the hive is structurally sound. Use ratchet straps to bind the hive components (bottom board, boxes, and lid) together tightly. This prevents any parts from shifting or separating during transport.
Next, block the hive entrance. Use a material like a screened entrance reducer or hardware cloth that completely blocks bees but allows for ventilation. Overheating is a serious risk.
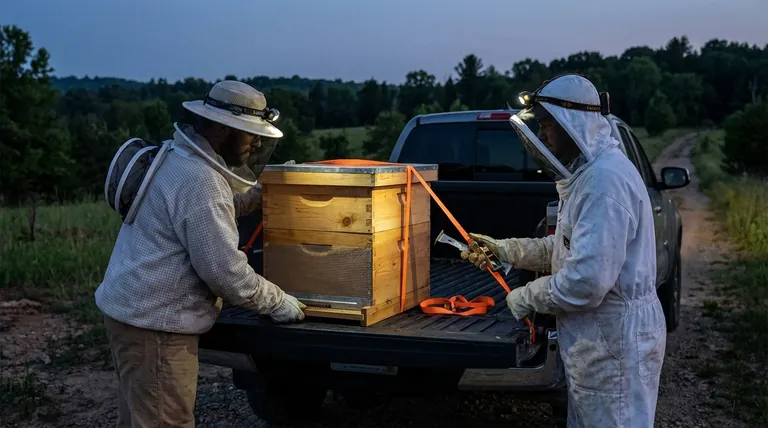
Step 3: Execute the Move After Dark
Wait until well after sunset to begin the move. By this time, all the foraging bees will have returned to the hive for the night, ensuring you move the entire colony.
Step 4: Transport with Care
When lifting and carrying the hive, keep it as level as possible. Tilting the hive can cause frames to shift, potentially crushing bees and damaging the delicate comb structure.
Step 5: Settle the Hive in its New Location
Place the hive in its predetermined new spot. Once it is stable, you can carefully remove the entrance block. It's wise to place a few branches or leaves near the new entrance to signal to the bees that something has changed, encouraging them to perform reorientation flights.
The Critical Post-Move Period
The work isn't finished once the hive is in its new location. The next few days are crucial for the colony's adjustment.
Allow for Reorientation
Do not disturb the hive for at least a few days, and ideally for a full week. The bees need this time to adjust to their new surroundings, perform orientation flights, and map out new foraging resources.
Resume Inspections Cautiously
After the adjustment period, you can resume your normal hive inspections. The colony should have accepted its new location and returned to its routine of foraging and brood-rearing.
Common Pitfalls to Avoid
Mistakes during a hive move can be catastrophic for the colony. Understanding the primary risks is key to avoiding them.
The "Forbidden Zone"
The most common and fatal mistake is moving a hive any distance between three feet and two miles. Bees moved within this range will almost always try to return to the original hive location, resulting in the loss of your entire foraging workforce.
Overheating the Colony
Never seal a hive with a solid, non-breathable material. A full colony generates a significant amount of heat, and without proper airflow, they can quickly overheat and die, especially in warmer weather.
Physical Damage and Stress
Moving is inherently stressful for the bees. Rough handling can damage the comb, kill the queen, and agitate the colony. A smooth, careful move minimizes this stress and helps the colony settle faster.
Making the Right Choice for Your Goal
Your moving strategy depends entirely on your objective.
- If your primary focus is a minor yard adjustment: Move the hive less than three feet per day until it reaches the desired position.
- If your primary focus is a major relocation to a new property: Move the hive over two miles in a single operation, ensuring you follow the night-moving and securing protocols precisely.
Ultimately, a successful hive move is a testament to the beekeeper's understanding of and respect for the colony's biology.
Summary Table:
| Key Step | Critical Action | Why It Matters |
|---|---|---|
| 1. Distance | Move <3 feet or >2 miles | Prevents bees from returning to the old, empty location and perishing. |
| 2. Preparation | Secure hive with straps; block entrance with breathable screen. | Prevents hive from shifting during transport and avoids overheating. |
| 3. Timing | Move the hive after dark. | Ensures all foraging bees are inside the hive for the move. |
| 4. Transport | Keep the hive level during transport. | Prevents frames from shifting and damaging comb or crushing bees. |
| 5. Post-Move | Allow 3-7 days for reorientation; do not disturb. | Gives bees time to reset their internal GPS and accept the new location. |
Ensure Your Hive Move is a Success with Professional-Grade Equipment
Moving a hive is a high-stakes operation that requires precision and the right tools. Whether you're a commercial apiary managing hundreds of colonies or a distributor supplying beekeepers, having durable, reliable equipment is non-negotiable for a safe relocation.
HONESTBEE supplies the beekeeping supplies and equipment you can trust. From heavy-duty ratchet straps to secure hive bodies to ventilated entrance blocks that prevent overheating, our wholesale-focused operations are designed to meet the demands of professional beekeeping.
Let us help you protect your valuable colonies.
Contact our team today to discuss your equipment needs and learn how our products support the health and productivity of your bees during moves and beyond.
Visual Guide
Related Products
- Stainless Steel Round Beehive Air Vents for Ventilation
- Wholesales Dadant Size Wooden Bee Hives for Beekeeping
- Metal Hive Feet Bee Hive Stand for Ant Protection
- Metal Bee Hive Stand Bee Box Stand for Beekeeping
- Wooden Bee Hive Frames for Beekeeping and Wholesale
People Also Ask
- How can moisture be effectively controlled inside a beehive during winter? Expert Tips for Colony Survival
- Why is good ventilation crucial when transporting beehives? Protect Your Colony from Lethal Overheating
- What happens if there is no ventilation at the top of a hive in winter? Prevent Deadly Condensation and Colony Loss
- What is the role of proper ventilation in beekeeping during winter? It's About Keeping Your Hive Dry, Not Warm
- How can ventilation be added to a beehive without using an inner cover? Simple, Effective Solutions for Healthy Hives