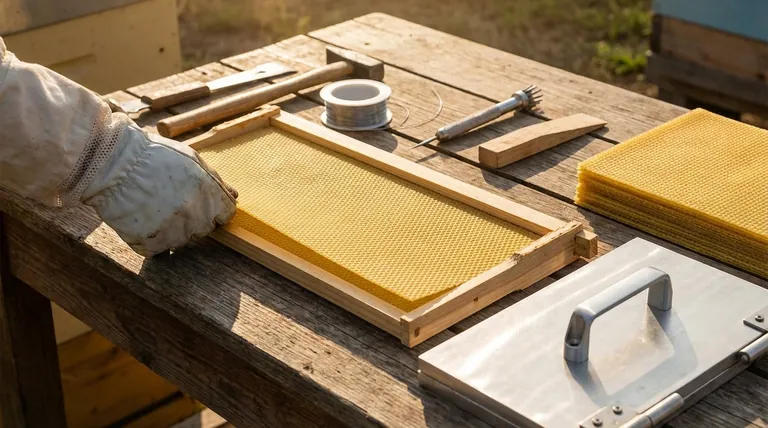
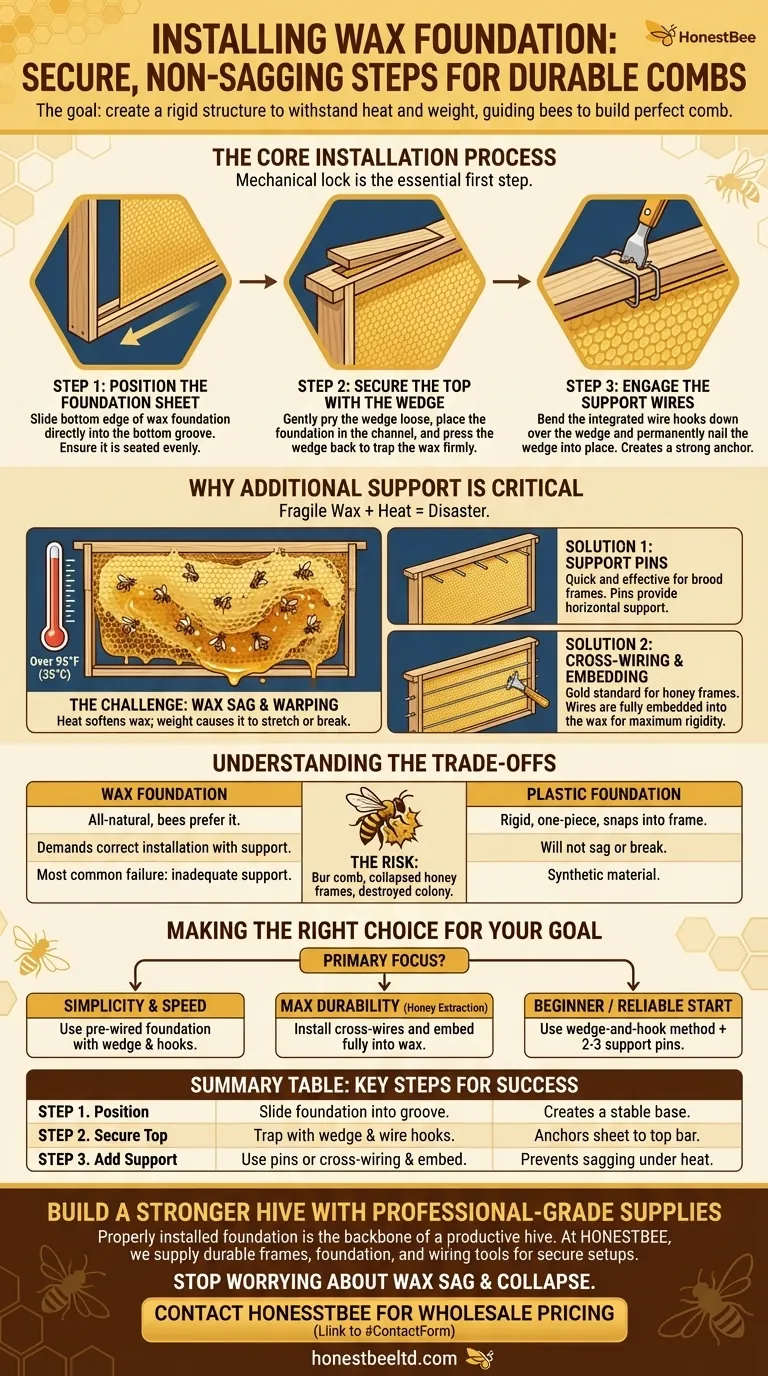
To properly install wax foundation, you must first place the sheet into the bottom groove of the frame. Then, secure the top edge by fitting it into the top bar and trapping it in place by sliding the removable wooden wedge over the foundation's integrated wire hooks. This mechanical lock is the essential first step to creating a stable base for the bees.
The goal of installing wax foundation isn't just to place a sheet in a frame. It is to create a rigid, non-sagging structure that can withstand the heat of the hive and the weight of honey, guiding your bees to build a perfect, durable comb.
The Core Installation Process
The standard wooden frame is designed with a simple but effective system for securing wax foundation. Understanding each component's role is key to a successful installation.
Step 1: Position the Foundation Sheet
First, identify the top and bottom of your frame. The bottom bar has a single, simple groove.
Carefully slide the bottom edge of the wax foundation sheet directly into this groove. Ensure it is seated evenly along the entire length.
Step 2: Secure the Top with the Wedge
The top bar of the frame has a more complex design, featuring a removable piece of wood called a wedge (or wedge cleat).
Gently pry this wedge loose if it's nailed in. Place the top of the foundation sheet into the channel, then press the wedge back into place, trapping the wax sheet firmly against the top bar.
Step 3: Engage the Support Wires
Most wax foundation sheets come with small wire hooks protruding from the top edge. These are not for decoration; they are a critical structural component.
After the wedge is in place, bend these wire hooks down and over the wedge. Use a hive tool or small hammer to gently nail the wedge permanently into the frame, securing both the foundation and the hooks. This creates a strong anchor point.
Why Additional Support is Critical
Beeswax is a natural material, but it is also fragile and susceptible to heat. Without proper reinforcement, a new sheet of foundation can easily warp or collapse under its own weight inside a warm hive, creating a disaster for your bees.
The Challenge: Wax Sag and Warping
A beehive is a warm, humid environment, often exceeding 95°F (35°C). This heat softens the beeswax foundation.
As bees draw out the comb and fill it with heavy honey or brood, the softened wax can stretch, sag, or even break completely away from the frame.
Solution 1: Support Pins and Rods
For a simple boost in stability, you can use foundation support pins. These are small metal pins pushed through the side-bar holes of the frame, providing horizontal support for the wax sheet.
This method is quick and effective for brood frames, which bear less weight than honey frames.
Solution 2: Cross-Wiring and Embedding
For maximum rigidity, especially in frames intended for honey extraction, cross-wiring is the gold standard. This involves running thin support wire horizontally across the frame through holes in the side bars.
To fully integrate the wire, you must embed it into the wax. This is done either by heating a spur embedder tool and rolling it along the wire or by passing a low-voltage electric current through the wire, causing it to heat up and melt slightly into the foundation.
Understanding the Trade-offs
While wax is a traditional and natural choice, its installation requires more care than modern alternatives. Understanding the risks helps you avoid common mistakes.
Wax vs. Plastic Foundation
Plastic foundation offers a rigid, one-piece solution that simply snaps into a frame. It will not sag or break, but it is a synthetic material.
Wax foundation is all-natural and what bees prefer, but its fragility demands correct and thorough installation. Failing to provide adequate wire support is the most common point of failure.
The Risk of Improper Installation
A poorly installed foundation that sags or breaks can lead to a cascade of problems. Bees will build "burr comb" in the gaps, creating a tangled mess that is impossible to inspect.
In a worst-case scenario, a full frame of honey can collapse, destroying comb, killing bees and brood, and creating a massive cleanup job that disrupts the entire colony.
Making the Right Choice for Your Goal
The level of support your foundation needs depends on its intended use.
- If your primary focus is simplicity and speed: Use pre-wired foundation that only requires securing with the wedge and hooks.
- If your primary focus is maximum durability for honey extraction: Install horizontal cross-wires and embed them fully into the wax.
- If you are a beginner looking for a reliable starting point: Use the wedge-and-hook method and add two or three foundation support pins for extra security.
By investing a few extra minutes in proper installation, you are building a durable and productive home for your bees.
Summary Table:
| Step | Key Action | Purpose |
|---|---|---|
| 1. Position | Slide foundation into the bottom groove. | Creates a stable base. |
| 2. Secure Top | Trap foundation with the wedge and wire hooks. | Anchors the sheet to the top bar. |
| 3. Add Support | Use pins or cross-wiring and embed into wax. | Prevents sagging under heat and weight. |
Build a Stronger Hive with Professional-Grade Supplies
Properly installed foundation is the backbone of a productive hive. At HONESTBEE, we supply commercial apiaries and distributors with the durable, high-quality frames, foundation, and wiring tools needed for a secure, long-lasting setup. Stop worrying about wax sag and comb collapse.
Contact HONESTBEE today for wholesale pricing on beekeeping equipment designed for performance and reliability.
Visual Guide
Related Products
- Notebook Style Beeswax Foundation Mould Wax Foundation Mold
- Beeswax Machine Press Embosser Wax Foundation Mold Printer Bee Hive Equipment Making Sheet
- Colorful Silicone Beeswax Foundation Mold Mould for Beekeeping
- Manual Beeswax Comb Foundation Machine Wax Foundation Mill Embossing Machine
- Economy Manual Beeswax Embossing Mill Wax Foundation Machine Roller
People Also Ask
- What are the technical advantages of beeswax foundations and feeding tools? Optimize Your Bee Breeding Phase
- What is a foundation mold used for? Turn Your Wax Cappings into High-Quality Foundations
- Why are specific wax foundation molds used to downsize brood cells? Master Mechanical Pest Inhibition
- Why is high-purity natural beeswax essential for foundations? Prevent Larval Mortality & Boost Colony Health
- How can beeswax value-addition processes be utilized to increase beekeeping revenue? Boost Your Apiary Profitability


