With practice, a high success rate is well within reach. An experienced beekeeper can realistically achieve a larval grafting success rate of at least 80%. This success is not a matter of luck, but a direct result of selecting the correct larvae and mastering a gentle transfer technique.
The core principle of successful grafting is not just moving a larva, but transferring the entire biological system it lives in—the tiny, comma-shaped larva floating undisturbed on its bed of royal jelly—into a new queen cell cup.
The Foundation of Success: Selecting the Right Larva
The single most critical factor in grafting is the age and condition of the larva you choose. This decision is made before a grafting tool ever touches the comb.
Age is Everything
Only graft larvae that are under 24 hours of age from hatching. At this stage, they have the highest potential to be accepted and developed into a well-fed, viable queen by the nurse bees.
Identifying the Ideal Candidate
Visually, you are looking for the smallest larvae you can see. A suitable larva has a slight comma-shaped curvature and is visibly floating on a generous amount of royal jelly.
Older larvae are unsuitable. They will be noticeably larger and have a more defined "C" shape, indicating they are past the ideal window for queen rearing.
The Importance of Royal Jelly
The larva must be floating on what looks like a small raft of jelly. This royal jelly is crucial, as it provides nourishment and prevents the larva from drying out during the transfer. The goal is to scoop both the larva and its jelly together.
Mastering the Grafting Technique
The physical transfer is a delicate process that demands a steady hand and an understanding of the tool's mechanics.
The Correct Transfer Motion
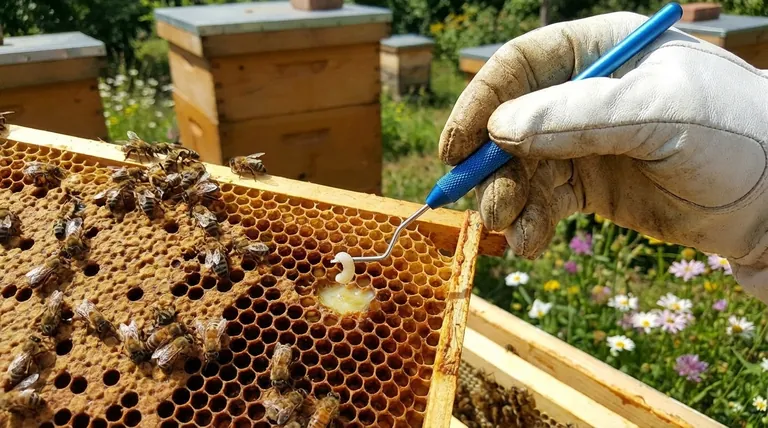
The grafting tool must follow the natural curve of the worker cell. You are not picking the larva up, but rather sliding the tool underneath it.
Scooping Without Touching
Insert the tool under the back of the larva (the outside of its curve). This allows you to lift the larva and its royal jelly without the tool making direct contact with the larva's body, preventing injury.
Placing the Larva
Gently deposit the larva and its jelly onto the bottom of the artificial cell cup. It should sit in the center, undisturbed and in the same orientation as it was in the original cell.
Verifying Your Success
You don't have to wait for a sealed queen cell to know if your grafts were accepted. The first signs of success are visible much earlier.
The 24-Hour Check
Examine the grafted cell cups approximately 24 hours after the transfer. This is the first opportunity to accurately gauge your success rate.
The Telltale Wax Rim
A successful graft will have a smooth, slightly curved wax rim built onto the edge of the cell cup by the nurse bees. This ring is very thin and fragile, measuring about 3-4mm high, and is the definitive sign of acceptance.
Understanding the Trade-offs
While the process is straightforward, small mistakes can lead to widespread failure. Understanding these common pitfalls is key to achieving a high success rate.
The Pitfall of Older Larvae
Choosing larvae that are even slightly too old is the most common error. While these may sometimes be accepted, they often result in poorly developed queens or are rejected outright, wasting the time and resources of the colony.
The Risk of Physical Damage
A clumsy or rushed technique can easily damage or crush the larva. A damaged larva will be promptly removed and discarded by the nurse bees, resulting in a failed graft. The "scoop, don't touch" principle is paramount.
The Danger of Drying Out
Larvae are incredibly fragile and can desiccate (dry out) in seconds. You must work efficiently, protecting the frame of larvae from direct sun and wind, and complete your grafts without unnecessary delay.
A Checklist for Achieving an 80%+ Success Rate
Use these points to guide your efforts and troubleshoot your process.
- If your primary focus is maximizing acceptance: Prioritize larvae that are barely visible to the naked eye and are swimming in a generous pool of royal jelly.
- If your primary focus is improving your technique: Practice the smooth, scooping motion of the grafting tool on drone larvae first, as they are larger and more expendable.
- If your primary focus is confirming your results: Check your grafts at the 24-hour mark for the delicate wax ring, which is the only definitive sign of initial acceptance.
Mastering these details transforms queen rearing from a game of chance into a predictable and rewarding skill.
Summary Table:
| Key Factor | Critical Detail | Target Outcome |
|---|---|---|
| Larva Age | Under 24 hours old, comma-shaped | High acceptance potential |
| Royal Jelly | Generous pool, larva floating | Prevents desiccation, nourishes larva |
| Grafting Motion | Scoop from the back, follow cell curve | Avoids physical damage to larva |
| Success Verification | Check for a thin, curved wax rim at 24 hours | Accurate early gauge of acceptance |
Ready to elevate your queen rearing operation with professional-grade equipment and expert support?
As HONESTBEE, we specialize in supplying durable, precision-crafted beekeeping supplies and equipment to commercial apiaries and distributors through our wholesale-focused operations. Our tools are designed to help you master delicate tasks like larval grafting, ensuring efficiency and maximizing your success rates.
Contact our expert team today to discuss how our wholesale solutions can help you build a more productive and profitable beekeeping business.
Visual Guide

Related Products
- Plastic Beekeeping Honey Bee Larvae Grafting Tools for Queen Rearing and Chinese Grafting
- Black 2 Pack Beekeeper Queen Grafting Tool for Bee Queen Larva Transferring Needle
- Retractable Chinese Queen Rearing Grafting Tools Equipment
- Stainless Steel Beekeeping Queen Grafting Tool for Honey Bee Rearing
- Plastic Chinese Queen Grafting Tool for Bee Queen Rearing
People Also Ask
- What is the grafting method of queen rearing? Master Controlled Queen Production for Your Apiary
- What is the process of grafting in honey bee queen rearing? A Master Guide for Commercial Success
- Why is it necessary for migratory beekeeping enterprises to utilize professional queen bee rearing tools? Boost Resilience
- What happens if a larva is grafted too late? Avoid Scrub Queens and Failed Rearing
- What is the proper technique for grafting a honey bee larva? Master Precision Queen Rearing Techniques


