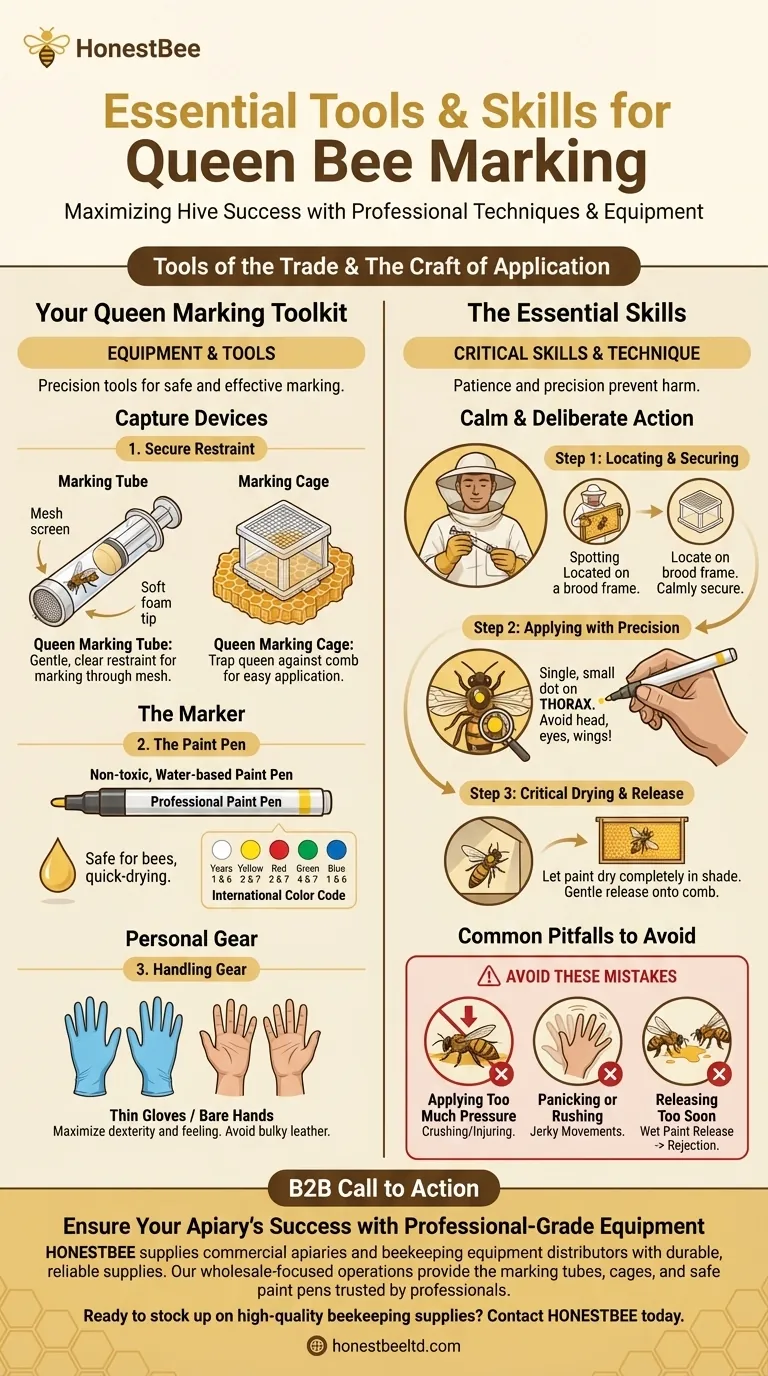
To successfully mark a queen bee, you need a few specialized tools and, more importantly, a set of practiced skills. The essential equipment includes a method for safely restraining the queen, such as a marking tube or cage, and a non-toxic, water-based paint pen in the correct color for the year. The critical skills are a steady hand, immense patience, and a gentle touch to ensure the queen is not harmed or stressed.
The success of marking a queen bee hinges less on the specific tools you choose and more on the calm, deliberate technique you employ. The primary goal is to apply a clear mark without causing injury or distress that could lead to the colony rejecting her.
Assembling Your Queen Marking Toolkit
Before you open the hive, having the right equipment ready is essential for a smooth and safe process. Each tool serves a specific purpose in isolating and marking the queen with minimal disruption.
The Capture Device: Tube vs. Cage
Your first choice is how you will restrain the queen. The two most common tools are a queen marking tube or a queen marking cage.
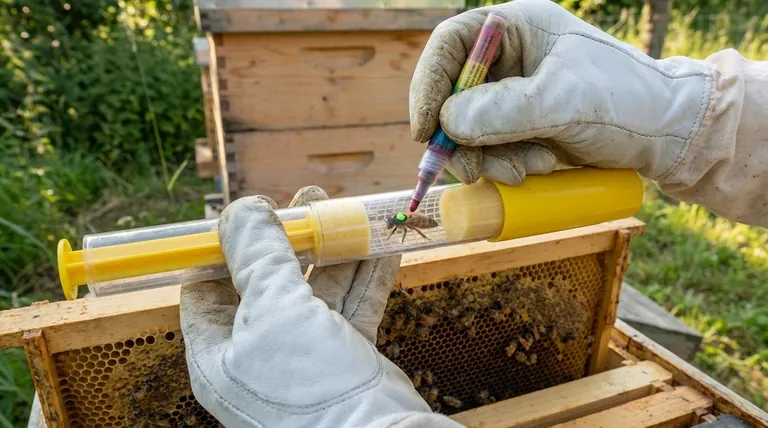
A marking tube is a clear cylinder with a soft foam plunger. You place the open end over the queen and gently push her up against a mesh screen, allowing you to mark her thorax through the grid.
A marking cage is a small, one-handed device that you press directly over the queen on the surface of the comb, trapping her against the wax so you can apply the paint.
The Marking Pen: Color and Composition
The pen itself is critical. Always use a non-toxic, water-based paint pen specifically designed for marking queens. These pens are safe for the bees and do not contain harsh odors that could cause the colony to react negatively.
Before you begin, test the pen on another surface to ensure the paint flows smoothly. A quick, confident dot is far better than a messy smudge.
Personal Gear: Dexterity is Key
Your choice of gloves directly impacts your ability to handle the queen gently. Avoid bulky leather gloves, as they prevent you from feeling how much pressure you are applying.
Many experienced beekeepers opt for thin nitrile or even no gloves at all to maximize dexterity and ensure they can hold the queen by her wings or thorax without causing harm.
The Essential Skill: Calm and Deliberate Action
Marking a queen is a delicate procedure. Your movements must be slow, steady, and confident to avoid alarming the bees or injuring their most important member.
Step 1: Locating and Securing the Queen
First, you must find the queen on a frame of brood. Once located, calmly place your chosen capture device over her. If using a tube, gently guide her inside. If using a cage, press it into the comb to secure her.
Step 2: Applying the Mark with Precision
With the queen secured, apply a single, small dot of paint to the middle of her thorax (the section between her head and abdomen).
It is absolutely critical that no paint gets on her head, eyes, antennae, or wing joints. Misplaced paint can interfere with her senses or movement and may lead to her rejection by the hive.
Step 3: The Critical Drying and Release Phase
After applying the mark, keep the queen confined for a minute or two to allow the paint to dry completely. Keep her in the shade to prevent overheating.
Once the paint is dry, gently release her directly onto the face of the brood comb. Slowly and carefully place the frame back into the hive, ensuring you do not crush or "roll" her between frames.
Common Pitfalls to Avoid
Mistakes during the marking process can have severe consequences for the queen and the colony. Awareness of these risks is your best defense against them.
Applying Too Much Pressure
Whether holding the queen by hand or using a tool, excessive pressure can easily crush and kill her. The goal is to restrain, not immobilize. Always use the absolute minimum force necessary.
Panicking or Rushing the Process
A queen will often move or try to grab onto your finger or the tool. Do not panic. Remain calm and maintain a gentle but secure grip. Rushed, jerky movements are what lead to injury.
Releasing the Queen Too Soon
If you release the queen while the paint is still wet, other bees may attempt to clean it off. This excessive grooming can injure the queen or, in some cases, lead to the hive identifying her as "damaged" and killing her.
Making the Right Choice for Your Goal
Your approach to marking should match your comfort level and experience. The well-being of the queen is always the top priority.
- If you are a new beekeeper: Start by using a queen marking cage, as it keeps the queen on the comb and feels less intimidating than handling her directly.
- If you are building confidence: Progress to using a queen marking tube, which gives you more control while still providing a protective barrier.
- If you are an experienced handler: You may choose to pick the queen up by her wings or thorax to mark her, as this is often the fastest method.
Ultimately, mastering this skill is about developing a feel for the process and prioritizing the safety of the queen above all else.
Summary Table:
| Tool | Purpose | Key Skill |
|---|---|---|
| Marking Tube/Cage | Safely restrain the queen | Calm, deliberate handling |
| Non-toxic Paint Pen | Apply a clear, color-coded mark | Precision and a steady hand |
| Thin Gloves / Bare Hands | Maximize dexterity for gentle handling | Patience and a gentle touch |
Ensure Your Apiary's Success with Professional-Grade Equipment
Marking your queen bees is a critical skill for effective hive management. Equip yourself with the right tools to do the job safely and efficiently. HONESTBEE supplies commercial apiaries and beekeeping equipment distributors with the durable, reliable supplies needed for large-scale operations.
We understand the demands of commercial beekeeping. Our wholesale-focused operations provide the marking tubes, cages, and safe paint pens that professionals trust to protect their valuable queens.
Ready to stock up on high-quality beekeeping supplies? Contact HONESTBEE today to discuss your equipment needs and wholesale pricing.
Visual Guide
Related Products
- One Hand Yellow Queen Marking Catcher Tube Cage Beekeeper Tool Accessory for Queen Bee
- Queen Bee Marking Pen POSCA Queen Marking Pens for Beekeeping Bee Markers
- Queen Bee Marking Tube Cage Bottle Catcher Holder with Clear Plastic Plunger Marker
- Plastic Long Marker Device for Catching and Marking Bees Queen Bee Marking Tube and Cage
- Transparent Plastic Bee Catcher Queen Marker Tube Cage Beekeeping Tool Equipment
People Also Ask
- What tools are commonly used for marking queen bees? A Guide to Safe and Effective Marking
- What physical risks are involved in marking a queen bee? Expert Safety Tips for Successful Hive Management
- Why are high-quality queen bee marking tools essential for pedigree tracking? Master Honey Bee Genetic Integrity
- What tools are recommended for marking a Queen bee? Ensure a Safe and Successful Mark
- What is the significance of using queen marking tools in apiary performance monitoring? Optimize Your Hive Productivity


