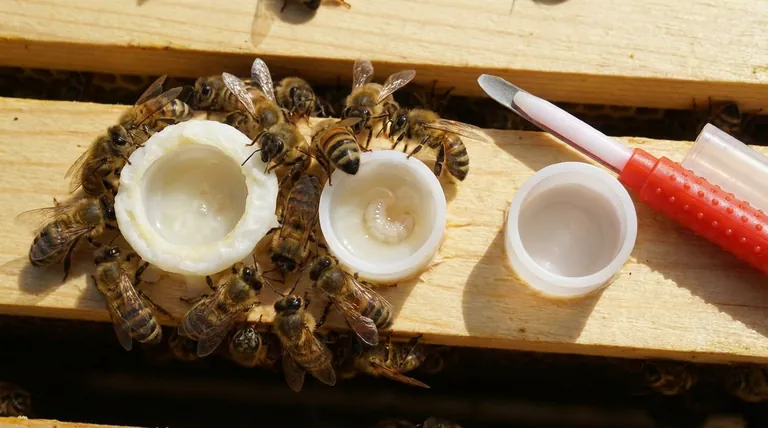
To determine if your grafted larvae have been accepted, you must look for two distinct visual cues within the colony. First, observe the cell cups for the addition of a smooth, slightly curved wax rim around the edge. Second, note the behavior of the worker bees, as they will cluster tightly over accepted cells to begin construction and feeding.
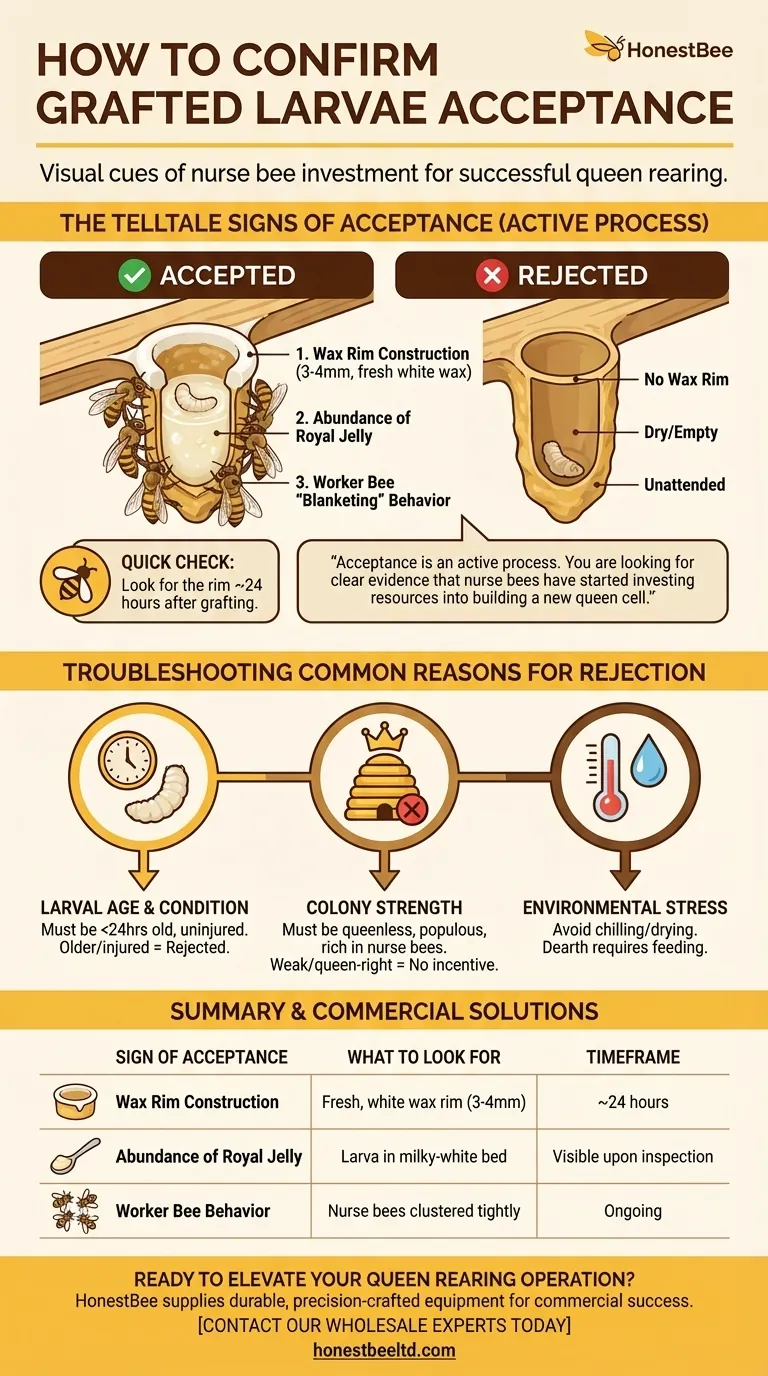
The core principle is that acceptance is an active process. You aren't just looking for a living larva; you are looking for clear evidence that the nurse bees have started investing resources into building a new queen cell around it.
The Telltale Signs of an Accepted Graft
Successful grafting is confirmed by the specific building and feeding behaviors of the nurse bees. These actions are unmistakable once you know what to look for, typically around 24 hours after you've placed the graft frame in the cell-builder colony.
The Wax Rim: A Clear Sign of Construction
The most reliable indicator of acceptance is new wax construction. Nurse bees will draw out the plastic or wax cell cup, adding a delicate, uniform rim of fresh white wax that is typically 3-4 millimeters high.
This rim is the foundation of the new queen cell. It will be smooth and have a gentle, downward curve. A rejected cell will have no such rim and will look exactly as it did when you put it in.
The Abundance of Royal Jelly
Inside this newly built wax rim, you will see the larva floating in a generous, milky-white bed of royal jelly. The bees provision an accepted larva with a surplus of this special food to fuel its rapid development into a queen.
If you see a dry larva or an empty cup, the graft has been rejected. The bees will either remove the larva or simply ignore it, and no royal jelly will be present.
Worker Bee Behavior: A Blanket of Care
Accepted cells will be covered by a cluster of dedicated nurse bees. They will be actively working on the cells, making it difficult to even see the cup itself without gently brushing the bees away.
This "blanketing" behavior signifies intense focus. The bees are regulating temperature, adding wax, and constantly feeding the developing queen. Ignored or rejected cells, by contrast, will be bare and unattended.
Understanding Common Reasons for Rejection
If you find a low acceptance rate, it is crucial to troubleshoot the process. Rejection is not random; it is the colony's response to a specific problem.
Larval Age and Condition
This is the most common point of failure. The larvae you graft must be the correct age—ideally less than 24 hours old. They should look like tiny, C-shaped specks floating in royal jelly.
Older larvae are unsuitable for raising a quality queen and will be promptly rejected. Likewise, any larva that was injured during the transfer from its original cell will be identified as non-viable and removed by the bees.
Cell-Builder Colony Strength
The condition of the cell-builder colony is paramount. For high acceptance, the colony must be queenless (or perceive itself to be queenless), populous, and packed with a high concentration of young nurse bees.
A weak colony, a colony with a laying queen, or one with a shortage of nurse bees has no biological incentive to invest the immense resources required to raise new queens.
Environmental Stress
Grafted larvae are extremely fragile. If they are allowed to chill or dry out during the transfer process, they will perish and be removed by the bees.
Similarly, a lack of incoming nectar and pollen (a "dearth") can dramatically reduce acceptance rates. The colony must feel resource-rich to commit to raising new queens, so supplemental feeding is often necessary.
Making the Right Choice for Your Goal
Evaluating your grafts correctly allows you to either move forward with confidence or quickly diagnose a problem with your queen-rearing setup.
- If your primary focus is quick confirmation: Check the frame 24 hours after grafting and look for the unmistakable white wax rim being built on the cell cups.
- If your primary focus is troubleshooting poor acceptance: First, verify you are grafting larvae of the correct age, then assess the strength and queenless status of your cell-builder colony.
Recognizing these signs of acceptance is a fundamental skill that moves you from simply attempting queen rearing to successfully managing it.
Summary Table:
| Sign of Acceptance | What to Look For | Timeframe |
|---|---|---|
| Wax Rim Construction | Fresh, white wax rim (3-4mm high) on the cell cup | ~24 hours after grafting |
| Abundance of Royal Jelly | Larva floating in a milky-white bed of food | Visible upon careful inspection |
| Worker Bee Behavior | Nurse bees clustered tightly over the cell | Ongoing after acceptance |
Ready to Elevate Your Queen Rearing Operation?
Successful grafting relies on high-quality, reliable equipment. At HONESTBEE, we supply commercial apiaries and beekeeping equipment distributors with the durable, precision-crafted tools needed for consistent results—from grafting tools to cell cups and more.
Let us support your success. Contact our wholesale experts today to discuss your equipment needs and how our products can help you achieve higher acceptance rates and robust queen production.
Visual Guide
Related Products
- Plastic Beekeeping Honey Bee Larvae Grafting Tools for Queen Rearing and Chinese Grafting
- Black 2 Pack Beekeeper Queen Grafting Tool for Bee Queen Larva Transferring Needle
- Retractable Chinese Queen Rearing Grafting Tools Equipment
- Stainless Steel Beekeeping Queen Grafting Tool for Honey Bee Rearing
- Stainless Steel Queen Grafting Tool for Beekeeping and Bee Queen Grafting
People Also Ask
- How do larvae grafting tools and royal jelly production kits contribute to a diversified bee product strategy?
- What is the primary function of the Larvae Grafting Tool? Master the Art of High-Quality Queen Bee Rearing
- Why is it necessary for migratory beekeeping enterprises to utilize professional queen bee rearing tools? Boost Resilience
- What is the grafting method of queen rearing? Master Controlled Queen Production for Your Apiary
- What is the primary function of a Professional Bee Larvae Grafting Tool in queen rearing? Enhance Breeding Efficiency


