To prepare a frame for a queen rearing kit, you must first select a suitable brood frame and then modify it to hold the kit's plastic comb box. The process involves selecting a dark, drawn-out brood comb, cutting a central section out of the comb, and securely attaching the plastic box to the frame's top bar in the space you've created. This ensures the kit is placed directly within the colony's brood-rearing area.
The core principle is not just to make the kit fit, but to make it so attractive and natural-feeling that the queen accepts it as part of the brood nest and lays her eggs in it without hesitation. Success depends entirely on how well you integrate the artificial kit into the living hive.
The Goal: Encouraging Queen Acceptance
Before cutting into a frame, you must understand the goal. You are trying to convince a queen to lay eggs in a plastic box. This requires tricking the bees into treating the box as a natural and desirable part of their brood nest.
Mimicking the Natural Brood Nest
A "well-used" or dark-colored brood frame is critical. These frames are coated in propolis and carry the scent of the colony, pheromones, and thousands of bee footsteps. This familiar environment makes the foreign plastic of the kit far less jarring to the bees and the queen.
The Importance of Frame Choice
Select a drawn brood frame that contains some pollen and unsealed nectar or honey, preferably one adjacent to frames with existing eggs and larvae. Do not choose a frame that is completely full of capped honey, as this is a food storage area, not a nursery. The queen looks for laying space on the active edges of the brood nest.
Step-by-Step Frame Preparation
Precision during this stage prevents problems later. A poorly prepared frame can be ignored by the bees or fail structurally.
Step 1: Select the Ideal Frame
Choose a dark, drawn brood frame. If possible, pick one from which brood has recently emerged, as the queen will see this as prime real estate for laying. Gently brush all the bees off the frame and back into the hive.
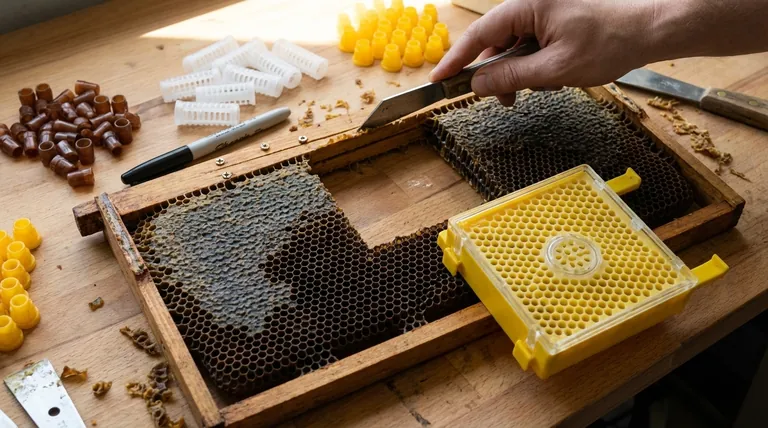
Step 2: Measure and Cut the Comb
The comb box is typically around 4 to 5 inches wide. Using a sharp hive tool or long knife, cut a section out of the center of the comb. The cut should go from the underside of the top bar all the way down to the top of the bottom bar, creating a clean rectangular opening.
Step 3: Secure the Comb Box
Position the plastic comb box in the opening you just created. It should be flush against the underside of the frame's top bar. Secure it firmly using two small screws or a heavy-duty staple gun. The box must not wobble or shift.
Common Pitfalls to Avoid
Many queen-rearing failures can be traced back to mistakes made during this initial setup. Understanding these common errors is key to ensuring success.
Pitfall: Using a New Frame
Never use a new frame with fresh foundation. The bees will be far more interested in drawing out the natural wax foundation than paying any attention to your plastic kit. The queen will almost certainly ignore it.
Pitfall: Incorrect Frame Type
Do not use a frame of pure, capped honey. The queen does not lay eggs in food storage areas. Placing the kit here guarantees it will be ignored and likely just filled with nectar by worker bees.
Pitfall: Poor Placement in the Hive
Once prepared, the frame must be placed directly in the center of the brood nest. It should be surrounded by other frames containing eggs, larvae, and pupae. Placing it on the outside edge of the box will isolate it from the queen's activity zone.
Making the Right Choice for Your Goal
Your specific actions should align with your primary objective for the hive at that moment.
- If your primary focus is rapid acceptance: Use a frame that brood has just emerged from, as this is the most attractive possible space for a queen to begin laying again.
- If your primary focus is colony stability: Ensure the prepared frame is placed between a frame of pollen and a frame of emerging brood to provide all necessary resources for the new larvae.
By properly preparing and placing the frame, you are setting the stage for the colony to raise the high-quality queens your apiary needs.
Summary Table:
| Step | Key Action | Why It Matters |
|---|---|---|
| 1. Select Frame | Choose a dark, drawn brood comb with pollen/nectar. | Mimics the natural brood nest scent, encouraging the queen to lay. |
| 2. Cut Comb | Remove a central 4-5 inch section from the comb. | Creates a clean space to securely fit the plastic comb box. |
| 3. Attach Kit | Secure the box flush under the top bar with screws/staples. | Prevents wobbling, making the kit feel like a natural part of the hive. |
| 4. Hive Placement | Position the frame in the center of the brood nest. | Places the kit in the queen's active laying zone for immediate use. |
Equip Your Apiary for Success with HONESTBEE
Preparing frames correctly is just the first step. Reliable, high-quality equipment is fundamental to efficient queen rearing and overall hive health.
HONESTBEE supplies commercial apiaries and beekeeping equipment distributors with the durable, precision tools needed for large-scale operations. From robust frames and foundations to essential hive management supplies, our wholesale-focused offerings are designed to support your productivity and profitability.
Let's discuss how our products can integrate into your operation.
Contact HONESTBEE today to request a wholesale catalog or speak with our team about your specific needs.
Visual Guide

Related Products
- Premium Nicot Style Queen Rearing Kit with Hair Roller Bee Cages
- Jenter Queen Rearing Kit Complete Set for Bee Breeding
- Nicot Queen Rearing Kit for Beekeeping and Grafting in Nicot System
- No Grafting Queen Rearing Kit: System for Royal Jelly Production and Queen Rearing
- Retractable Chinese Queen Rearing Grafting Tools Equipment
People Also Ask
- What is the primary function of a queen rearing kit? Eliminate Manual Grafting for Superior Bee Breeding
- How do modern queen bee rearing and breeding kits improve apiary management? Transition to Proactive Precision Breeding
- How is 'active' queen rearing defined in beekeeping? Master Intentional Colony Management & Genetic Control
- How do specialized queen rearing kits and queen management tools improve the success rate of bee colony expansion?
- How do beekeepers utilize the 'emergency response' for queen rearing? Master Controlled Queen Production


