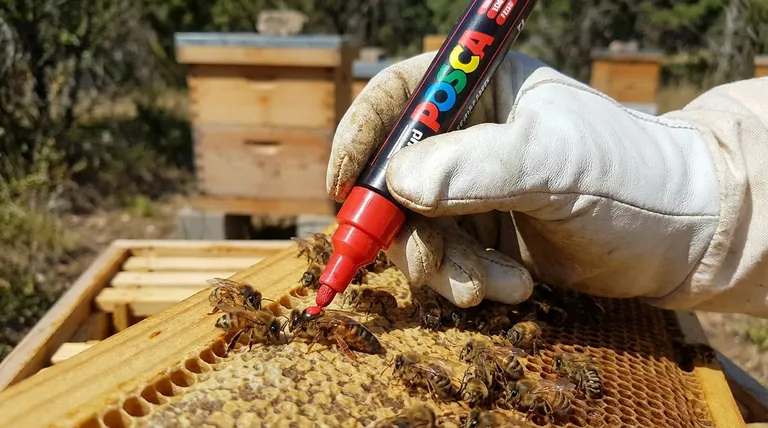
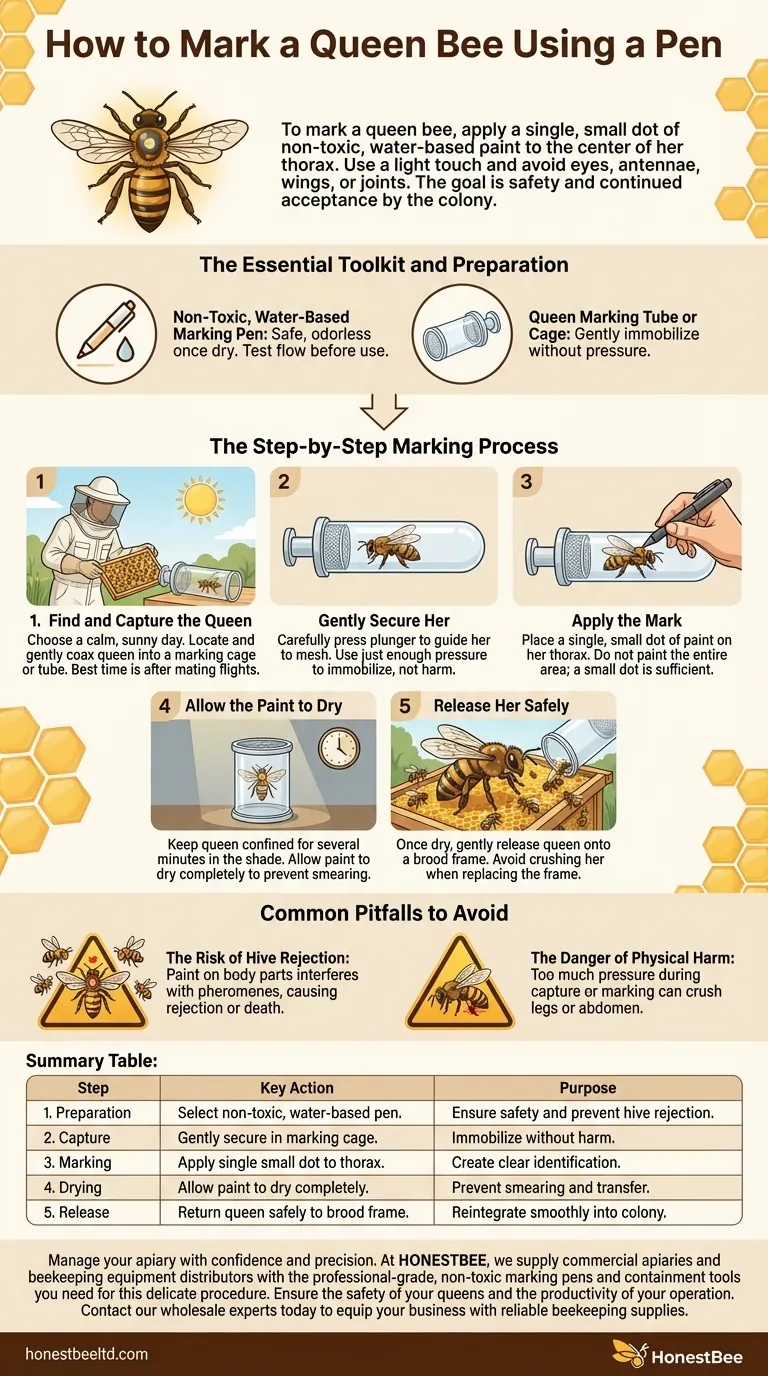
To mark a queen bee with a pen, you must place a single, small dot of non-toxic, water-based paint onto the center of her thorax—the middle section of her body. It is critical to use a light touch and avoid getting any paint on her eyes, antennae, wings, or joints, as this can harm her and risk her rejection by the hive.
The goal of marking a queen is not just about applying paint. It's a delicate procedure focused on ensuring the queen's safety and her continued acceptance by the colony, which requires the right tools, timing, and technique.
The Essential Toolkit and Preparation
Successfully marking a queen bee begins long before you open the hive. Proper preparation minimizes stress on both the beekeeper and the bees.
Selecting the Right Pen
The only acceptable tool is a non-toxic, water-based marking pen designed specifically for this purpose. These pens are engineered to be safe for the queen and odorless once dry, reducing the chance of rejection.
Before you begin, always test the pen on a separate surface, like a piece of wood or your thumbnail, to ensure a smooth, consistent flow of paint.
Choosing a Containment Tool
You must gently immobilize the queen to mark her accurately. A queen marking tube or cage is highly recommended. These tools are designed to hold the queen securely against a mesh screen without applying harmful pressure.
The Step-by-Step Marking Process
With the right tools prepared, the process itself can be straightforward and calm. A steady hand and deliberate movements are key.
Step 1: Find and Capture the Queen
Choose a calm, sunny day to inspect your hive. Locate the queen on a frame and gently coax her into your marking cage or tube.
The best time to mark a queen is after she has completed her mating flights and has begun laying eggs, ensuring she is established in the colony.
Step 2: Gently Secure Her
Once captured in the tube or cage, carefully and slowly press the plunger or screen to guide her to the mesh. Use just enough pressure to prevent her from moving, but not enough to cause any harm.
Step 3: Apply the Mark
With the queen secured, place a single, small dot of paint on her thorax. Do not paint the entire thorax; a small, solid dot is all that is needed for identification.
Step 4: Allow the Paint to Dry
Keep the queen safely confined in the marking tool for several minutes. This crucial step allows the paint to dry completely, preventing it from smearing onto other parts of her body or onto other bees.
Keep her in the shade during this time to avoid overheating.
Step 5: Release Her Safely
Once the mark is dry to the touch, gently release the queen back onto the surface of a brood frame, preferably near open brood.
Carefully place the frame back into the hive, ensuring you do not crush or "roll" her between the frames.
Common Pitfalls to Avoid
Marking a queen is a low-risk procedure when done correctly, but errors can have significant consequences for the colony.
The Risk of Hive Rejection
If paint gets on the queen’s antennae or other body parts, it can interfere with her ability to communicate via pheromones. This foreign scent or perceived injury may cause the worker bees to reject and kill her.
The Danger of Physical Harm
Applying too much pressure during capture or marking can easily crush the queen’s leg or damage her abdomen. This is why using proper tools and a gentle touch is non-negotiable.
How to Apply This to Your Hive
Your approach should be guided by your primary objective and experience level.
- If your primary focus is safety and minimizing risk: Use a dedicated marking cage, take your time, and allow several minutes for the paint to dry completely before releasing the queen.
- If your primary focus is confidence-building: Practice your technique on drone bees first, as they are larger and their loss is not detrimental to the hive.
Properly marking your queen transforms your ability to manage your hive effectively and ensure its long-term health.
Summary Table:
| Step | Key Action | Purpose |
|---|---|---|
| 1. Preparation | Select a non-toxic, water-based queen marking pen. | Ensure safety and prevent hive rejection. |
| 2. Capture | Gently secure the queen in a marking cage or tube. | Immobilize her without causing harm. |
| 3. Marking | Apply a single small dot to the center of the thorax. | Create a clear, lasting identification mark. |
| 4. Drying | Allow the paint to dry completely before release. | Prevent smearing and transfer of scent/paint. |
| 5. Release | Return the queen safely to a brood frame. | Reintegrate her smoothly into the colony. |
Manage your apiary with confidence and precision. Properly marking your queen is essential for effective hive management. At HONESTBEE, we supply commercial apiaries and beekeeping equipment distributors with the professional-grade, non-toxic marking pens and containment tools you need for this delicate procedure. Ensure the safety of your queens and the productivity of your operation. Contact our wholesale experts today to equip your business with reliable beekeeping supplies.
Visual Guide
Related Products
- Queen Bee Marking Pen POSCA Queen Marking Pens for Beekeeping Bee Markers
- Queen Bee Marking Pen UNI Medium Point for Queen and Bee Marking
- One Hand Yellow Queen Marking Catcher Tube Cage Beekeeper Tool Accessory for Queen Bee
- Plastic Long Marker Device for Catching and Marking Bees Queen Bee Marking Tube and Cage
- Queen Bee Marking Tube Cage Bottle Catcher Holder with Clear Plastic Plunger Marker
People Also Ask
- What is the purpose of using a queen marking pen? Enhance Hive Management and Age Tracking
- What role do specialized marking pens and color-coding systems play in honeybee tracking? Enhance Research Precision
- What are the primary benefits of marking a queen bee in a commercial apiary? Boost Efficiency & Management
- Why are Posca pens commonly used for marking queen bees? The Safest, Most Durable Method for Beekeepers
- How should a new paint pen be primed before marking a queen bee? Essential Tips for Safe & Clear Markings


