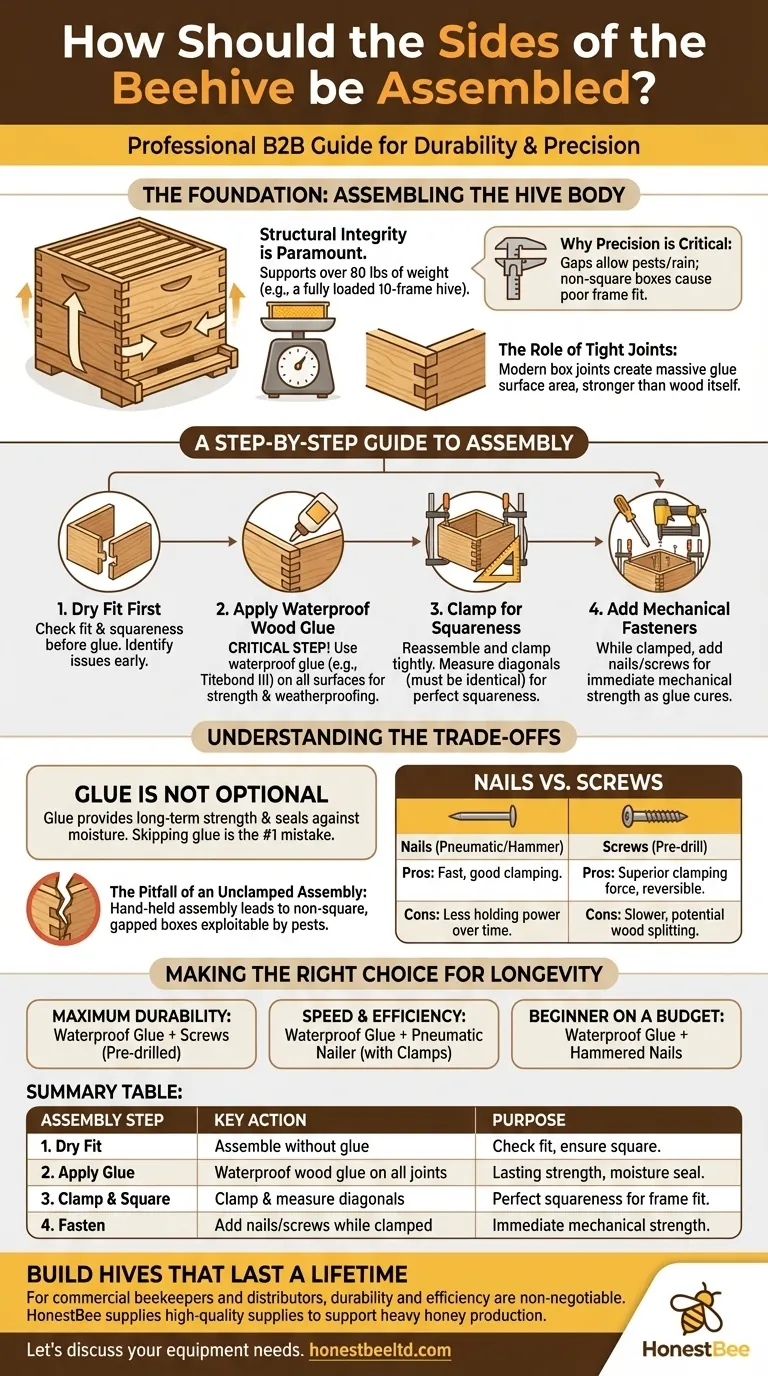
Properly assembling the sides of your beehive is achieved by creating perfectly square, tight-fitting joints that are secured with both glue and fasteners. This process ensures the structural integrity needed to protect a colony and support the immense weight of honey, wax, and bees. Using clamps to hold the components together during this process is essential for achieving professional, gap-free results.
The goal of hive assembly is not merely to connect pieces of wood. It is to construct a precise, rigid, and weatherproof box that maintains correct "bee space," keeps out pests, and can bear significant weight without warping or failing over time.
The Foundation: Assembling the Hive Body
The "sides" of a beehive form the main box, known as the hive body or super. The structural integrity of this box is paramount for the success and management of the colony.
Why Precision is Critical
A poorly assembled hive body can cause significant problems. Gaps can allow rain and pests to enter, while a box that is not perfectly square will cause frames to fit incorrectly, making hive inspections difficult and disruptive.
The structure must also be incredibly strong. A single deep frame full of honey can weigh 8 pounds or more, meaning a fully-loaded 10-frame hive body must support over 80 pounds of weight.
The Role of Tight Joints
Modern hive bodies typically use box joints (also called finger joints) for the corners. These interlocking fingers create a massive surface area for glue, resulting in a joint that is stronger than the wood itself.
Your assembly goal is to ensure these joints fit together snugly with no gaps.
A Step-by-Step Guide to Assembly
-
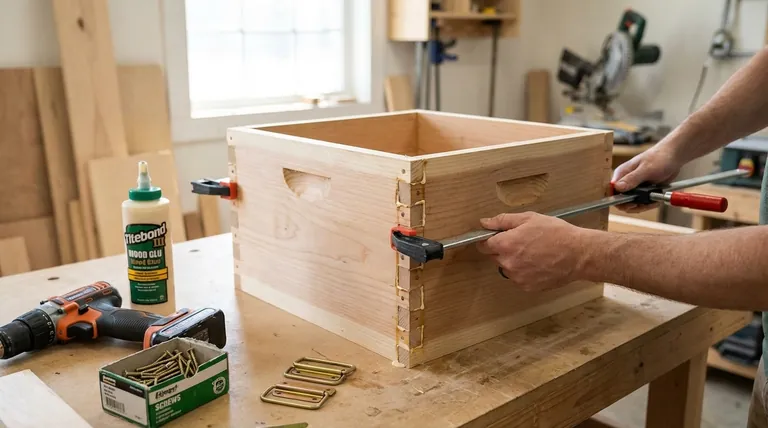
Dry Fit First: Before using any glue, fit the four sides together to ensure all pieces are correctly milled and form a square box. Identify any issues before they become permanent.
-
Apply Waterproof Wood Glue: Disassemble the dry-fit box. Apply a thin, even layer of high-quality waterproof wood glue (like Titebond III) to the fingers of each joint. This is the most critical step for strength and weatherproofing.
-
Clamp for Squareness: Reassemble the glued sides and use bar clamps or strap clamps to pull the corners together tightly. Measure the box diagonally from corner to corner. Now measure the other diagonal. The two measurements must be identical for the box to be perfectly square. Adjust the clamps until it is.
-
Add Mechanical Fasteners: While the box is clamped and square, drive nails or screws through the joints to hold them in place while the glue cures. This provides immediate mechanical strength.
Understanding the Trade-offs
The choices you make during assembly impact the hive's longevity and your own efficiency.
Glue is Not Optional
Fasteners like nails and screws are primarily for clamping the wood together while the glue sets. The glue provides the real, lasting strength and seals the joint against moisture. Skipping glue is the most common mistake a new beekeeper can make.
Nails vs. Screws
Nails are fast, especially with a pneumatic nailer. They provide good clamping pressure and are the standard for most commercial operations.
Screws offer superior clamping force and holding power over the long term. They also make it possible to reverse a mistake. However, they are slower to install and can split the wood if you do not pre-drill pilot holes.
The Pitfall of an Unclamped Assembly
Attempting to assemble a hive body by simply holding it together by hand while you nail it will almost certainly result in a box that is not square and has small gaps in the joints. These gaps will be exploited by pests and the elements, shortening the life of your equipment.
Making the Right Choice for Longevity
Use this guide to determine the best assembly method for your specific goals.
- If your primary focus is maximum durability: Use a high-quality waterproof wood glue in every joint and secure the corners with screws, pre-drilling pilot holes to prevent splitting.
- If your primary focus is speed and efficiency: Use waterproof glue and a pneumatic nailer, but pay extra attention to keeping the box perfectly square with clamps during the entire nailing process.
- If you are a beginner on a budget: A combination of waterproof glue and standard hammered nails is perfectly effective. Your top priority should be achieving tight, square corners, not the type of fastener you use.
A well-built hive is the foundation of a healthy, productive colony.
Summary Table:
| Assembly Step | Key Action | Purpose |
|---|---|---|
| 1. Dry Fit | Assemble without glue to check fit. | Ensure pieces are correctly milled and form a square. |
| 2. Apply Glue | Use waterproof wood glue on all joints. | Provides lasting strength and seals against moisture. |
| 3. Clamp & Square | Use clamps and measure diagonals. | Achieve perfect squareness for correct frame fit. |
| 4. Fasten | Add nails or screws while clamped. | Provides immediate mechanical strength while glue cures. |
Build Hives That Last a Lifetime
A strong, well-assembled hive is the foundation of a productive apiary. For commercial beekeepers and equipment distributors, durability and efficiency are non-negotiable.
HONESTBEE supplies the high-quality beekeeping supplies and equipment you need to build hives that protect your investment and support heavy honey production. Our wholesale-focused operations are designed to meet the demands of commercial-scale beekeeping.
Let's discuss your equipment needs. Contact our team today to learn how our products and expertise can help you build a stronger, more profitable operation.
Visual Guide
Related Products
- Stainless Steel Round Beehive Air Vents for Ventilation
- Wholesales Dadant Size Wooden Bee Hives for Beekeeping
- Metal Hive Feet Bee Hive Stand for Ant Protection
- Metal Bee Hive Stand Bee Box Stand for Beekeeping
- Wooden Bee Hive Frames for Beekeeping and Wholesale
People Also Ask
- How does hive ventilation affect honey bee colony behavior in the spring? Optimize Swarm Prevention and Hive Health
- Why is good ventilation crucial when transporting beehives? Protect Your Colony from Lethal Overheating
- How can a beekeeper provide proper ventilation for a beehive throughout the year? Seasonal Strategies for Bee Health
- How does ventilation affect colony health, and how should it be managed seasonally? A Guide to Preventing Moisture & Overheating
- How can beekeepers implement effective ventilation to manage internal hive moisture? Keep Your Colony Dry and Productive