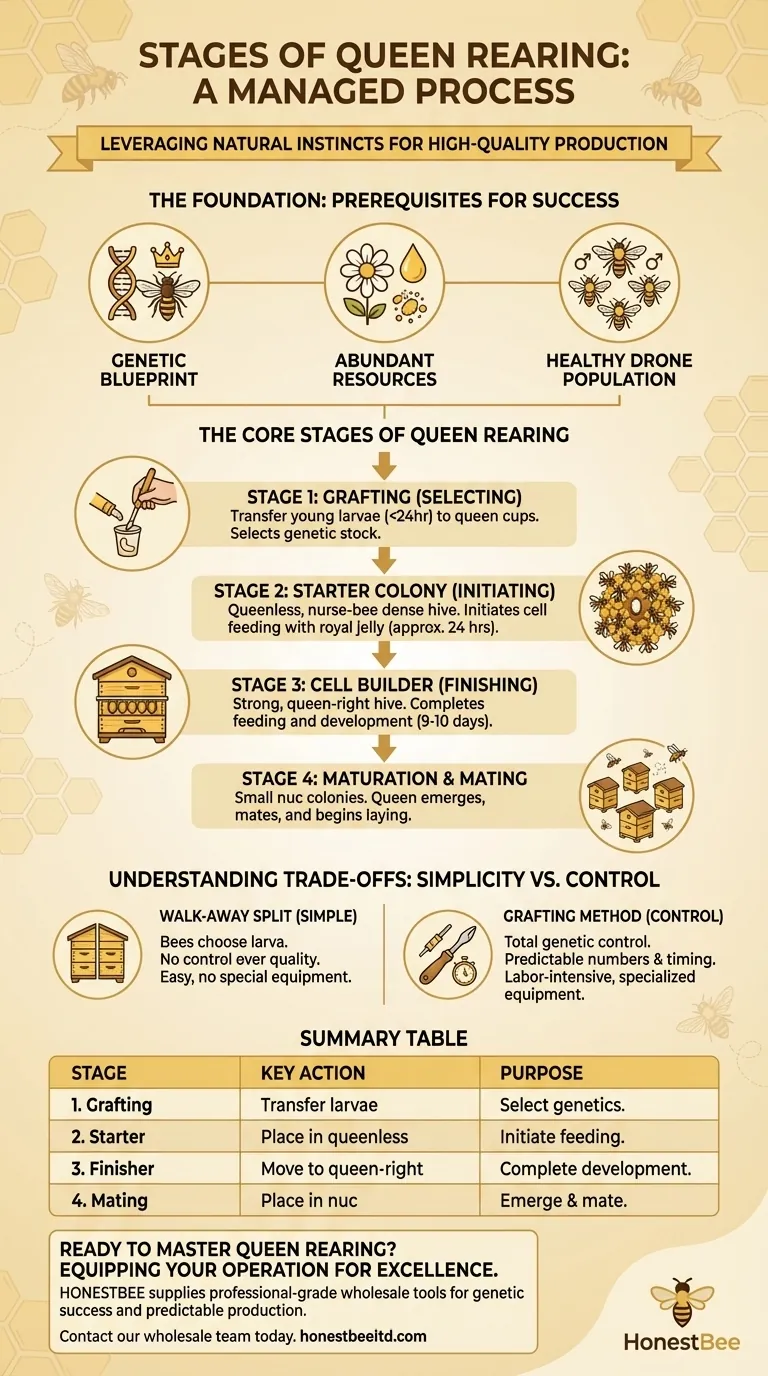
At its core, raising queen bees is a managed process that leverages a colony's natural impulse to create a new queen when it believes it has lost its own. The primary stages involve selecting genetic material, initiating queen cells in a "starter" colony, growing them out in a "finisher" colony, and finally, hatching and mating the new queens in smaller "nucleus" colonies.
Successful queen rearing is not merely a mechanical procedure; it is the art of creating a specific, controlled biological state—a strong, well-fed, and queenless colony—to direct the bees' natural instincts towards producing high-quality queens on your schedule.
The Foundation: Prerequisites for Success
Before initiating the stages of queen rearing, certain environmental and colony conditions must be met. Ignoring these fundamentals is the most common reason for failure.
The Genetic Blueprint
The entire process begins with selecting a "queen mother" from a colony that exhibits your desired traits. This could include a gentle temperament, high honey production, strong disease resistance, or a low tendency to swarm. The quality of your new queens is directly determined by this initial genetic choice.
Abundant Resources
Strong colonies require ample resources. A robust flow of both nectar (for energy) and high-quality pollen (for protein to raise brood) is non-negotiable. Without this, the bees will not have the capacity to feed and develop numerous queen cells properly.
A Healthy Drone Population
New queens must mate to become productive. This requires a large population of sexually mature, high-quality drones in the area. Mating occurs in mid-air, and a diverse, healthy drone population ensures your new queen is well-mated, which is critical for her long-term viability.
The Core Stages of Queen Rearing
Once the foundational elements are in place, the technical process of raising queens begins. This multi-stage approach ensures each phase is optimized for success.
Stage 1: Grafting - Selecting the Future Queens
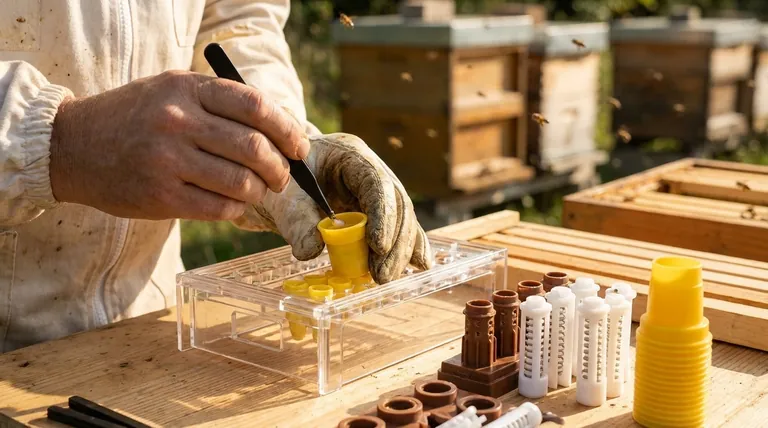
Grafting is the physical act of transferring very young female larvae (less than 24 hours old) from the comb of your chosen queen mother into artificial queen cups. This delicate task requires a steady hand and good eyesight. These grafted larvae are the genetic stock for all the new queens you intend to raise.
Stage 2: The Starter Colony - Initiating the Cells
The grafted queen cups are placed into a "starter" colony. This colony's defining feature is that it is queenless and densely populated with young nurse bees. The sudden absence of a queen triggers an emergency response, and the nurse bees immediately begin feeding the grafted larvae copious amounts of royal jelly, starting their development into queen cells.
A starter colony can typically only initiate this process for about 24 hours before their queenless state begins to degrade their effectiveness.
Stage 3: The Cell Builder - Finishing the Queens
After 24 hours, the now-accepted queen cells are moved to a strong "cell builder" or "finisher" colony. This colony is also powerful and well-fed, but it is typically queen-right (containing a queen), with the queen separated from the developing cells by a queen excluder.
The role of the finisher is to continue feeding and building out the queen cells for the next 9-10 days until they are capped and mature.
Stage 4: Maturation and Mating - The Final Step
Approximately two days before the new queens are due to emerge, the mature, capped queen cells are carefully removed from the finisher colony. Each cell is placed into its own small nucleus colony, often called a "nuc" or "mating nuc."
These small hives contain a few frames of bees, food, and no queen. The new queen emerges, hardens, and flies out on mating flights. Once she has successfully mated and begun laying eggs, she is a proven queen ready to be introduced into a full-sized colony.
Understanding the Trade-offs: Simplicity vs. Control
While grafting offers maximum control over genetics and timing, it is not the only method for creating new queens.
The "Walk-Away" Split
The simplest method is a "walk-away" split. This involves dividing a strong colony into two, ensuring the queenless half has eggs and young larvae. The bees will naturally recognize their queenless state and create their own emergency queen cells.
This method is easy and requires no special equipment. However, you have no control over which larva the bees choose, potentially resulting in a lower-quality queen.
The Grafting Method
The Doolittle method, which involves grafting, is more labor-intensive and requires specialized equipment. Its significant advantage is total control. You select the exact genetics, produce a large number of queens simultaneously, and can time their emergence precisely.
This control is essential for any beekeeper focused on genetic improvement or producing queens at scale.
Making the Right Choice for Your Goal
Your approach should align directly with your objectives as a beekeeper.
- If your primary focus is simplicity and colony expansion: A walk-away split is an effective and straightforward way to increase your number of hives.
- If your primary focus is genetic improvement and scale: The grafting method is the professional standard for producing high-quality queens with specific, desirable traits in predictable numbers.
Ultimately, mastering queen rearing is about understanding and directing the powerful biological instincts of the honey bee colony to achieve your specific goals.
Summary Table:
| Stage | Key Action | Purpose |
|---|---|---|
| 1. Grafting | Transfer young larvae to queen cups. | Selects the specific genetic material for new queens. |
| 2. Starter Colony | Place grafts in a strong, queenless hive. | Initiates cell acceptance and feeding with royal jelly. |
| 3. Cell Builder (Finisher) | Move accepted cells to a strong, queen-right hive. | Completes the feeding and development of queen cells. |
| 4. Maturation & Mating | Place capped cells into small nucleus (nuc) colonies. | Allows the new queen to emerge, mate, and begin laying. |
Ready to Master Queen Rearing?
Producing high-quality queens at scale requires reliable, professional-grade equipment. HONESTBEE supplies commercial apiaries and beekeeping equipment distributors with the wholesale tools needed for success—from precision grafting tools to robust nucleus hive boxes.
Let us equip your operation for genetic excellence and predictable production.
Contact our wholesale team today to discuss your needs.
Visual Guide
Related Products
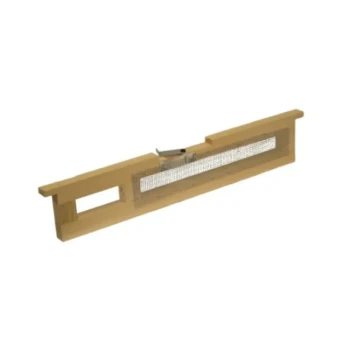
- JZBZ Langstroth Queen Rearing Frame for Beekeeping
- Jenter Queen Rearing Kit Complete Set for Bee Breeding
- No Grafting Queen Rearing Kit: System for Royal Jelly Production and Queen Rearing
- Premium Nicot Style Queen Rearing Kit with Hair Roller Bee Cages
- Nicot Queen Rearing Kit for Beekeeping and Grafting in Nicot System
People Also Ask
- What roles do professional queen rearing frames and artificial queen cells play? Scaling Your Queen Bee Production
- What is the primary function of converting a standard hive frame for queen rearing? Optimize Mass Queen Production
- What is the purpose of the specialized frame in queen cell production? A System for Controlled, Large-Scale Queen Rearing
- Why use finishing colonies for queen cell capping? Secrets to Superior Queen Quality and Performance
- How does the positioning of cell bars within a queen rearing frame affect royal jelly production? Optimize Your Yield