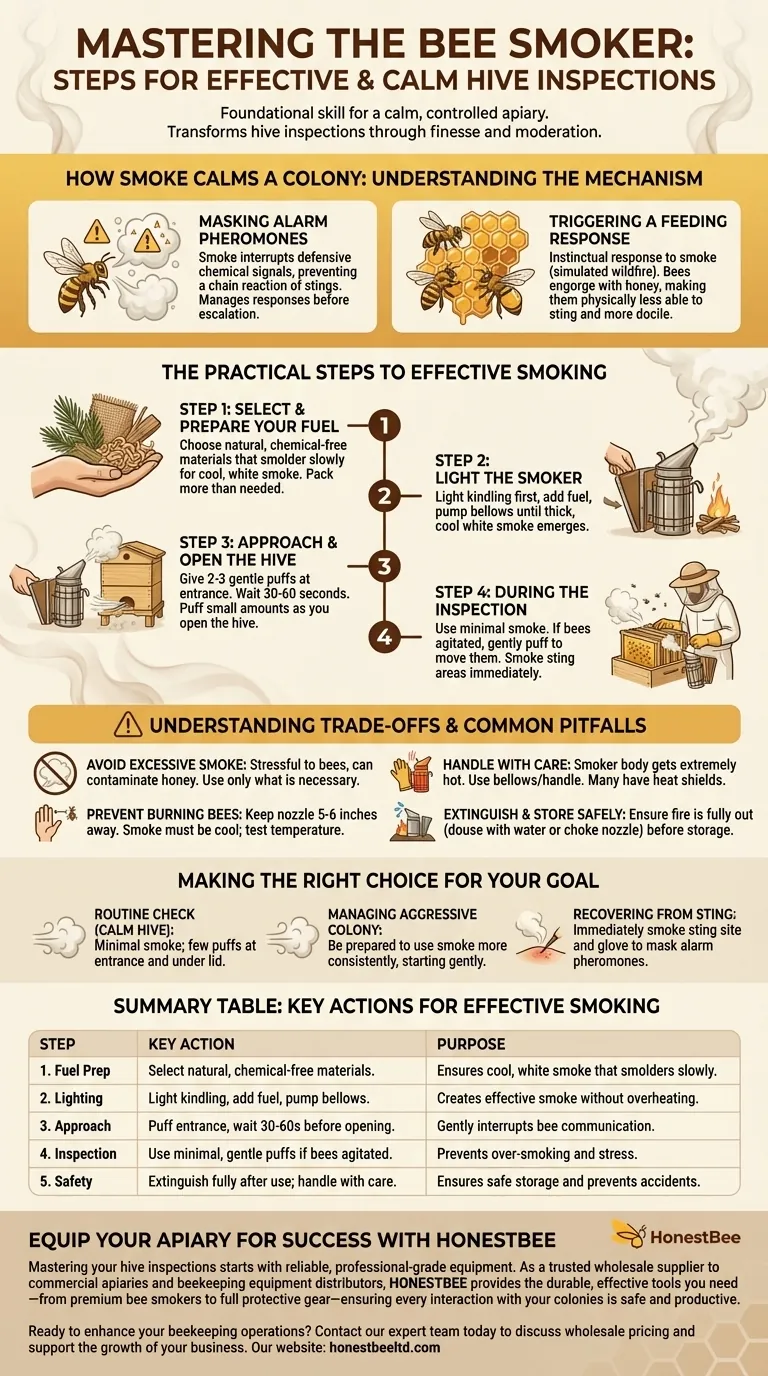
Using a bee smoker correctly is a foundational skill that transforms a potentially difficult hive inspection into a calm, controlled process. The key steps involve preparing a suitable fuel source, lighting it to produce cool, white smoke, gently applying it to the hive entrance before opening, and using minimal puffs throughout the inspection before safely extinguishing it afterward.
The purpose of a smoker is not to sedate or overwhelm the bees, but to gently interrupt their natural defensive communications. Mastering this tool is about finesse and moderation, ensuring the well-being of both the beekeeper and the colony.

How Smoke Calms a Colony
To use a smoker effectively, you must first understand why it works. The smoke serves two primary functions that make a colony more docile.
Masking Alarm Pheromones
When a honey bee feels threatened or stings, it releases an alarm pheromone. This chemical signal instantly alerts other guard bees to the location of the threat, often triggering a chain reaction of defensive stings.
Smoke effectively masks this pheromone, preventing the signal from spreading throughout the colony. This allows you to manage a potential defensive response before it escalates.
Triggering a Feeding Response
The presence of smoke also triggers an ancient, instinctual response related to a wildfire threatening the hive. The bees' first reaction is to prepare to abandon their home.
To do this, they consume large amounts of honey, engorging themselves to carry as much of their food stores with them as possible. A bee with a full stomach is physically less able to flex its abdomen to sting and is generally more preoccupied and docile.
The Practical Steps to Effective Smoking
Executing the technique properly is a matter of preparation and gentle application. Rushing the process is a common mistake that can lead to a smoker that goes out or produces hot, ineffective smoke.
Step 1: Select and Prepare Your Fuel
The ideal fuel is something that smolders slowly and produces a thick, cool smoke. It must be natural and free of any chemicals, paints, or glues.
Common and effective fuel sources include dry pine needles, untreated burlap, cotton fabric, wood shavings, dry leaves, and rotted, punky wood. Always pack more fuel than you think you will need to avoid having to refuel mid-inspection.
Step 2: Light the Smoker
Start by lighting a small amount of starter fuel or kindling in the bottom of the smoker's fire pot. Gently pump the bellows until this initial fuel is burning well.
Next, add your main fuel on top of the burning kindling. Pack it in, but not so tightly that it chokes the airflow. Continue pumping the bellows until you see thick, cool, white smoke coming from the nozzle.
Step 3: Approach and Open the Hive
Begin by directing two to three gentle puffs of smoke into the hive entrance. This serves as your initial announcement. Wait 30-60 seconds before proceeding.
Next, crack the outer cover and direct a few more puffs of smoke into the small opening. Finally, remove the outer cover, and puff a bit of smoke across the top of the inner cover or frames before beginning your inspection.
Step 4: During the Inspection
A common mistake is to over-smoke the hive. For a calm colony, you may not need any more smoke at all.
If you notice bees becoming agitated or lining up on the top bars to face you, gently puff a small amount of smoke over them to move them along. If you are stung, smoke the area on your suit or glove immediately to mask the alarm pheromone.
Understanding the Trade-offs and Common Pitfalls
While essential, a smoker is a tool that requires respect and careful handling. Misuse can be counterproductive and even dangerous.
Avoid Using Too Much Smoke
Everything in moderation. Excessive smoke is stressful for the bees and can contaminate the honey with a smoky flavor. It is also unpleasant and unhealthy for the beekeeper to breathe. Use only what is necessary to keep the colony calm.
Prevent Burning the Bees
The smoke itself should be cool. Before applying it to the bees, test the temperature on the back of your hand. Always keep the smoker nozzle at least 5-6 inches away from the bees to avoid burning their delicate wings with a hot puff or stray ember.
Handle the Smoker with Care
The body of the smoker becomes extremely hot during use. Handle it only by the bellows or a designated handle. Many smokers have a heat shield for protection and a hook for conveniently hanging it on the side of the hive box. Never leave it on a flammable surface.
Extinguish and Store Safely
After your inspection is complete, you must ensure the fire is completely out. You can do this by stuffing the nozzle with green grass to choke the fire or by emptying the hot contents onto a non-flammable surface and dousing them with water. Do not store the smoker until it is fully extinguished and cool to the touch.
Making the Right Choice for Your Goal
Your use of the smoker should adapt to the specific temperament of the colony and the situation at hand.
- If your primary focus is a routine check on a calm hive: Use minimal smoke—just a few puffs at the entrance and under the lid is often sufficient.
- If your primary focus is managing an aggressive or agitated colony: Be prepared to use smoke more consistently to keep the bees calm, but always start gently and increase only as needed.
- If your primary focus is recovering after being stung: Immediately smoke the sting site and your glove to mask the alarm pheromones and prevent a defensive cascade.
Ultimately, mastering the smoker is about learning to have a calm conversation with your bees, turning a potentially stressful interaction into a productive inspection.
Summary Table:
| Step | Key Action | Purpose |
|---|---|---|
| 1. Fuel Prep | Select natural, chemical-free materials (e.g., pine needles, burlap). | Ensures cool, white smoke that smolders slowly. |
| 2. Lighting | Light kindling, add fuel, pump bellows for thick, white smoke. | Creates effective smoke without overheating. |
| 3. Approach | Puff smoke into hive entrance, wait 30-60 seconds before opening. | Gently interrupts bee communication before inspection. |
| 4. Inspection | Use minimal, gentle puffs only if bees show agitation. | Prevents over-smoking and stress to the colony. |
| 5. Safety | Extinguish fully after use; handle with care due to extreme heat. | Ensures safe storage and prevents accidents. |
Equip your apiary for success with HONESTBEE.
Mastering your hive inspections starts with reliable, professional-grade equipment. As a trusted wholesale supplier to commercial apiaries and beekeeping equipment distributors, HONESTBEE provides the durable, effective tools you need—from premium bee smokers to full protective gear—ensuring every interaction with your colonies is safe and productive.
Ready to enhance your beekeeping operations? Contact our expert team today to discuss wholesale pricing and discover how our supplies can support the health of your bees and the growth of your business.
Visual Guide
Related Products
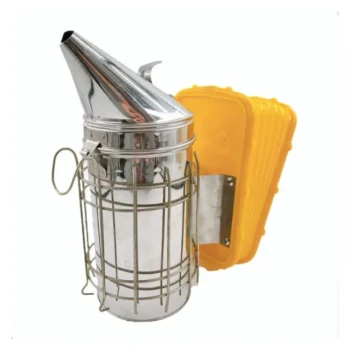
- Stainless Steel Honey Bee Smoker Hive and Honeycomb Smoker for Beekeeping
- Professional Bee Smoker with Elongated Spout and Durable Bellows for Beekeeping
- Premium Traditional Copper Bee Smoker with Bellows
- Heavy Duty Manual Bee Smoker Blower for Beekeeping
- European Stainless Steel Bee Smoker for Honey Bee Hive
People Also Ask
- Why is a smoker important in beekeeping? Essential for Safe and Calm Hive Management
- Why is a specialized bee smoker considered a critical tool for apiary safety? Master Hive Control & Productivity
- What is the best material for a bee smoker? Choose the Right Fuel for a Calm Hive
- When should you add more fuel to the bee smoker? Watch for This Critical Smoke Signal
- Why is a stainless steel bee smoker considered indispensable? Master Hive Management with Cool Smoke Technology