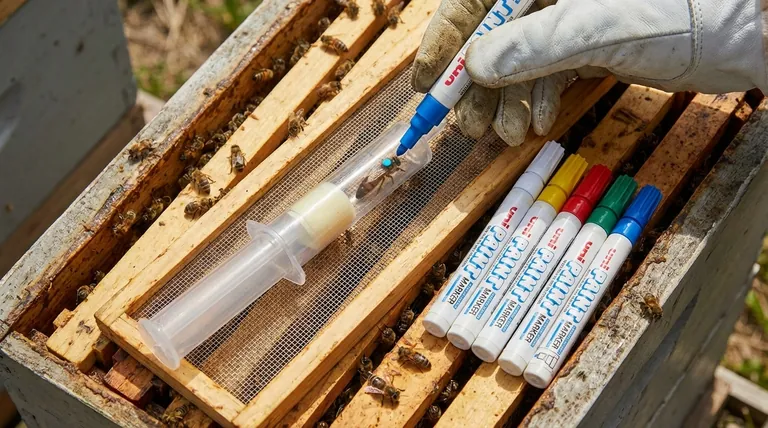
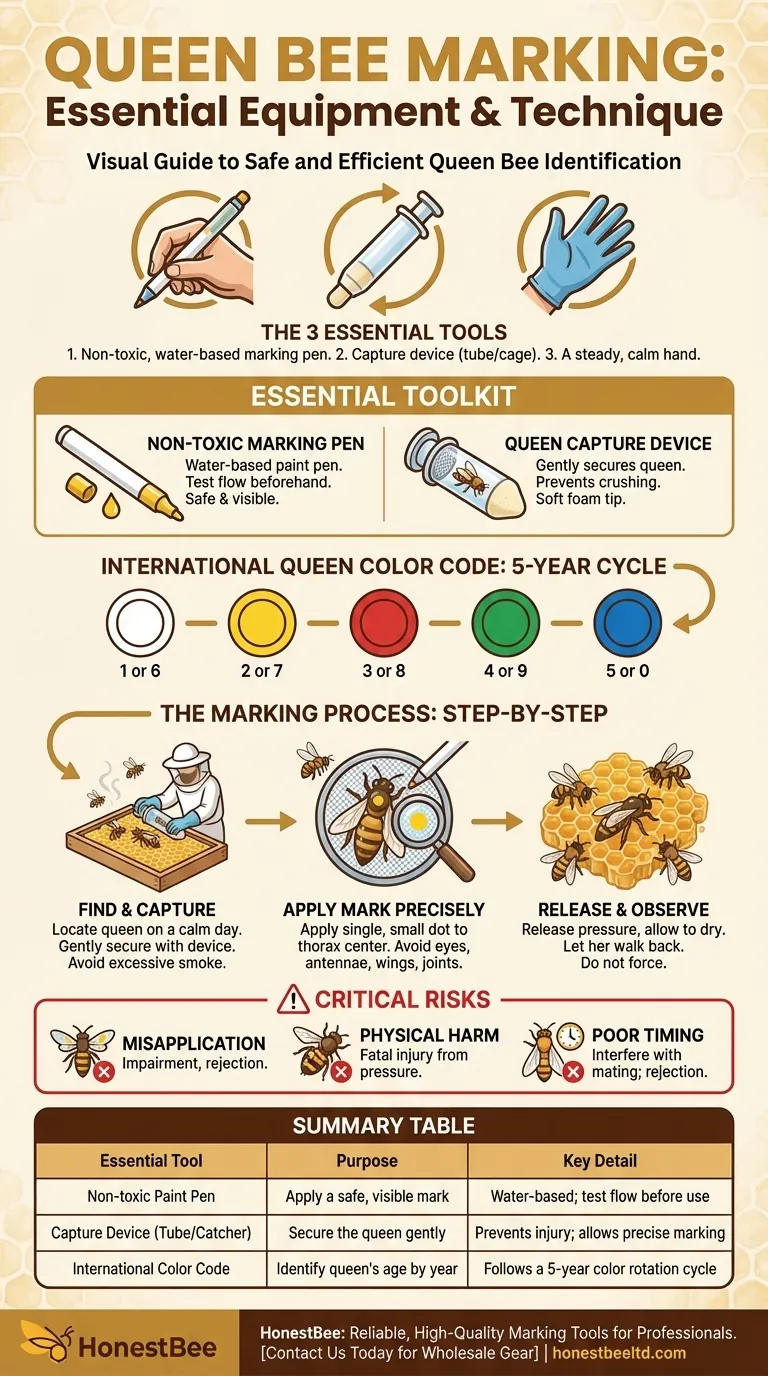
Marking your queen bee requires three essential tools. You will need a non-toxic, water-based marking pen, a capture device like a queen marking tube or cage, and a steady hand. The goal is to apply a small dot of color to her thorax safely and efficiently during a calm hive inspection.
Successful queen marking is less about the equipment and more about the technique. While the tools are simple, the true challenge lies in handling the queen gently and marking her at the correct time to ensure her safety and acceptance by the colony.
The Essential Toolkit for Queen Marking
A successful marking procedure depends on having the right tools prepared before you open the hive. Rushing to find equipment while the hive is open increases stress on both the beekeeper and the bees.
The Marking Pen: Your Primary Tool
The most common and safest tool is a non-toxic, water-based paint pen. These are specifically designed for this purpose and come in various colors.
It's critical to test the pen beforehand on a surface like your glove or a piece of wood. This ensures the paint is flowing properly, preventing the need to press down hard on the queen.
The Capture Device: Securing the Queen Safely
A queen marking tube or a one-handed queen catcher is invaluable. These devices are designed to gently trap the queen against the comb and hold her securely without causing injury.
The plunger on a marking tube has a soft foam end, allowing you to carefully press the queen against the top screen for easy marking. This eliminates the risk of crushing her and is far safer than attempting to hold her with your fingers.
The International Queen Color Code
The color you use is not random. Beekeepers follow an international color code that identifies the year the queen was hatched or introduced. This allows you to know her age at a glance.
The code rotates through five colors based on the last digit of the year:
- White: Years ending in 1 or 6
- Yellow: Years ending in 2 or 7
- Red: Years ending in 3 or 8
- Green: Years ending in 4 or 9
- Blue: Years ending in 5 or 0
The Marking Process: A Step-by-Step Guide
With your tools ready, the process itself is straightforward but requires calm and deliberate movements.
Step 1: Find and Capture the Queen
On a calm, warm day, inspect your frames until you locate the queen. Once found, place the opening of your capture device over her and gently secure her. Avoid using excessive smoke, as this can cause the queen to run and hide.
Step 2: Apply the Mark with Precision
Carefully press the queen against the screen or mesh of your capture device. Uncap your tested pen and apply a small, single dot of paint to the center of her thorax.
The thorax is the hard, middle section of her body, directly between where her wings connect. This spot has no sensitive organs and is a stable surface for the mark.
Step 3: Release and Observe
After marking, release the pressure on the plunger and allow the queen to walk back onto the frame among the other bees. Do not force her out. Let her dry for a moment before gently placing the frame back in the hive.
Understanding the Critical Risks
Marking a queen is a simple concept with significant risks if done incorrectly. A mistake can lead to the loss of your queen and disrupt the entire colony.
The Danger of Misapplication
Never allow paint to get on the queen's eyes, antennae, wings, or leg joints. Paint in these areas can impair her sensory functions or movement, which can cause the workers to see her as damaged and reject or supersede her.
The Risk of Physical Harm
The queen's abdomen is soft and fragile. Applying too much pressure with your fingers or a marking tube can cause fatal internal injuries. The goal is to immobilize her, not to pin her down with force.
The Consequence of Poor Timing
You must only mark a mated, laying queen. Marking a virgin queen before she has taken her mating flights can interfere with the process. Furthermore, marking a newly introduced queen before the colony has fully accepted her can increase the chances of rejection.
Applying This to Your Hive
Your decision to mark a queen should be based on the situation and your comfort level.
- If you are a new beekeeper: Consider purchasing an already-marked queen for your first hive to observe her easily, and practice the marking motion on drones (male bees) to develop a feel for it.
- If you are marking a newly introduced queen: Wait at least a week after introduction and confirm you see a healthy brood pattern before you attempt to mark her.
- If you are marking a queen raised in your own hive: Ensure she has successfully mated and is laying eggs consistently before you proceed with marking.
A carefully marked queen provides immediate, invaluable information about the age and presence of the single most important bee in your colony.
Summary Table:
| Essential Tool | Purpose | Key Detail |
|---|---|---|
| Non-toxic Paint Pen | Apply a safe, visible mark | Water-based; test flow before use |
| Capture Device (Tube/Catcher) | Secure the queen gently | Prevents injury; allows precise marking |
| International Color Code | Identify queen's age by year | Follows a 5-year color rotation cycle |
Ready to mark your queen with confidence? HONESTBEE supplies professional beekeepers and equipment distributors with reliable, high-quality marking tools and hive management equipment. Our wholesale-focused operations ensure you get the durable, precise gear you need for successful apiary management. Contact HONESTBEE today to explore our catalog and elevate your beekeeping practice!
Visual Guide
Related Products
- One Hand Yellow Queen Marking Catcher Tube Cage Beekeeper Tool Accessory for Queen Bee
- Plastic Long Marker Device for Catching and Marking Bees Queen Bee Marking Tube and Cage
- Queen Bee Marking Pen UNI Medium Point for Queen and Bee Marking
- Queen Bee Marking Tube Cage Bottle Catcher Holder with Clear Plastic Plunger Marker
- Transparent Plastic Bee Catcher Queen Marker Tube Cage Beekeeping Tool Equipment
People Also Ask
- What tools are recommended for marking queen bees? Safely Identify Your Queen with the Right Kit
- What are the steps to mark a queen bee? A Safe, 3-Step Guide for Beekeepers
- Why are high-quality queen bee marking tools essential for pedigree tracking? Master Honey Bee Genetic Integrity
- What is the significance of using queen marking tools in apiary performance monitoring? Optimize Your Hive Productivity
- What tools are available to assist in safely marking a queen bee? Essential Gear for Professional Beekeepers