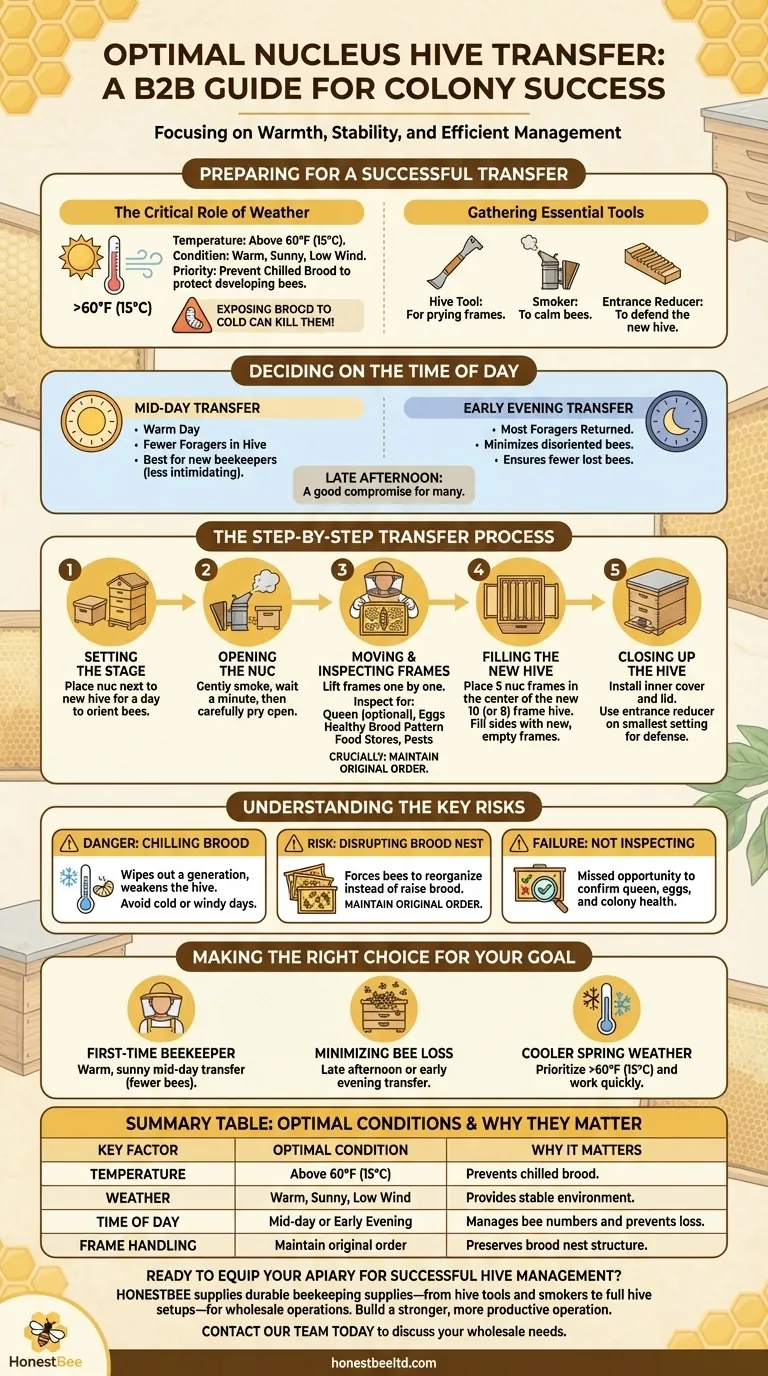
The optimal time to transfer a nucleus hive is on a warm, sunny day with low wind, when temperatures are consistently above 60°F (15°C). While the transfer can be done in the middle of the day or in the early evening, the absolute priority is maintaining a stable temperature to protect the colony's developing brood from getting chilled.
Your goal when transferring a nucleus hive is not just to move bees, but to transplant a living, breathing colony with minimal stress. The specific time of day is less critical than the environmental conditions and the care you take to maintain the hive's internal structure.
Preparing for a Successful Transfer
A successful transfer is about preparation. By choosing the right conditions and having your tools ready, you set the new colony up for a strong start.
The Critical Role of Weather
The single most important factor is temperature. Brood—the eggs, larvae, and pupae—must be kept at a consistent, warm temperature by the nurse bees.
Exposing frames of brood to temperatures below 60°F (15°C), even for a short time, can kill the developing bees. This is known as chilled brood, and it can severely set back the colony's growth. Always choose a calm, warm, and preferably sunny day for the transfer.
Deciding on the Time of Day
You will find two common recommendations for the time of day, each with its own logic.
A mid-day transfer is often easiest for the beekeeper. On a warm day, most forager bees will be out of the hive, meaning you have fewer bees in the box to manage, making the process less intimidating.
An early evening transfer ensures that nearly all the foragers have returned home for the night. This minimizes the number of bees that become disoriented and fail to find the new hive location.
For new beekeepers, a late afternoon transfer offers a good compromise, providing good light and fewer bees than in the evening, while still allowing most foragers to return.
Gathering Your Essential Tools
Having the right equipment on hand makes the process smooth and efficient.
- Hive Tool: This is non-negotiable for prying open the nuc and gently loosening the frames, which are often stuck together with propolis.
- Smoker: A few gentle puffs of smoke help calm the bees and mask alarm pheromones, making the colony more docile during the move.
- Entrance Reducer: This small block of wood reduces the size of the new hive's entrance, making it easier for the small colony to defend itself against robbers from other hives.
The Step-by-Step Transfer Process
Follow a calm, methodical process. Your goal is to move the frames efficiently while inspecting them for colony health.
Setting the Stage
If possible, place the nucleus box next to or on top of the new, empty hive body for a day before the transfer. This helps the bees orient to their new location.
Opening the Nuc
Gently puff smoke into the entrance of the nuc and wait a minute. Use your hive tool to pry the lid open and gently pry the frames apart to loosen them.
Moving and Inspecting the Frames
Carefully lift each frame out one by one. This is an excellent opportunity to conduct your first inspection. Look for the queen, eggs (tiny grains of rice), larvae, and capped brood.
Crucially, keep the frames in their original order. The queen lays eggs in a specific pattern, creating a "brood nest" that is surrounded by pollen and then honey. Transfer the frames into the center of the new, larger hive box, maintaining this exact sequence.
Filling the New Hive
Place the 5 frames from the nuc directly in the middle of the 10-frame (or 8-frame) hive body. Then, add new, empty frames to fill the remaining space on both sides.
Never leave large gaps inside the hive. The bees will fill any open space with irregular "brace comb," which makes future inspections difficult.
Closing Up the Hive
Once all frames are in place, put the inner cover and lid on the new hive. Install your entrance reducer on its smallest setting to give the colony a defensible entrance.
Understanding the Key Risks
Avoiding common mistakes is as important as following the correct steps. Your awareness of these risks is what ensures the colony thrives.
The Danger of Chilling the Brood
This risk cannot be overstated. A colony's future depends on its ability to raise new bees. A cold snap or a transfer on a cool, windy day can wipe out a generation of brood, weakening the hive for weeks.
Disrupting the Brood Nest
Bees are masters of efficiency. The brood nest is organized like a pantry: the queen and developing bees are in the warm center, with their food source (pollen and honey) stored in an arc around them.
Scrambling the frame order forces the bees to expend significant energy reorganizing their home instead of raising brood and foraging. Always maintain the original frame order.
Failing to Perform an Inspection
The transfer is your first and best chance to confirm you have a healthy, queenright colony. As you move each frame, look for:
- The Queen: Finding her is a bonus, but not essential.
- Eggs: Seeing eggs is definitive proof the queen was present and laying within the last 3 days.
- Healthy Brood Pattern: Look for frames with a solid, compact pattern of capped brood.
- Food Stores: Identify cells filled with pollen (bee bread) and honey.
- Pests: Quickly check for signs of pests like small hive beetles.
Making the Right Choice for Your Goal
Ultimately, the "best" time depends on balancing bee biology with your own comfort level as a beekeeper.
- If you are a first-time beekeeper: A warm, sunny mid-day transfer is often best, as fewer bees in the hive make the process feel more manageable.
- If your primary goal is minimizing bee loss: A late afternoon or early evening transfer ensures nearly all bees are moved to the new location without getting lost.
- If you are transferring in cooler spring weather: Prioritize a day where temperatures will be well above 60°F (15°C) and work quickly and efficiently to prevent chilling the brood.
By focusing on the colony's need for warmth and stability, you can ensure a successful transfer and a thriving new hive.
Summary Table:
| Key Factor | Optimal Condition | Why It Matters |
|---|---|---|
| Temperature | Above 60°F (15°C) | Prevents chilled brood, which can kill developing bees and set back the colony. |
| Weather | Warm, sunny, low wind | Provides a stable environment, minimizing stress on the colony during the move. |
| Time of Day | Mid-day or Early Evening | Mid-day: Fewer foragers in the hive. Evening: All foragers have returned. |
| Frame Handling | Maintain original order | Preserves the brood nest structure, saving the colony energy and promoting growth. |
Ready to equip your apiary for successful hive management?
A smooth nucleus hive transfer is just the beginning. For commercial beekeepers and distributors, having reliable, high-quality equipment is fundamental to operational success and colony health.
HONESTBEE supplies the durable beekeeping supplies and equipment you need—from hive tools and smokers to full hive setups—through our wholesale-focused operations. We help you build a stronger, more productive operation.
Contact our team today to discuss your wholesale needs and ensure your next season is your best yet.
Visual Guide
Related Products
- 5 Frame Wooden Nuc Box for Beekeeping
- Automatic Heat Preservation 6 Frame Pro Nuc Box for Honey Bee Queen Mating
- 4 Frame Plastic Nuc Boxes for Beekeeping Bee Nuc Box
- Steel Round Disc Entrance Reducer for Flexzion Bee Hive Nuc Box Gate
- Styrofoam Mini Mating Nuc Box with Frames Feeder Styrofoam Bee Hives 3 Frame Nuc Box
People Also Ask
- How are nuc boxes used in queen rearing? The Essential Tool for Reliable Queen Mating
- What are the options for adding frames to a nuc after taking two frames from the parent colony?
- What is the most common type of standard nuc? The 5-Frame Nuc Explained
- What built-in detail do many 5-frame nuc boxes have on the lid? A Guide to Efficient Hive Top Feeding
- What is the typical composition of frames in a nuc? A 5-Frame Blueprint for a Thriving Hive