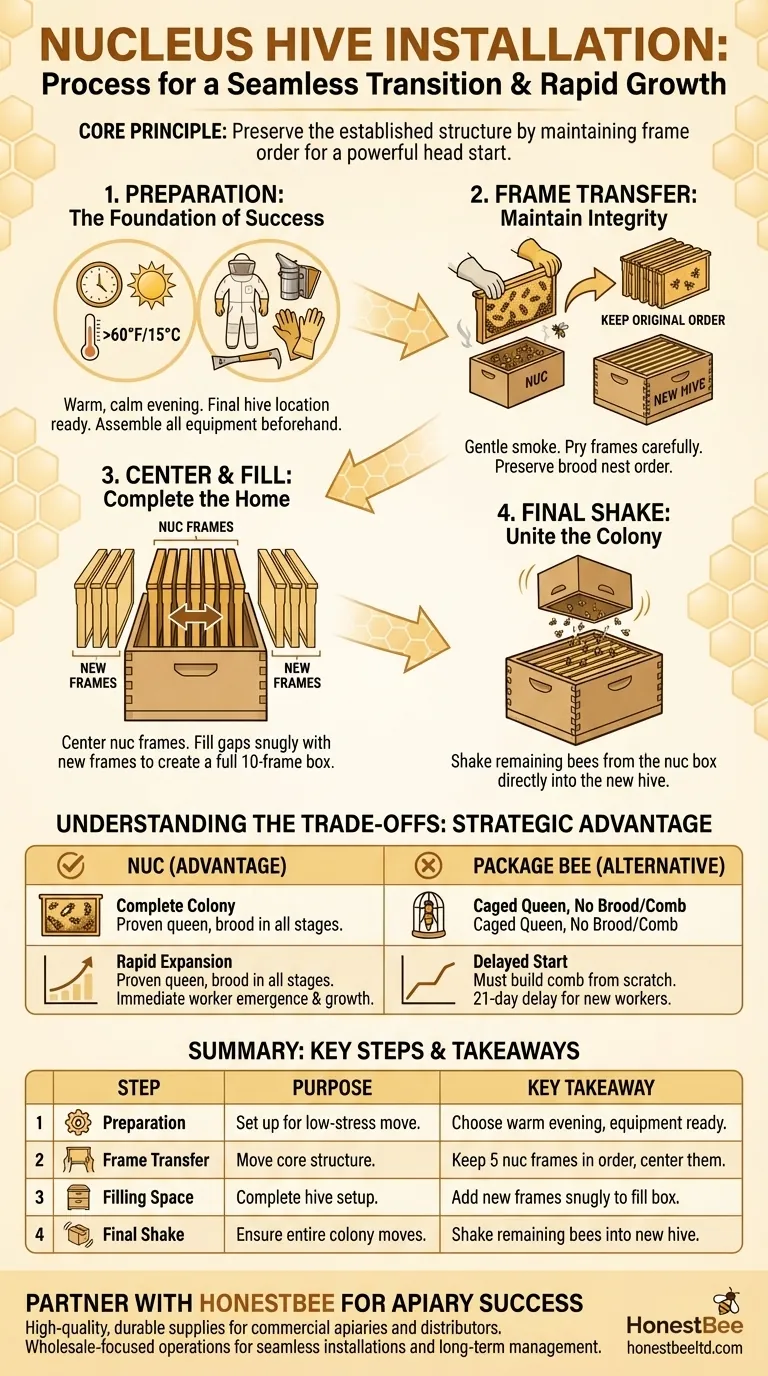
To install a nucleus hive, you must carefully transfer the five frames of bees, brood, and food from the small nuc box into a full-sized hive body. The key is to maintain the original order of the frames, placing them in the center of the new hive, and then filling the remaining space with new frames. This process ensures the colony's structure remains intact, minimizing stress and setting them up for successful expansion.
The core principle of a successful nuc installation is not just moving bees, but preserving the integrity of their established home. By maintaining the brood nest's original frame order and choosing the right time for the move, you give the colony a seamless transition and a powerful head start.
Step 1: Preparation for a Seamless Transition
Proper preparation is the most critical factor in a low-stress hive installation. Getting your timing, location, and equipment ready beforehand allows you to work calmly and efficiently.
Choose the Right Time and Weather
The ideal time to install your nuc is on a warm, calm day, preferably in the late afternoon or early evening.
Temperatures should be above 60°F (15°C) to prevent chilling the vulnerable brood.
An evening installation ensures most forager bees are back in the nuc, meaning more of the colony moves with the hive and has the entire night to settle in before orienting to their new home the next morning.
Prepare Your Hive Location
Select a site that receives ample morning sunlight but offers some protection from harsh afternoon sun and strong winds.
Ensure the area is level, easily accessible for your future inspections, and clear of obstructions or potential predators.
Assemble Your Equipment
Before you retrieve your nuc, have all your equipment set up and ready at the final hive location.
You will need a complete hive: a bottom board, a hive body (brood box), ten frames (with foundation or drawn comb), an inner cover, and an outer cover.
You will also need your personal protective gear, including a beekeeper suit or jacket, veil, and gloves, as well as a hive tool and a smoker.
Step 2: The Frame-by-Frame Transfer
This is the central task. Your goal is to move the colony's core—the five frames from the nuc—into the new hive with minimal disruption.
Open the Nucleus Hive
After putting on your protective gear, apply a few gentle puffs of smoke to the entrance of the nuc box to calm the bees.
Use your hive tool to carefully pry open the lid and gently loosen the frames, which are often stuck together with propolis.
Maintain the Brood Nest's Integrity
The arrangement of the frames is deliberate. The queen lays eggs in the center, creating a brood nest, which is surrounded by frames of pollen and honey. You must preserve this order.
Carefully lift the first frame from the nuc, inspect it briefly, and place it in the new hive body, pushing it to one side.
Center the Nuc Frames
Transfer the remaining four frames, one by one, into the new hive. Be sure to keep them in their original sequence.
Once all five nuc frames are in the new hive, slide them together so they are centered in the middle of the box. This placement helps the bees maintain the temperature of the crucial brood nest.
Fill the Remaining Space
With the five nuc frames in the center, you will have empty space on either side.
Fill these gaps with your new frames, placing them snugly against the nuc frames. A full hive body should contain ten frames with no extra space.
Move Every Last Bee
Some bees, and potentially the queen, will remain in the nuc box.
To ensure everyone moves to the new home, hold the open nuc box upside down over the new hive and give it a firm shake. The remaining bees will fall gently onto the top of the frames.
Understanding the Trade-offs
Choosing a nucleus hive is a strategic decision that gives you a distinct advantage over starting with a package of bees.
The Advantage of a Nuc
A nuc is a complete, functioning colony in miniature. It comes with a proven, laying queen and brood in all stages of development.
This means new worker bees will begin emerging almost immediately, allowing the colony's population to expand rapidly.
The Package Bee Alternative
Package bees are essentially a swarm in a box with a caged queen. They have no comb, brood, or food stores.
After installation, the colony must build comb from scratch and wait 21 days for the queen's first eggs to develop and emerge as adult workers. This delayed start can be a significant setback.
Making the Right Choice for Your Goal
Your approach to installation and management should align with your beekeeping objectives.
- If your primary focus is rapid colony buildup: A nuc is the superior choice, as the existing brood provides an immediate and continuous supply of new workers.
- If your primary focus is minimizing stress on the bees: Perform the installation on a warm evening, work gently, and meticulously maintain the original frame order to preserve the brood nest.
Ultimately, a successful installation is about providing the bees with a stable foundation from which they can thrive.
Summary Table:
| Key Step | Purpose | Key Takeaway |
|---|---|---|
| Preparation | Set up for a low-stress move. | Choose a warm, calm evening and have all equipment ready at the final hive location. |
| Frame Transfer | Move the colony's core structure. | Keep the 5 nuc frames in their original order and center them in the new hive body. |
| Filling Space | Complete the hive setup. | Add new frames snugly on either side of the centered nuc frames to fill the 10-frame box. |
| Final Shake | Ensure the entire colony moves. | Shake remaining bees from the nuc box directly into the new hive to unite the colony. |
Ready to build a stronger, more productive apiary? A successful start is critical for colony health and honey production. HONESTBEE supplies commercial apiaries and beekeeping equipment distributors with the high-quality, durable supplies needed for seamless hive installations and long-term management. From hive bodies and frames to protective gear and tools, our wholesale-focused operations ensure you get the reliable equipment your business depends on.
Contact HONESTBEE today to discuss your wholesale needs and equip your operation for success.
Visual Guide
Related Products
- 5 Frame Wooden Nuc Box for Beekeeping
- Automatic Heat Preservation 6 Frame Pro Nuc Box for Honey Bee Queen Mating
- 4 Frame Plastic Nuc Boxes for Beekeeping Bee Nuc Box
- Steel Round Disc Entrance Reducer for Flexzion Bee Hive Nuc Box Gate
- Styrofoam Mini Mating Nuc Box with Frames Feeder Styrofoam Bee Hives 3 Frame Nuc Box
People Also Ask
- What are the options for adding frames to a nuc after taking two frames from the parent colony?
- What is the primary function of five-frame nuclei boxes? Master Early Colony Establishment for Stronger Hives
- What frames should be moved into the queenless hive when requeening with a nuc? Ensure a Successful Queen Introduction
- What is the procedure for moving bees from a 5-frame nuc to a 10-frame hive? 6 Steps for a Successful Colony Transfer
- What is the most common type of standard nuc? The 5-Frame Nuc Explained