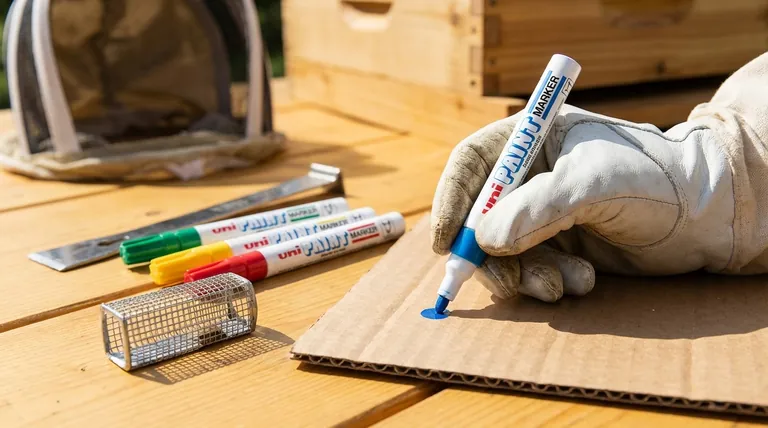
To prime a paint pen for marking a queen bee, you must first shake it well to mix the paint. Next, press the nib firmly onto a test surface, like paper or cardboard, causing it to retract into the pen's body. Repeat this pumping action until the nib becomes fully saturated with paint, then make a few test marks to ensure a smooth, consistent flow before approaching the queen.
The goal is not just to prime a pen, but to prepare for a safe, quick, and effective marking procedure. Proper pen preparation is the first critical step to ensure you can apply a clean, small dot of paint without harming the queen or causing unnecessary disruption to the hive.
Why We Mark Queens and What You Need
Marking a queen bee is a fundamental practice for efficient hive management. It allows a beekeeper to quickly identify her during inspections, verify her presence, and assess her health and laying patterns.
### Choosing the Right Pen
The most critical tool is a high-quality, non-toxic marking pen. These pens should be highly pigmented to create a visible mark.
For new beekeepers, water-based art pens are often recommended as a safe and effective option.
### Essential Tools for Securing the Queen
While not strictly required, using a tool to gently restrain the queen makes the process much easier and safer.
A queen marking tube is a clear plastic cylinder with a soft foam plunger. You can guide the queen inside and use the plunger to gently press her against a mesh screen for easy marking.
A queen marker cage is a small enclosure that can be pressed into the comb directly over the queen, trapping her temporarily against the wax so you can apply the mark.
The Marking Process: A Step-by-Step Guide
A calm, methodical approach is key to success. Ensure you have all your tools ready before you find and capture the queen.
### Step 1: Prime the Pen
As established, this initial step is non-negotiable for a clean mark.
First, shake the pen vigorously to ensure the paint is properly mixed.
Then, pump the nib on a separate surface until it is fully saturated. Test the flow to be certain it's ready before you bring it near the queen.
### Step 2: Secure the Queen
There are two primary methods for holding the queen still.
One method is to use a marking tube or cage to gently restrain her. This is often the safest option, especially for less experienced beekeepers.
A more advanced method is to gently pick the queen up between your thumb and index finger to mark her directly.
### Step 3: Apply a Small, Precise Mark
The goal is a small, clear dot that is easy to see but does not impede the queen's movement or function.
Apply a small dab of paint, approximately 2-3 mm across, to her thorax (the middle section of her body).
### Step 4: Release and Monitor
Once the mark is applied, carefully release the queen back onto the frame or into the hive.
Allow her a moment to reorient herself and observe as she begins to move among the other bees.
Common Pitfalls to Avoid
Success lies in avoiding common mistakes that can stress or harm the queen. Being aware of these potential issues beforehand is crucial.
### Using Too Much Paint
A large, messy blob of paint can get on the queen's wings or antennae, harming her. A primed pen with good flow prevents this by allowing for a small, controlled dot.
### An Unprepared Pen
Failing to prime the pen properly will result in a dry, faint mark or, worse, a sudden gush of paint when you finally get it flowing. This can startle you and cause you to harm the queen.
### Rushing the Process
Nervousness can lead to rough handling. Work calmly and deliberately, using a marking cage or tube if you are not confident handling the queen directly.
Applying This to Your Hive
Your experience level and confidence should guide your approach. The ultimate goal is always the safety of the queen.
- If your primary focus is safety and you are a new beekeeper: Use a queen marking tube or cage to eliminate the risk of dropping or injuring the queen by hand.
- If your primary focus is efficiency and you are an experienced beekeeper: Marking the queen directly by hand or on the frame can be faster, but it demands a steady hand and confidence.
Properly marking your queen transforms hive inspections from a stressful search into a quick, confident assessment.
Summary Table:
| Step | Action | Key Detail |
|---|---|---|
| 1 | Shake the Pen | Mix the paint thoroughly by shaking vigorously. |
| 2 | Pump the Nib | Press nib on test surface until fully saturated with paint. |
| 3 | Test the Flow | Make test marks to ensure a smooth, consistent ink flow. |
Ready to mark your queens with confidence?
As a beekeeper, your queen's safety and your hive's efficiency are paramount. Properly primed, high-quality marking pens are essential for a successful, stress-free procedure.
HONESTBEE supplies commercial apiaries and beekeeping equipment distributors with the reliable, non-toxic marking pens and tools you need. Our wholesale-focused operations ensure you get durable, highly-pigmented pens and secure handling tools like marking tubes and cages, helping you protect your most valuable asset.
Ensure every mark is perfect. Contact our expert team today to discuss your beekeeping supply needs!
Visual Guide

Related Products
- Queen Bee Marking Pen POSCA Queen Marking Pens for Beekeeping Bee Markers
- Queen Bee Marking Pen UNI Medium Point for Queen and Bee Marking
- One Hand Yellow Queen Marking Catcher Tube Cage Beekeeper Tool Accessory for Queen Bee
- Plastic Long Marker Device for Catching and Marking Bees Queen Bee Marking Tube and Cage
- Queen Bee Marking Tube Cage Bottle Catcher Holder with Clear Plastic Plunger Marker
People Also Ask
- What role do specialized marking pens and color-coding systems play in honeybee tracking? Enhance Research Precision
- What are the primary benefits of marking a queen bee in a commercial apiary? Boost Efficiency & Management
- What type of markers are commonly used for marking Queen bees? Choose the Safe, Non-Toxic Standard
- Why are specialized marking pens used for stingless bee queens? Essential Tools for Large-Scale Breeding Success
- How should a new paint pen be primed before marking a queen bee? Essential Tips for Safe & Clear Markings


