When you discover signs of excessive moisture or mold in a hive, your first step is to improve ventilation by removing the entrance reducer. On the next warm, sunny day, you must open the hive, clean out any dead bees, and efficiently scrape the moldy sections from the comb and hive body to minimize stress on the colony.
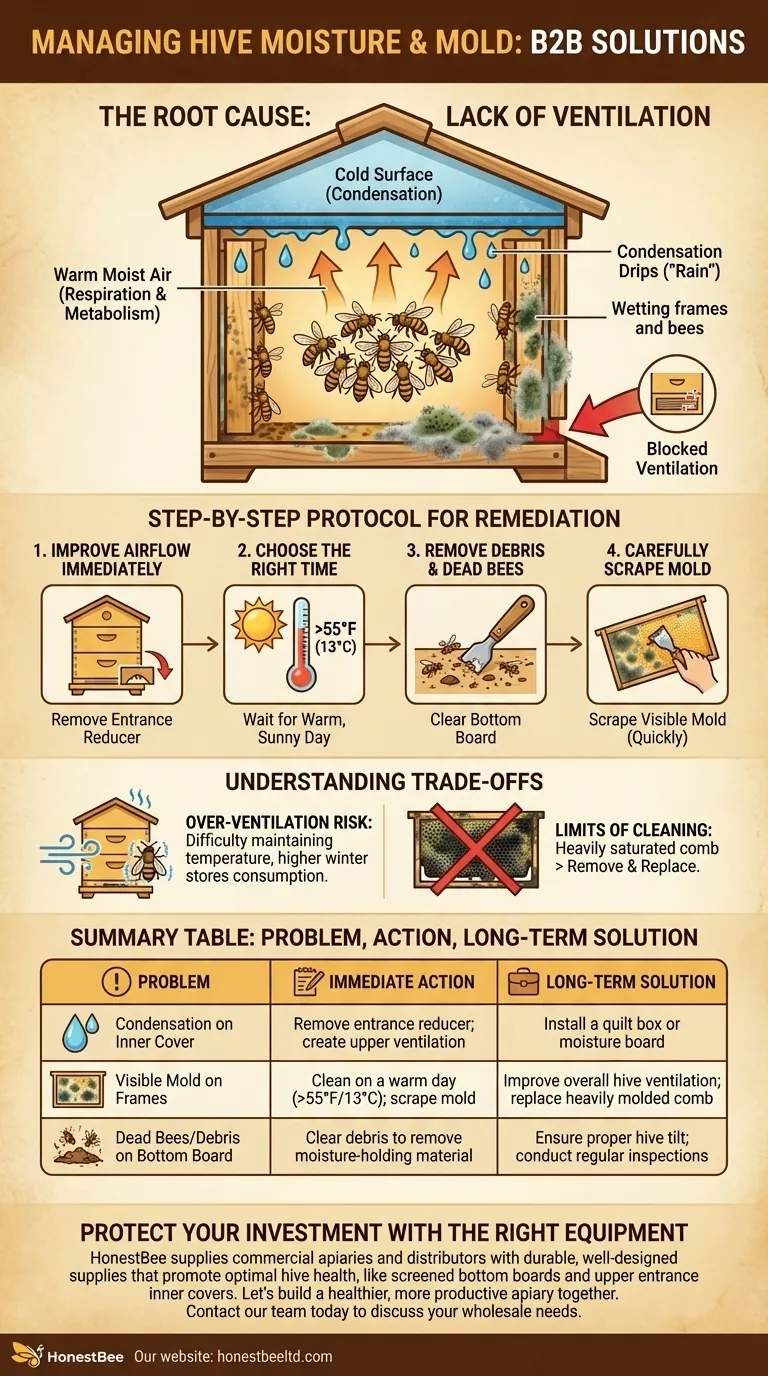
The presence of mold is not the core problem; it is a symptom. The true issue is a lack of adequate ventilation, which traps moisture inside the hive and creates the damp conditions necessary for mold to thrive.
Diagnosing the Root Cause: Why Moisture is the Real Enemy
A beehive is a living system that generates a significant amount of warm, moist air. Understanding how this moisture is created and where it goes is the key to preventing mold and ensuring your colony's health.
Bee Respiration and Condensation
Bees, like all living creatures, release warm, moist air as they breathe and metabolize honey. This warm, humid air naturally rises to the top of the hive.
The Cold Surface Problem
During cooler weather, the inner cover or hive lid is often the coldest surface inside the hive. When the warm, moist air from the cluster hits this cold surface, the water vapor condenses into liquid droplets, much like a cold glass of water on a summer day.
The 'Rain' Effect Inside the Hive
This condensation can become so significant that it drips back down onto the cluster of bees. This "rain" chills the bees, forcing them to consume more resources to stay warm, and soaks the frames, creating the perfect breeding ground for mold.
A Step-by-Step Protocol for Remediation
Once you've identified a moisture problem, you need to act methodically. The goal is to clean the hive while causing the least possible disruption to the colony.
Step 1: Improve Immediate Airflow
Your very first action should be to remove the entrance reducer. This immediately unblocks the hive's primary ventilation point, allowing damp air to escape and fresh, dry air to enter.
Step 2: Choose the Right Time to Intervene
Wait for a warm, sunny day, ideally above 55°F (13°C), to perform a full cleaning. Opening the hive in cold weather can severely chill the brood and stress the colony, doing more harm than good.
Step 3: Remove Debris and Dead Bees
Use your hive tool to clear the bottom board of any accumulated dead bees and debris. This material acts like a sponge, holding moisture and providing a food source for mold spores.
Step 4: Carefully Scrape Away Mold
Gently scrape any visible mold off the wooden frames and inner walls of the hive. Work quickly and deliberately. For honeycomb that is lightly affected, you can scrape the surface mold off, and the bees will often clean the rest.
Understanding the Trade-offs
Managing hive moisture is a balancing act. Actions taken to solve one problem can sometimes introduce another if not done carefully.
The Risk of Over-Ventilation
While essential, too much ventilation in cold climates can make it difficult for the bees to maintain the cluster's temperature. This forces them to burn through winter stores more quickly. The goal is airflow, not a wind tunnel.
The Limits of Cleaning
Scraping mold is a treatment, not a cure. If a frame of comb is black and heavily saturated with mold, it's often better to remove and replace it entirely. Heavily molded comb can be unhealthy for the bees and may not be effectively cleaned.
Making the Right Choice for Your Colony
Your response should be proportional to the problem. By focusing on ventilation, you can solve the root cause and prevent future issues.
- If your primary focus is a small amount of condensation: Immediately ensure you have both a lower entrance and a small upper entrance or notched inner cover to allow moist air to escape.
- If your primary focus is active mold growth: Perform a full cleaning on the next suitable day and strongly consider adding a quilt box to absorb and wick away moisture during the colder months.
Proactive ventilation management is the single most effective strategy for ensuring a dry, healthy, and mold-free hive.
Summary Table:
| Problem | Immediate Action | Long-Term Solution |
|---|---|---|
| Condensation on inner cover | Remove entrance reducer; create upper ventilation. | Install a quilt box or moisture board. |
| Visible mold on frames/hive body | Clean on a warm day (>55°F/13°C); scrape mold. | Improve overall hive ventilation; replace heavily molded comb. |
| Dead bees/debris on bottom board | Clear debris to remove moisture-holding material. | Ensure proper hive tilt for drainage; conduct regular inspections. |
Protect your investment and ensure your apiary's success with the right equipment.
Moisture problems are often a symptom of improper hive setup or ventilation. At HONESTBEE, we supply commercial apiaries and beekeeping equipment distributors with durable, well-designed supplies that promote optimal hive health. From screened bottom boards to inner covers with upper entrances, our wholesale-focused operations provide the reliable equipment you need to prevent moisture issues before they start.
Let's build a healthier, more productive apiary together. Contact our team today to discuss your wholesale needs.
Visual Guide