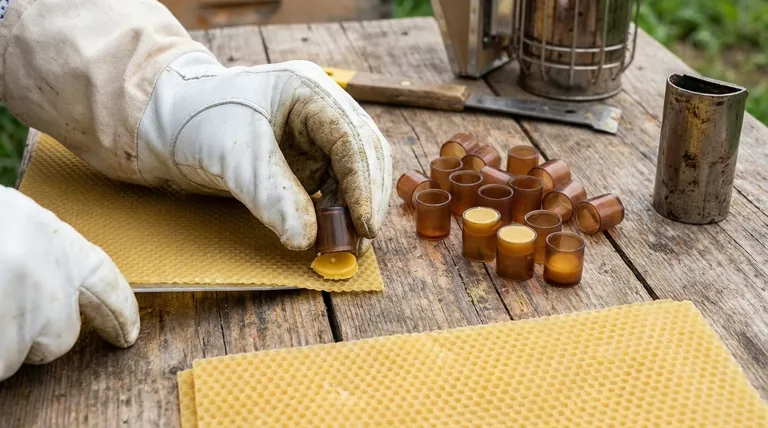
To prepare cell plugs for egg laying, you must create a beeswax base inside the tip of each hollow plug. This is achieved by pressing the open end of the plug firmly into a sheet of beeswax foundation and twisting it. This motion embeds a small disc of wax into the plug, creating a surface that is essential for encouraging the queen to deposit an egg.
The success of any queen rearing system that uses cell plugs depends on mimicking a natural environment. By embedding a wax base into each artificial plug, you provide the texture and scent the queen requires to accept the cell and lay an egg, thereby initiating the entire queen-rearing process.
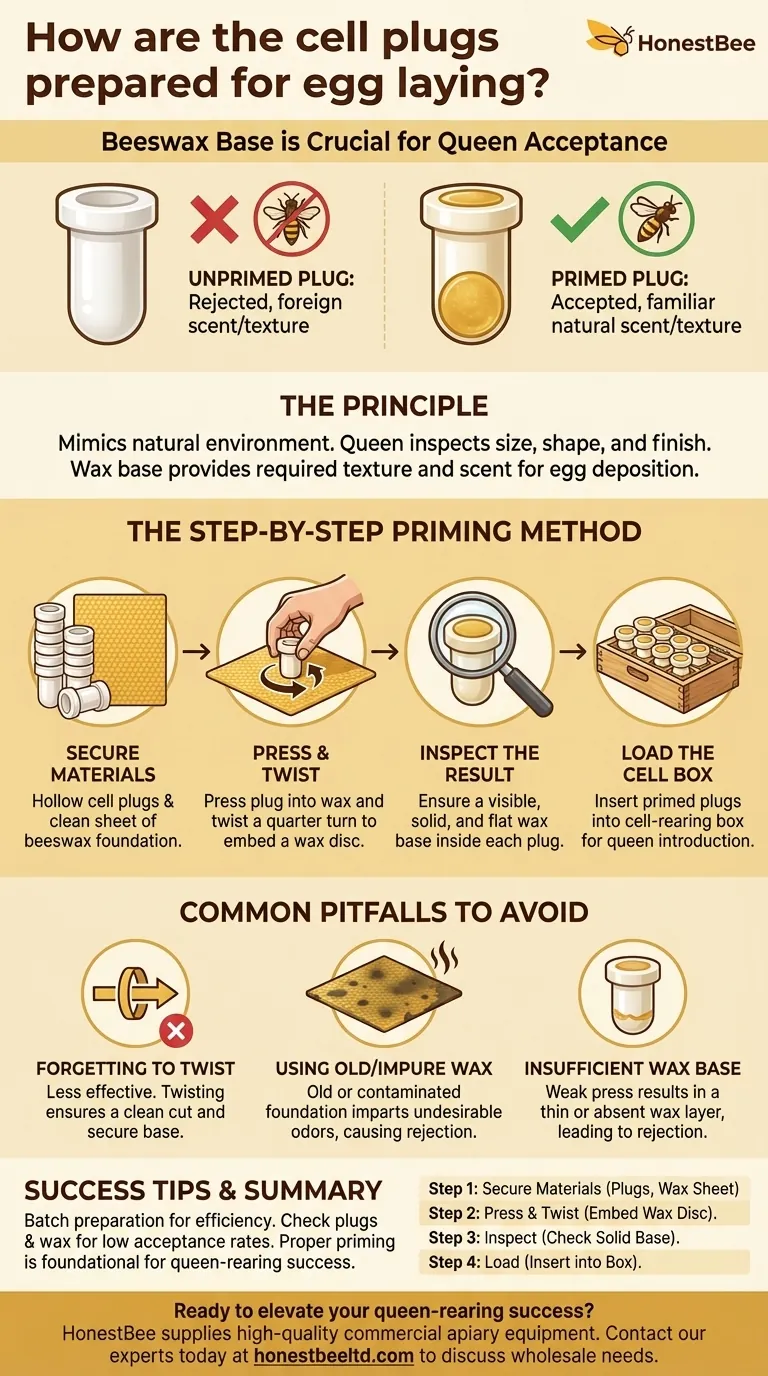
The Principle: Why a Wax Base is Crucial
A queen bee is highly selective about where she lays her eggs. Simply providing an empty plastic cup will almost always result in her rejection. Priming the plug with wax is a non-negotiable step that addresses the queen's biological instincts.
The Queen's Inspection Process
Before laying, a queen inspects a cell with her antennae, checking its size, shape, and finish. An unprimed plastic plug feels and smells foreign. The beeswax base provides a familiar and acceptable surface that signals the cell is properly constructed and ready for an egg.
Mimicking Natural Cell Preparation
In a natural hive, worker bees meticulously build and polish wax cells before the queen uses them. The act of priming a cell plug is a way for the beekeeper to simulate this final, critical step, effectively "tricking" the queen into believing the cell is hive-ready.
The Step-by-Step Priming Method
The process is simple and repetitive, making it easy to prepare a large number of plugs in one session. The goal is consistency.
Step 1: Secure Your Materials
You will need your hollow cell plugs and a clean sheet of beeswax foundation. The foundation provides the ideal source of pure beeswax for this task.
Step 2: Master the "Press and Twist"
Place the sheet of foundation on a flat, firm surface. Take a single cell plug and press the hollow end down into the wax.
As you press, twist the plug about a quarter turn. This twisting motion is what cleanly shears a small disc of wax from the foundation and embeds it securely in the base of the plug.
Step 3: Inspect the Result
A properly primed plug will have a visible, solid wax base at the bottom. The wax should be seated flatly, creating a floor inside the plug. If the wax is loose or absent, the queen will likely reject it.
Step 4: Load the Cell Box
Once primed, the plugs are inserted into the back of your cell-rearing box (a common system holds 90 plugs). With all plugs in place, the rear cover is secured, and the box is ready to be introduced to the queen.
Common Pitfalls to Avoid
While the process is straightforward, a few common mistakes can lead to low acceptance rates and wasted effort.
Forgetting to Twist
Simply pressing the plug into the wax without twisting is less effective. The shearing action from the twist is what ensures a clean cut and a securely seated wax base.
Using Old or Impure Wax
Bees are sensitive to scents. Using old, dark, or contaminated foundation may impart an undesirable odor to the plug, causing the queen to pass it over. Always use fresh, clean beeswax foundation for the best results.
Insufficient Wax Base
If you don't press firmly enough, the resulting wax layer may be too thin or incomplete. This can also lead to rejection. Ensure you can see a distinct, solid base in every plug you prepare.
Making the Right Choice for Your Goal
Your objective is to maximize the number of eggs laid in your cell plugs. Success is a direct result of meticulous preparation.
- If your primary focus is efficiency: Prepare all your cell plugs in a single batch session. This ensures consistency and makes the process faster than priming them one by one as needed.
- If you are experiencing low acceptance rates: First, inspect your unused plugs to confirm a solid wax base is present in each one. Second, consider switching to a newer, cleaner sheet of foundation to rule out scent contamination.
Properly priming your cell plugs is the small but foundational step that ensures a predictable and successful start to your queen-rearing efforts.
Summary Table:
| Step | Action | Key Detail |
|---|---|---|
| 1 | Secure Materials | Use hollow cell plugs and a clean sheet of beeswax foundation. |
| 2 | Press & Twist | Firmly press the plug into the wax and twist a quarter turn to embed a disc. |
| 3 | Inspect | Check for a solid, flat wax base at the bottom of each plug. |
| 4 | Load | Insert the primed plugs into your cell-rearing box for introduction to the queen. |
Ready to elevate your queen-rearing success?
Proper equipment is fundamental to a thriving apiary. At HONESTBEE, we supply commercial apiaries and beekeeping equipment distributors with high-quality, wholesale-focused supplies. From durable cell plugs to pristine beeswax foundation, our products are designed to meet the rigorous demands of professional beekeeping.
Contact our experts today to discuss your specific needs and discover how our reliable equipment can support your operation's growth and efficiency.
Visual Guide
Related Products
- Premium Nicot Style Cell Bar Holder and Queen Cell Cup Holder System
- JZBZ Type Wide Base Plastic Queen Cell Cups for Base Mounting and Queen Rearing
- JZBZ Style Push-In Cell Protector for Professional Queen Rearing Kits
- JZBZ Push-In Queen Cell Cups for Beekeeping
- Brown Nicot Queen Cell Cups for Breeding Queen Bees Beekeeping
People Also Ask
- How does the material of queen cell cups affect royal jelly production yield? Optimize Your Harvest Efficiency
- What environmental conditions should be avoided during cell transport? Protect Your Queen Cells from Harm
- What role do specialized queen rearing tools play in developing mite-resistant honeybee stock? Master Genetic Selection
- What should be done before inserting freshly grafted or started cells? Ensure High Queen Acceptance Rates
- What roles do specialized queen cell cups play in royal jelly production? Optimize Your Hive's Secretion and Yield


