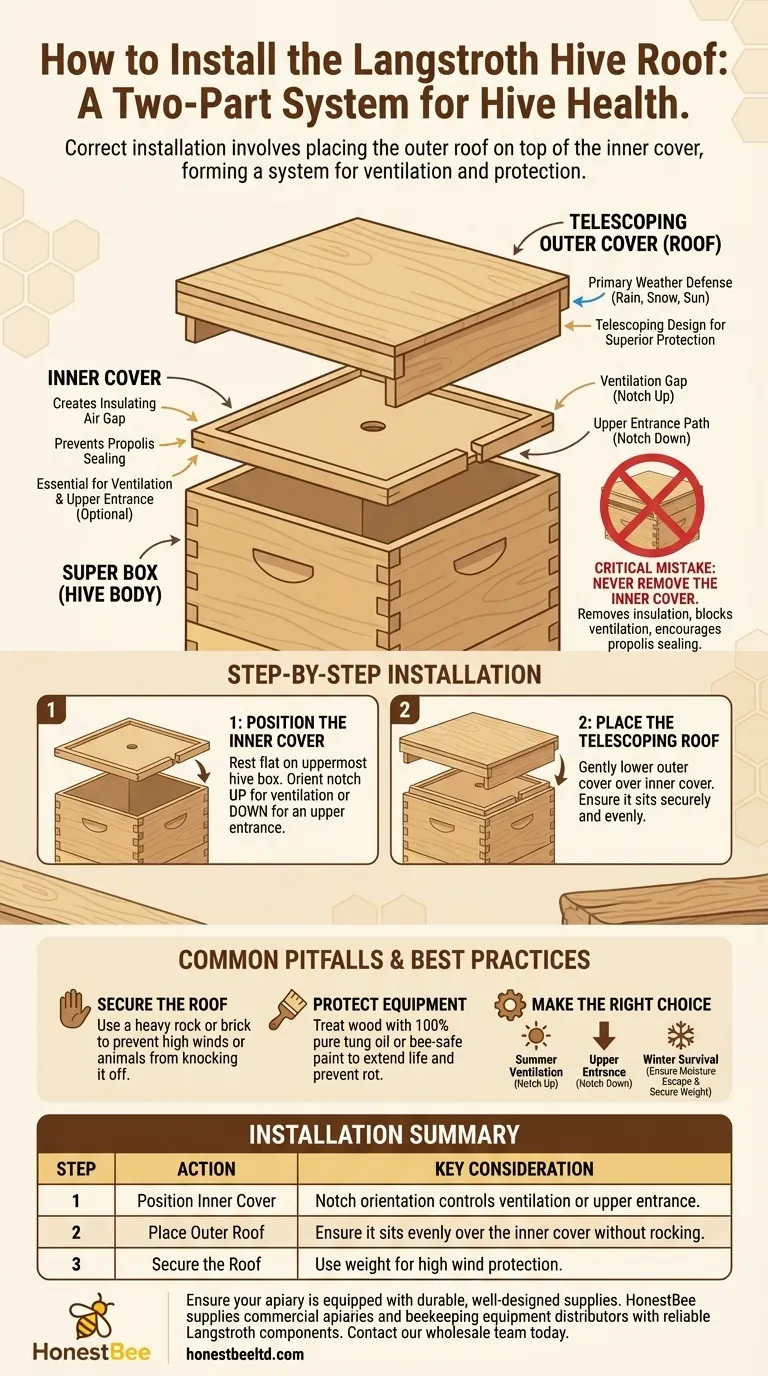
To properly install a Langstroth hive roof, you do not remove the inner cover. Instead, you ensure the inner cover is correctly positioned on top of the uppermost hive box (the super), and then you place the telescoping outer cover, or "roof," directly on top of the inner cover. This two-part system is fundamental to the hive's health, providing both ventilation and protection from the elements.
The hive roof is not just a lid; it is the final component of a system designed to manage climate and access. Proper installation requires understanding its relationship with the inner cover to ensure the colony's well-being.
The Purpose of the Hive's Two-Part Cover System
A common point of confusion is the relationship between the inner cover and the outer roof. They are not interchangeable; they work together as a complete system.
The Critical Role of the Inner Cover
The inner cover is a thin wooden board that sits directly on top of the highest box in your hive. It serves several crucial functions.
First, it creates a layer of dead air space, which provides insulation against both heat and cold.
Second, it prevents the bees from sealing the outer roof to the hive body with propolis, which would make hive inspections incredibly difficult.
Finally, the inner cover typically has a notched rim or a central hole that is essential for hive ventilation and providing an optional upper entrance for the bees.
The Function of the Outer Cover (Roof)
The outer cover, often called a telescoping roof, is the hive's primary defense against the weather.
Its job is to shield the colony from rain, snow, and direct sun. The "telescoping" design means its sides extend down over the top edge of the hive body, offering superior protection compared to a simple flat lid.
Step-by-Step Installation for a Healthy Hive
Correct installation is simple but must be done in the proper sequence to benefit the bees.
Step 1: Position the Inner Cover
Before the roof goes on, verify the inner cover is in place. It should rest flat on the top edges of the uppermost hive box. The orientation of the notched rim is a key decision: placing it "up" creates a small gap for ventilation under the roof, while placing it "down" can create a small upper entrance for the bees.
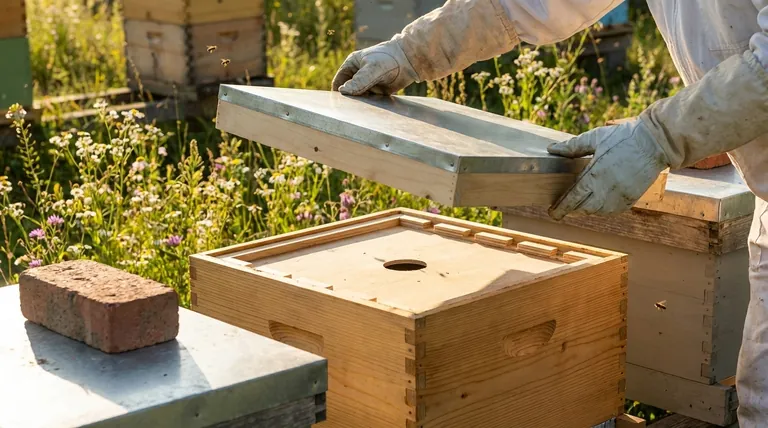
Step 2: Place the Telescoping Roof
Gently lower the outer cover over the inner cover. Ensure it is seated securely, with its sides fitting over the top of the hive body. The roof should rest evenly and without rocking.
Common Pitfalls and Best Practices
Simply placing the roof is easy, but overlooking key details can negatively impact your colony. Understanding the trade-offs is the mark of an experienced beekeeper.
Never Remove the Inner Cover
The most critical mistake is removing the inner cover and placing the roof directly on the hive box. This destroys the insulating air gap, eliminates crucial ventilation pathways, and encourages the bees to glue the roof down, making future inspections a disruptive and damaging process for the colony.
Protecting Your Equipment
While the roof is designed to be durable, a little maintenance goes a long way. Treating the wood with 100% pure tung oil or a bee-safe exterior paint protects it from water damage and sun exposure, significantly extending its life. Leaving the wood bare will eventually lead to rot and decay.
Securing the Roof in High Winds
A standard telescoping roof sits on the hive but is not latched. In areas prone to high winds or when dealing with curious animals, the roof can be easily knocked off, exposing the colony. It is a universal best practice to place a heavy rock or a brick on top of the roof to keep it secure.
Making the Right Choice for Your Goal
Your roof configuration can be adjusted slightly based on your management goals and the time of year.
- If your primary focus is summer ventilation: Position the inner cover with the notch facing up. This creates a small gap that allows hot, moist air to escape from under the roof.
- If your primary focus is creating an upper entrance: Position the inner cover with the notch facing down. This gives foraging bees a path to enter and exit at the top of the hive, reducing congestion at the main entrance.
- If your primary focus is winter survival: Ensure the inner cover provides an escape path for moisture, and always use a weight to secure the roof against winter storms.
Understanding how the components of your hive work together empowers you to make proactive decisions for the health of your colony.
Summary Table:
| Step | Action | Key Consideration |
|---|---|---|
| 1 | Position the Inner Cover | Place flat on the top super. Notch orientation (up/down) controls ventilation or upper entrance. |
| 2 | Place the Outer Roof | Lower the telescoping cover securely over the inner cover. Ensure it sits evenly without rocking. |
| 3 | Secure the Roof | Use a brick or heavy rock to prevent it from being blown off in high winds. |
Ensure your apiary is equipped with durable, well-designed supplies. Proper installation starts with quality equipment. HONESTBEE supplies commercial apiaries and beekeeping equipment distributors with the reliable Langstroth components needed for thriving colonies. Contact our wholesale team today to discuss your hive equipment needs.
Visual Guide
Related Products
- Telescopic Beehive Outer Cover Lid Roof with Galvanised Sheeting for Langstroth Hive and Beehive Outer Cover
- Long Langstroth Style Horizontal Top Bar Hive for Wholesale
- Solid Bottom Board Australian Pine Wood Langstroth Bottom Board for Wholesale
- Langstroth Solid Bottom Board for Beekeeping
- Langstroth Honey Bee Box Hive Boxes for Different Depths
People Also Ask
- What is a telescoping outer cover for a beehive? Protect Your Colony with Superior Weatherproofing
- What are the guidelines for painting beehive outer covers and box edges? Expert Tips for Hive Preservation
- What is the function of a telescoping beehive cover? Essential Hive Climate Control & Protection
- What is the purpose of an outer cover on a beehive? Essential Weatherproofing for Thriving Colonies
- What is the function of an outer cover on a beehive? Protect Your Colony with Advanced Weatherproofing