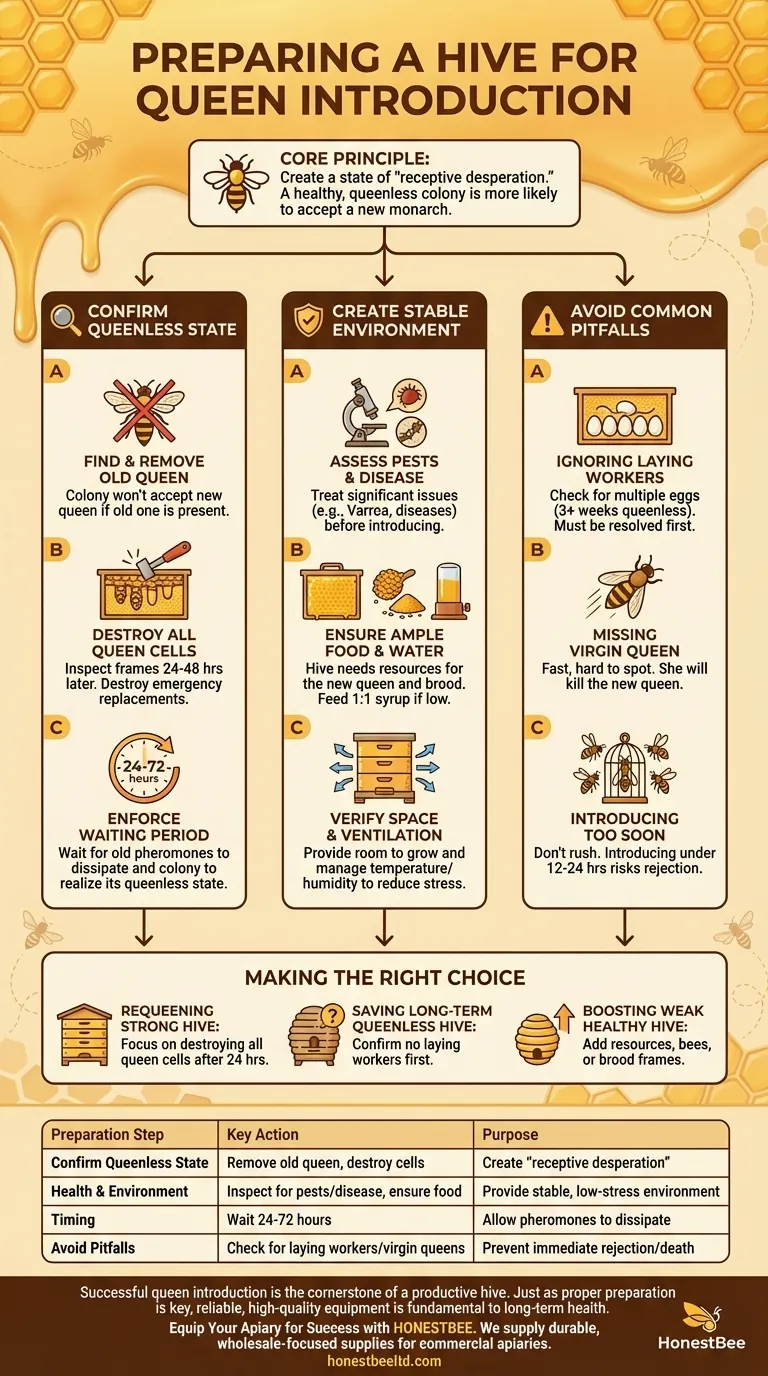
To properly prepare a hive for a new queen, you must first ensure the colony is "hopelessly queenless" by removing any existing queen, queen cells, and waiting for the bees to recognize their absence. You must also confirm the hive is healthy, free from significant pest pressure, and has adequate food, water, and space to support the new queen and her future brood.
The core principle behind queen introduction is to create a state of receptive desperation. A healthy, well-fed colony that knows it has no other option for a monarch is overwhelmingly more likely to accept a new one.
The Foundation: Confirming a Queenless State
The single most important factor for success is ensuring the colony is truly, unequivocally queenless. Introducing a new queen into a hive that already has one (even a virgin or a laying worker) will result in her immediate death.
Step 1: Find and Remove the Old Queen
If you are intentionally requeening, you must first locate and remove the old queen. A colony will not accept a new queen while the old one is still present. This step is obviously skipped if the hive has already lost its queen.
Step 2: Destroy All Queen Cells
After removing the old queen, wait 24-48 hours and then inspect every frame for queen cells. These are emergency replacements the workers have started to create. You must destroy every single one. If left intact, the bees will prefer their own homegrown queen over the new one you are introducing.
Step 3: Enforce a Waiting Period
The ideal time to introduce a new queen is between 24 and 72 hours after the hive becomes queenless. This waiting period allows the old queen's pheromones to dissipate and ensures the entire colony is aware of its queenless state, making them desperate for a replacement.
Creating a Stable and Healthy Environment
Once the hive is confirmed queenless, you must ensure the environment is calm and stable. A stressed colony is far less likely to be receptive.
Assess for Pests and Disease
Before introducing a new queen, perform a thorough inspection for high levels of Varroa mites, signs of chalkbrood, or other ailments. A stressed, unhealthy hive may reject a new queen or be unable to support her once she begins laying. Treat any significant issues before attempting requeening.
Ensure Ample Food and Water Stores
A new queen needs to begin laying thousands of eggs per day almost immediately. This requires a massive amount of resources. The hive must have several frames of stored honey and pollen to give the bees the confidence to feed the queen and her new brood. If stores are low, provide supplementary feeding with a 1:1 sugar syrup.
Verify Proper Space and Ventilation
The colony needs adequate space to grow once the new queen gets established. A congested hive can lead to swarming preparations, which work against queen acceptance. Ensure there is enough drawn comb for her to lay in and proper ventilation to manage temperature and humidity, reducing overall colony stress.
Common Pitfalls That Lead to Rejection
Mistakes during preparation are the primary cause of failed introductions. Understanding these common errors is critical for success.
Ignoring Laying Workers
If a hive has been queenless for an extended period (typically 3+ weeks), some worker bees may begin to lay unfertilized eggs. You can spot this by seeing multiple eggs in a single cell or eggs laid on the sides. A hive with laying workers will almost always reject a new queen; this issue must be resolved first.
Missing a Virgin Queen
Sometimes a hive may appear queenless, but a fast-moving, unmated virgin queen is present. These can be very difficult to spot. If a virgin is present, she will kill the new queen you introduce. The absence of eggs for over a week combined with agitation is a potential sign.
Introducing the Queen Too Soon
Do not rush the process. Placing a new queen in a hive less than 12-24 hours after removing the old one is risky. The bees may still be loyal to the previous queen's scent and see the newcomer as an intruder, a behavior known as "balling" where they surround and kill her.
Making the Right Choice for Your Goal
Your preparation strategy should align with the specific condition of your hive.
- If your primary focus is requeening a strong, established hive: Your main task is to meticulously destroy all existing queen cells 24 hours after removing the old queen.
- If your primary focus is saving a hive that has been queenless for weeks: You must first confirm there are no laying workers before you even consider introducing a new queen.
- If your primary focus is boosting a weak but healthy hive: Ensure it is packed with resources (both bees and food) by combining it with another small hive or adding frames of brood from a stronger one.
Ultimately, successful queen introduction is about managing the colony's psychology to ensure they see the new queen not as a threat, but as their salvation.
Summary Table:
| Preparation Step | Key Action | Purpose |
|---|---|---|
| Confirm Queenless State | Remove old queen & destroy all queen cells. | Creates a state of "receptive desperation" in the colony. |
| Health & Environment Check | Inspect for pests/disease, ensure ample food/water. | Provides a stable, low-stress environment for the new queen. |
| Timing | Wait 24-72 hours after becoming queenless. | Allows old queen's pheromones to dissipate. |
| Avoid Common Pitfalls | Check for laying workers or virgin queens. | Prevents immediate rejection and queen death. |
Equip Your Apiary for Success with HONESTBEE
Successful queen introduction is the cornerstone of a productive hive. Just as proper preparation is key to queen acceptance, using reliable, high-quality equipment is fundamental to the long-term health and efficiency of your operation.
HONESTBEE supplies commercial apiaries and beekeeping equipment distributors with the durable, wholesale-focused supplies needed to manage strong, thriving colonies. From hive tools and feeders to protective gear, our products are designed to support the demanding cycles of commercial beekeeping.
Let us help you build a more resilient and profitable operation.
Contact our wholesale experts today to discuss your equipment needs and how we can support your beekeeping success.
Visual Guide
Related Products
- Durable Plastic Hive Number Set for Beekeeping
- Stainless Steel Round Beehive Air Vents for Ventilation
- HONESTBEE Professional Hive Top Bee Feeder Feeding Solution
- Professional Large-Format Hive Number Set for Beekeeping
- HONESTBEE Professional Long Handled Hive Tool with Precision Cutting Blade
People Also Ask
- Why might beekeepers prefer plastic hives for extraction? Boost Efficiency & Sanitation
- What are the advantages of numbered plastic tags? Achieve Precise Individual Honeybee Identification
- Is it good to have a bee hive in your yard? Unlock Enhanced Pollination and Local Honey
- Why might bees reject a plastic hive? Key Factors in Colony Acceptance and Material Management
- What potential problems can the smooth interior surface of plastic hives cause? Combat Moisture and Disease