Starting a new bee colony is a foundational skill in beekeeping, involving the successful introduction of bees into a prepared hive. The basic process requires you to obtain bees, typically as a "package" or a "nucleus colony," and transfer them into a hive box equipped with frames. For a package, this involves installing the bulk of the worker bees and hanging the separate queen cage inside, allowing the colony to acclimate to her before she is released.
Success in starting a new colony is not merely the act of placing bees in a box. It is about understanding the two primary methods for sourcing bees, managing the critical first few weeks, and confirming the queen has been accepted and is actively laying.
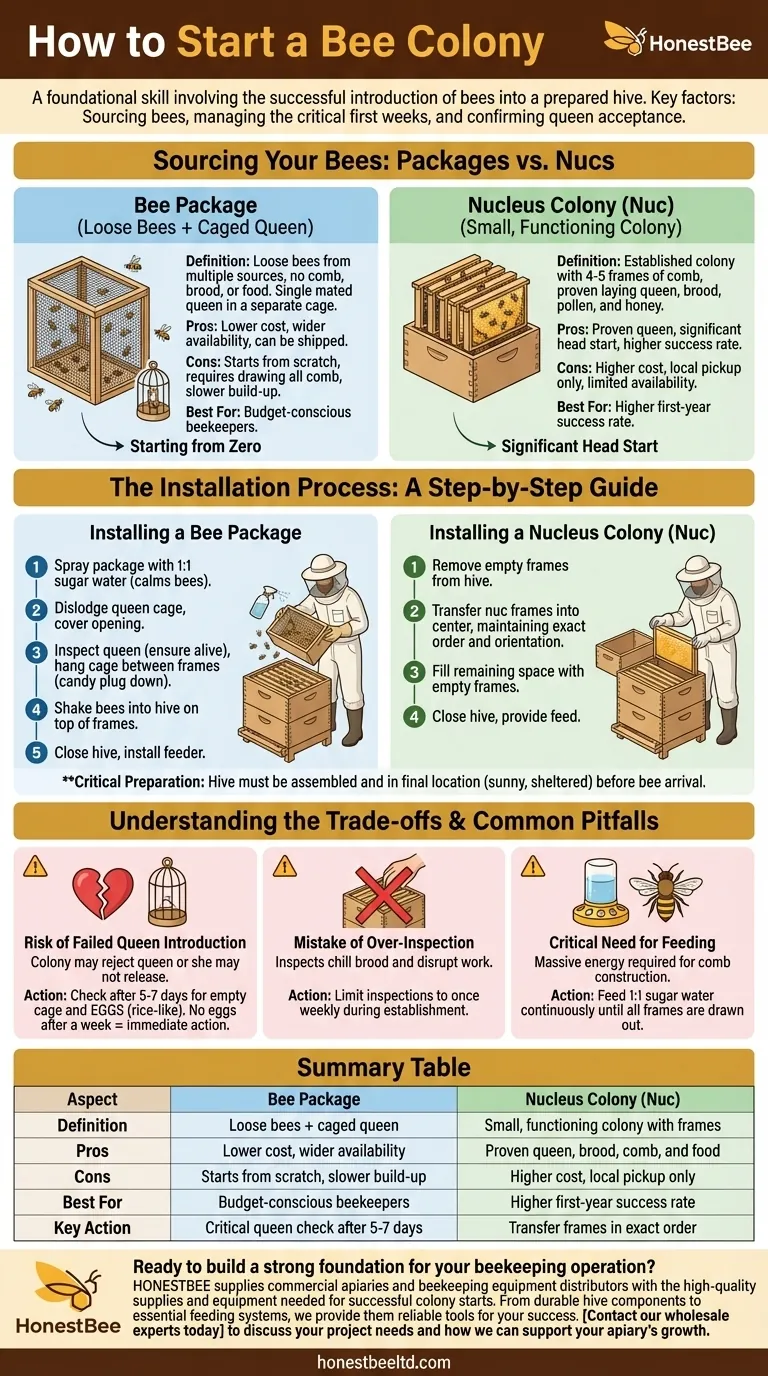
Sourcing Your Bees: Packages vs. Nucs
The first decision you must make is how you will acquire your bees. This choice has a significant impact on the colony's initial development speed and your early management tasks.
Understanding a Bee Package
A bee package is essentially a ventilated box containing several pounds of loose, unrelated bees and a single, mated queen housed in a separate small cage.
These bees are typically shaken from multiple strong hives and are not a pre-existing family unit. They have no comb, brood, or food stores.
Packages are often more readily available and can be shipped, making them a common choice for new beekeepers. However, the colony must start from absolute zero, drawing out all their comb and raising the first round of brood.
Understanding a Nucleus Colony (Nuc)
A nucleus colony, or "nuc," is a small, functioning bee colony. It typically consists of four or five frames of drawn comb containing a proven, laying queen, brood (eggs, larvae, and pupae), and stores of pollen and honey.
Because a nuc is an established colony, it has a significant head start over a package. The workforce is already in place, and the queen's performance is already verified.
Nucs are generally more expensive and must be picked up locally. Their availability can be limited, but they offer a much higher initial success rate, especially for beginners.
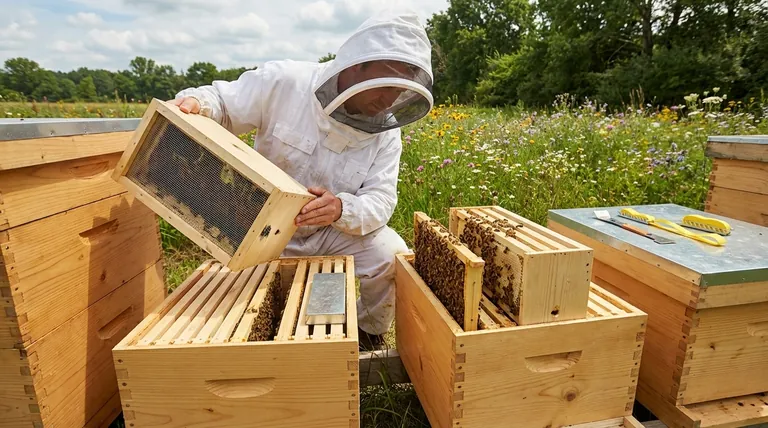
The Installation Process: A Step-by-Step Guide
The day you install your bees is a critical moment. Preparation is key to ensuring a smooth and low-stress transition for both you and the bees.
Preparing the Hive and Location
Before your bees arrive, your hive should be fully assembled and placed in its final location. Ensure you have the hive body, bottom board, frames, inner cover, outer cover, and a feeder ready.
The ideal location is sunny, sheltered from high winds, and has a clear flight path. Face the entrance away from high-traffic areas.
Installing a Bee Package
- Lightly spray the outside of the package with a 1:1 sugar water solution. This calms the bees and gives them a meal.
- Gently dislodge the queen cage and the feed can from the package. Cover the opening to prevent bees from escaping.
- Inspect the queen to ensure she is alive. Hang the queen cage (with the candy plug facing down) between two frames in the center of the hive.
- Firmly shake the bees from the package directly into the hive, on top of the frames.
- Gently place the inner cover and outer cover on the hive and install your feeder.
Installing a Nucleus Colony (Nuc)
- Open your hive and remove the number of empty frames corresponding to the size of your nuc (e.g., remove five empty frames for a five-frame nuc).
- Carefully transfer the frames from the nuc box into the center of your hive, keeping them in the exact same order and orientation. This is crucial for maintaining the integrity of the brood nest.
- Add the empty frames you removed back into the hive to fill the remaining space.
- Close the hive and provide feed.
Understanding the Trade-offs & Common Pitfalls
Starting a colony is more than a mechanical process; it involves biology and behavior. Understanding potential issues is vital for troubleshooting.
The Risk of a Failed Queen Introduction
The single most common point of failure is queen acceptance. The colony may reject and kill the new queen, or she may fail to be released from her cage.
You must check the hive after 5-7 days. Look for an empty queen cage and, more importantly, for eggs. Seeing tiny, rice-like eggs at the bottom of cells is the only definitive proof that your queen has been accepted and is laying.
If you see no eggs after a week, the queen may have been lost. You must act quickly to requeen the hive before the colony becomes non-viable.
The Mistake of Over-Inspection
While it's tempting to constantly check on your new colony, this is a mistake. Each inspection chills the brood and disrupts the colony's work.
Limit your inspections to once a week, at most, during the critical establishment phase. Your goals are simple: confirm the queen is laying, ensure they have enough food, and check that they are drawing out new comb.
The Critical Need for Feeding
A new package or nuc has a massive construction project ahead of it. They must produce wax and draw out comb, which requires an immense amount of energy.
You must feed your new colony a 1:1 sugar water solution continuously until they have drawn out comb on all the frames in their first hive box. Failing to feed is a primary reason new colonies struggle or fail.
How to Apply This to Your Project
Your choice of bee source and your actions in the first month will set the trajectory for your colony's entire season.
- If your primary focus is a higher probability of first-year success: A nucleus colony (nuc) is the superior choice, as it provides a proven queen and a significant head start.
- If your primary focus is lower initial cost and wider availability: A bee package is a viable option, but you must be diligent with feeding and perform a critical queen check after one week.
- For any new colony, regardless of the source: Your most crucial actions are to provide consistent feed and to verify within 7-10 days that the queen is present and laying eggs.
These first steps are the foundation upon which the health, productivity, and survival of your entire colony will be built.
Summary Table:
| Aspect | Bee Package | Nucleus Colony (Nuc) |
|---|---|---|
| Definition | Loose bees + caged queen | Small, functioning colony with frames |
| Pros | Lower cost, wider availability | Proven queen, brood, comb, and food |
| Cons | Starts from scratch, slower build-up | Higher cost, local pickup only |
| Best For | Budget-conscious beekeepers | Higher first-year success rate |
| Key Action | Critical queen check after 5-7 days | Transfer frames in exact order |
Ready to build a strong foundation for your beekeeping operation? HONESTBEE supplies commercial apiaries and beekeeping equipment distributors with the high-quality supplies and equipment needed for successful colony starts. From durable hive components to essential feeding systems, we provide the reliable tools for your success. Contact our wholesale experts today to discuss your project needs and how we can support your apiary's growth.
Visual Guide
Related Products
- Modern Flat-Mount Hive Number Set for Beekeeping
- Langstroth Honey Bee Box Hive Boxes for Different Depths
- Langstroth Bee Hives Bee Keeping Box for Beginners Beekeeping
- Wholesales Dadant Size Wooden Bee Hives for Beekeeping
- HONESTBEE Collapsible Tiered Bee Swarm Catcher for Beekeeping
People Also Ask
- What are the strategic benefits of installing beekeeping hives at an elevation of 1 to 6 meters? Protect Your Assets
- What are the structural advantages of bee hives with high-efficiency ventilation? Prevent Honeycomb Thermal Collapse
- What are the primary advantages of modern beekeeping hives? Scale Your Apiary with Industrial Efficiency
- What are the structural and management advantages of modern beekeeping hives? Scale Your Honey Yields Today
- What are the key advantages of modern improved beekeeping hives? Scale Your Honey Yield and Production Efficiency