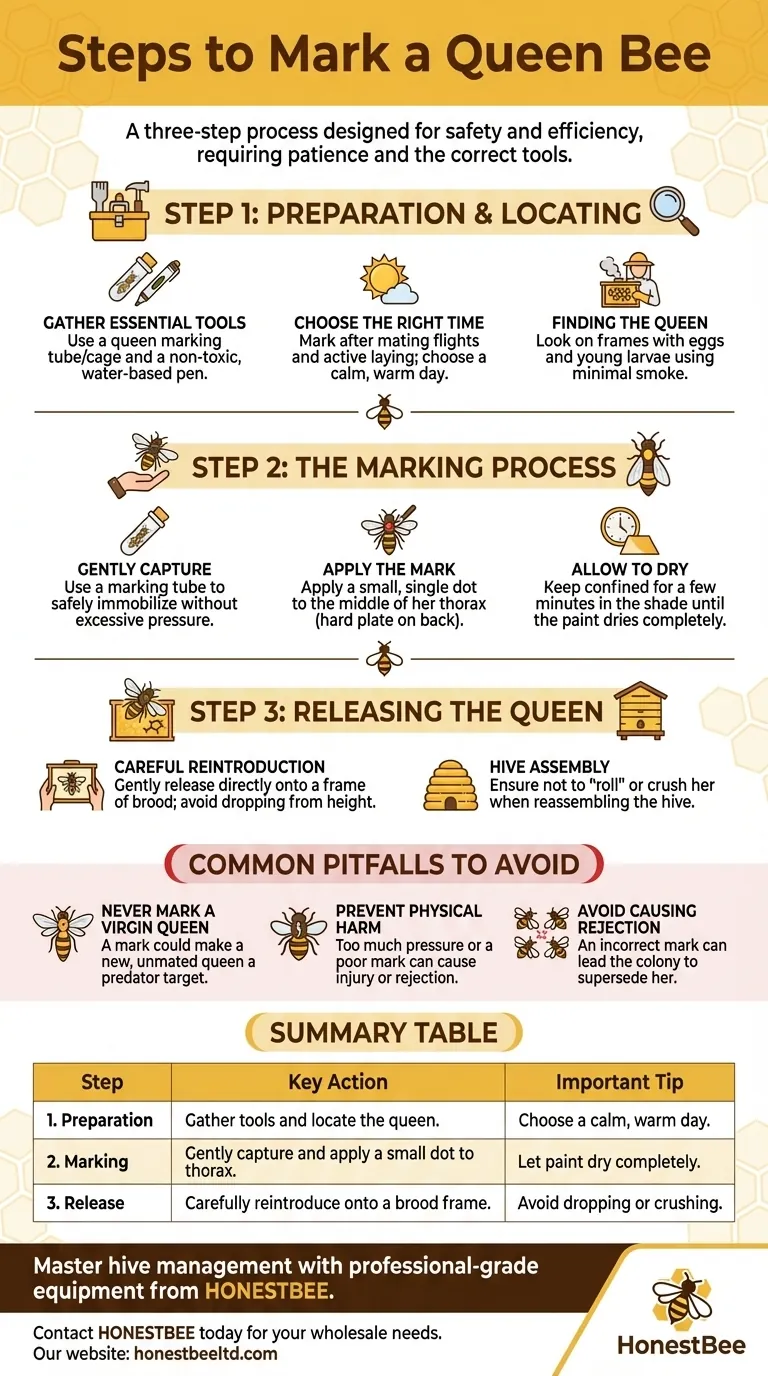
Marking a queen bee is a three-step process designed for safety and efficiency. The core procedure involves locating and gently capturing the queen, applying a small dot of non-toxic paint to her thorax, and carefully releasing her back into the hive once the paint is dry.
The primary objective is not just to apply paint, but to safely place a durable mark without harming the queen or causing the colony to reject her. This requires patience, the correct tools, and a calm, deliberate approach.
Step 1: Preparation and Locating the Queen
Before you open the hive, having your tools ready and choosing the right moment is critical for a smooth process.
Gather the Essential Tools
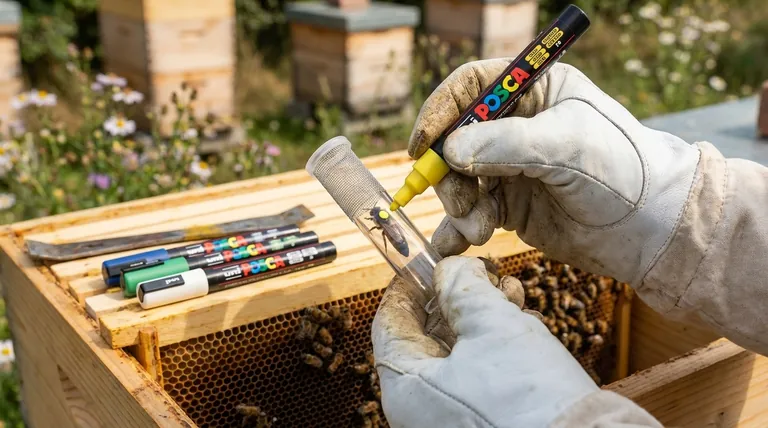
Your primary tools will be a queen marking tube or cage and a non-toxic, water-based queen marking pen. The tube or cage allows you to safely immobilize the queen without direct handling, significantly reducing the risk of injury.
Choose the Right Time
The ideal time to mark a queen is after she has completed her mating flights and is actively laying eggs. Marking her before she is mated can interfere with her flights and acceptance.
Plan the marking for a calm, warm day. Good weather ensures the bees are less defensive, making the inspection and process less stressful for the entire colony.
Finding the Queen
When inspecting the hive, use minimal smoke, as too much can cause the queen to hide or run. Look for her on frames containing eggs and young larvae, which is her primary domain. She is identifiable by her longer abdomen and deliberate movements.
Step 2: The Marking Process
This is the most delicate phase and requires a steady hand. The goal is to be quick, gentle, and precise.
Gently Capturing the Queen
Once located, use your marking tube or cage to gently confine her against the comb. Secure her carefully, ensuring you do not crush her or apply excessive pressure.
Applying the Mark
Before marking, test your paint pen on a separate surface to ensure a smooth, consistent flow. Apply a small, single dot of paint to the middle of her thorax—the hard plate on her back between her head and abdomen.
The thorax is the safest and most durable location for the mark. Never allow paint to get on her eyes, antennae, wings, or leg joints.
Allowing the Paint to Dry
Keep the queen confined within the marking tube for a few minutes to allow the paint to dry completely. Do this in the shade to prevent her from overheating.
Step 3: Releasing the Queen
A successful release is just as important as the marking itself.
A Careful Reintroduction
Once the paint is dry, gently release the queen directly onto a frame of brood. Avoid dropping her from a height.
Carefully place the frame back into the brood nest, ensuring you do not "roll" or crush her between the frames as you reassemble the hive.
Common Pitfalls to Avoid
Mistakes during the marking process can have severe consequences for the queen and the colony.
Never Mark a Virgin Queen
A newly hatched, unmarked queen must be allowed to complete her mating flights. A paint mark could make her a more visible target for predators during these crucial flights.
Prevent Physical Harm
The most common mistake is applying too much pressure when caging or marking the queen. A gentle touch is non-negotiable to prevent injury that could lead to her being rejected by the hive.
Avoid Causing Rejection
A poorly placed mark or a queen covered in paint may be perceived as foreign or damaged by the workers. This can lead the colony to supersede her, meaning they will raise a new queen to replace the one you just marked.
Making the Right Choice for Your Goal
Your approach should align with your primary objective as a beekeeper.
- If your primary focus is safety and confidence: Always use a queen marking tube or cage to eliminate the risk of dropping or crushing her.
- If your primary focus is hive stability: Wait until a newly introduced queen is fully accepted and has an established laying pattern before you attempt to mark her.
- If your primary focus is long-term tracking: Use the internationally recognized color code for the year to instantly know your queen's age during future inspections.
By following these deliberate steps, you can safely mark your queen and significantly improve your ability to manage a healthy, productive hive.
Summary Table:
| Step | Key Action | Important Tip |
|---|---|---|
| 1. Preparation | Gather tools (marking tube, pen) and locate the queen. | Choose a calm, warm day for minimal bee defensiveness. |
| 2. Marking | Gently capture the queen and apply a small dot to her thorax. | Let the paint dry completely before releasing her. |
| 3. Release | Carefully reintroduce the queen directly onto a brood frame. | Avoid dropping or crushing her when reassembling the hive. |
Master hive management with professional-grade equipment from HONESTBEE.
As a commercial apiary or beekeeping equipment distributor, your efficiency and the health of your colonies depend on reliable tools. Our wholesale-focused operations provide the durable, precision beekeeping supplies you need—from queen marking kits to full hive systems—ensuring your operations run smoothly and profitably.
Contact HONESTBEE today to discuss your wholesale needs and elevate your beekeeping practice.
Visual Guide
Related Products
- One Hand Yellow Queen Marking Catcher Tube Cage Beekeeper Tool Accessory for Queen Bee
- Queen Bee Marking Tube Cage Bottle Catcher Holder with Clear Plastic Plunger Marker
- Transparent Plastic Bee Catcher Queen Marker Tube Cage Beekeeping Tool Equipment
- Queen Bee Marking Pen POSCA Queen Marking Pens for Beekeeping Bee Markers
- Queen Bee Marking Pen UNI Medium Point for Queen and Bee Marking
People Also Ask
- What tools are commonly used for marking queen bees? A Guide to Safe and Effective Marking
- What is the significance of using queen marking tools in apiary performance monitoring? Optimize Your Hive Productivity
- Why are high-quality queen bee marking tools essential for pedigree tracking? Master Honey Bee Genetic Integrity
- What are the specific advantages of using international standard marking tools in queen bee production and management?
- What tools are recommended for marking a Queen bee? Ensure a Safe and Successful Mark


