To operate a bee smoker, you must first establish a small, sustainable fire that smolders rather than flames. Start by lighting a small piece of kindling, like crumpled paper or cotton, inside the smoker's chamber. Gradually add your primary fuel, such as pine needles or wood shavings, and use the bellows to encourage the fire. Once it's well-lit, add more fuel and close the lid to restrict airflow, which transforms the fire into the desired cool, white smoke.
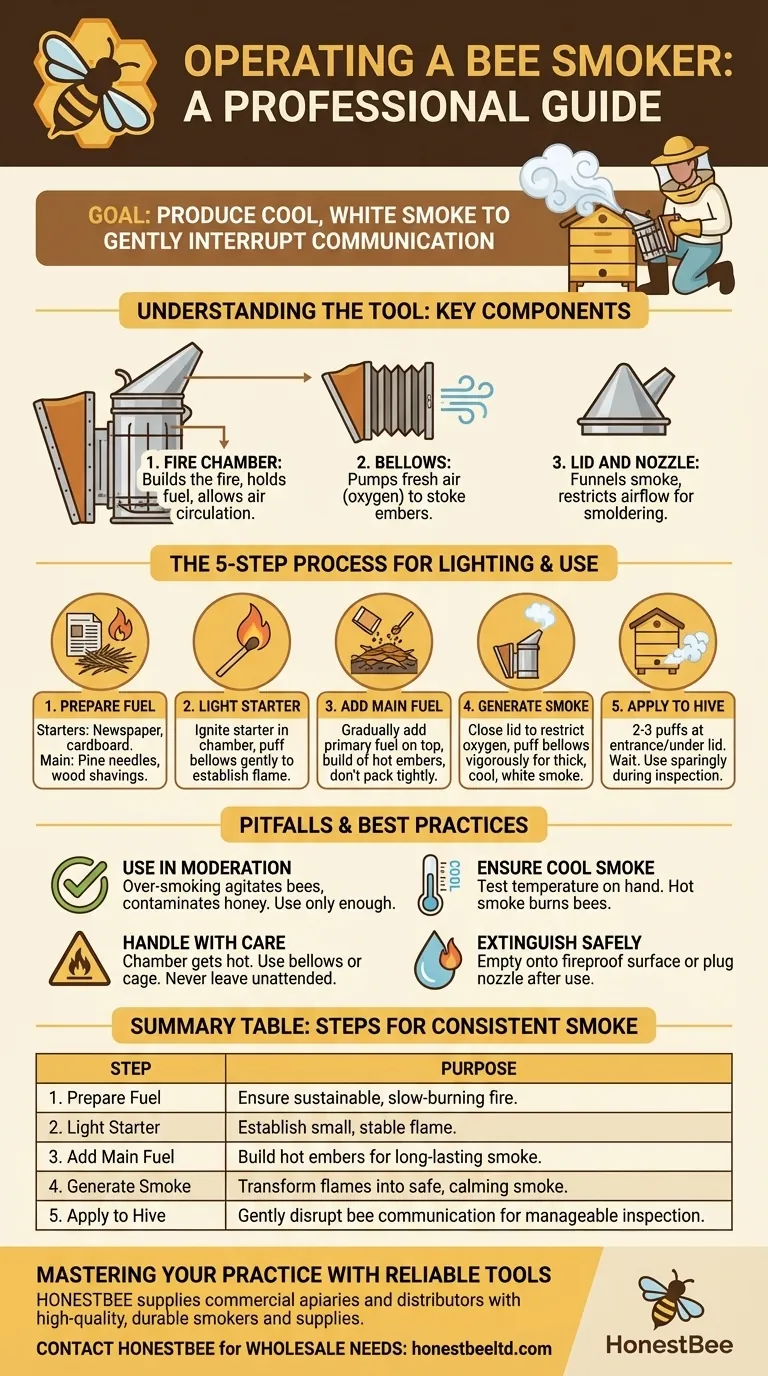
The core principle of using a bee smoker is not to subdue the bees, but to gently interrupt their chemical communication. The goal is to produce a consistent supply of cool, white smoke, which requires a smoldering fire, not an open flame.

Understanding the Tool: Key Components
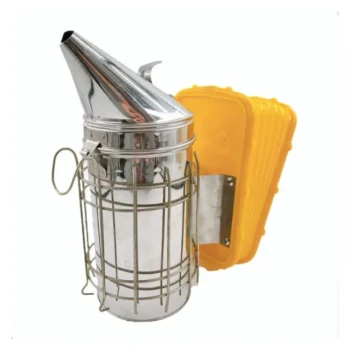
A bee smoker is a simple yet effective device. Understanding its three main parts helps you operate it correctly.
The Fire Chamber
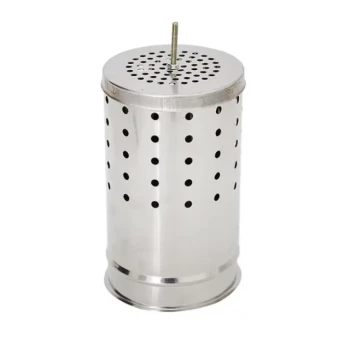
This is the main cylinder where you build the fire. It often contains a grid or inner plate at the bottom to hold the fuel up, allowing air to circulate underneath and preventing the fire from suffocating.
The Bellows
This is the accordion-like pump attached to the fire chamber. Squeezing the bellows forces a jet of fresh air (oxygen) into the base of the fire, which stokes the embers and produces a puff of smoke.
The Lid and Nozzle
The conical lid funnels the smoke out through a nozzle. Closing the lid restricts airflow, which is critical for turning a flaming fire into a smoldering one that produces the correct type of smoke.
The Step-by-Step Process for Lighting and Use
Properly lighting and managing a smoker is a fundamental beekeeping skill. Follow these steps for consistent results.
Step 1: Prepare Your Fuel
You need two types of fuel: a starter and a main fuel.
Good starters ignite easily and include materials like crumpled newspaper, cardboard, dryer lint, or cotton balls.
Good main fuels burn slowly and produce thick smoke. Excellent options include dry pine needles, untreated wood shavings, rotten wood, or commercial smoker fuels.
Step 2: Light the Starter
Place your starter material in the bottom of the empty fire chamber. Light it with a match or lighter, and give the bellows a few gentle puffs to help the flame establish itself.
Step 3: Add Primary Fuel
Once the starter is burning well, begin adding your main fuel on top of it. Add a small amount at first, puffing the bellows gently to help it catch fire.
Continue adding fuel until the chamber is about three-quarters full. Don't pack it down too tightly at this stage; you still want good airflow to build a hot bed of embers.
Step 4: Generate Cool, White Smoke
Once your main fuel is burning with a small flame, pack it down gently with your hive tool. Add a final, loose layer of fuel on top—this can even be green grass or leaves, which helps cool the smoke.
Close the lid securely. This action significantly reduces the oxygen supply, causing the fire to smolder rather than flame. Puff the bellows vigorously a few times until thick, cool, white smoke emerges from the nozzle.
Step 5: Applying Smoke to the Hive
Approach your hive calmly. Puff a small amount of smoke (2-3 puffs) near the main entrance. Wait about 30-60 seconds before opening the hive.
Once you crack the outer cover, puff a little smoke into the opening before removing it completely. As you work through the hive, use only a few puffs of smoke as needed to keep the bees calm.
Common Pitfalls and Best Practices
Effective smoking is an art of moderation and safety. Misusing a smoker can be counterproductive and harmful to your bees.
Use Smoke in Moderation
The most common mistake is over-smoking the hive. This can agitate the bees, contaminate honey with a smoky flavor, and is unnecessarily disruptive. Use just enough smoke to keep the bees manageable.
Ensure the Smoke is Cool
Hot smoke or embers can burn and kill your bees. Before directing smoke at them, test the temperature on the back of your hand from a few inches away. If it's too hot, give the smoker a few more puffs to clear it out.
Handle the Smoker with Care
The fire chamber becomes extremely hot during use. Always handle it by the bellows or the protective wire cage around it to avoid serious burns. Never leave a lit smoker unattended, especially in dry conditions.
Extinguish Safely After Use
When you are finished with your inspection, safely extinguish the fuel. You can empty the hot contents onto a fireproof surface like concrete or dirt, or you can plug the nozzle with grass or a cork to suffocate the fire completely.
How to Apply This to Your Inspection
Your approach to smoking should match the temperament of the colony and your goal for the inspection.
- If your primary focus is a quick, routine inspection: A few gentle puffs at the entrance and a bit under the lid is usually all you need for a calm colony.
- If you are dealing with a more defensive hive: You may need to apply smoke more regularly, but still in moderation, to keep the guard bees from becoming overly aggressive.
- If your primary focus is safety for both you and the bees: Always prioritize cool smoke, handle the smoker carefully, and ensure it is fully extinguished when you're done.
Mastering the bee smoker is a key step toward becoming a confident and effective beekeeper.
Summary Table:
| Step | Key Action | Purpose |
|---|---|---|
| 1. Prepare Fuel | Gather starter (e.g., paper) & main fuel (e.g., pine needles). | Ensure a sustainable, slow-burning fire. |
| 2. Light Starter | Ignite starter in the chamber; puff bellows gently. | Establish a small, stable flame. |
| 3. Add Main Fuel | Gradually add primary fuel on top of the starter. | Build a bed of hot embers for long-lasting smoke. |
| 4. Generate Smoke | Close lid, puff bellows to produce cool, white smoke. | Transform flames into safe, calming smoke for bees. |
| 5. Apply to Hive | Use 2-3 puffs at the entrance and under the lid as needed. | Gently disrupt bee communication for a manageable inspection. |
Ready to equip your apiary with reliable, professional-grade tools?
Mastering your beekeeping practice starts with the right equipment. HONESTBEE supplies commercial apiaries and beekeeping equipment distributors with high-quality, durable smokers and essential beekeeping supplies through our wholesale-focused operations.
Let us help you work more efficiently and safely with your hives.
Contact HONESTBEE today to discuss your wholesale needs and elevate your beekeeping operation.
Visual Guide
Related Products
- Stainless Steel Honey Bee Smoker Hive and Honeycomb Smoker for Beekeeping
- Professional Bee Smoker with Elongated Spout and Durable Bellows for Beekeeping
- Heavy Duty Manual Bee Smoker Blower for Beekeeping
- Premium Traditional Copper Bee Smoker with Bellows
- European Stainless Steel Bee Smoker for Honey Bee Hive
People Also Ask
- What type of bee smoker is recommended for a beginner? Top Picks for Easy Hive Management
- When should you add more fuel to the bee smoker? Watch for This Critical Smoke Signal
- How should a beekeeper use a smoker when approaching a hive? A Guide to Calm, Safe Inspections
- How do bee smokers and colored light sources work together to assist in night-time honey harvesting? Expert Strategies
- Why is a bee smoker considered an essential auxiliary tool? Boost Safety and Efficiency in Honey Harvesting