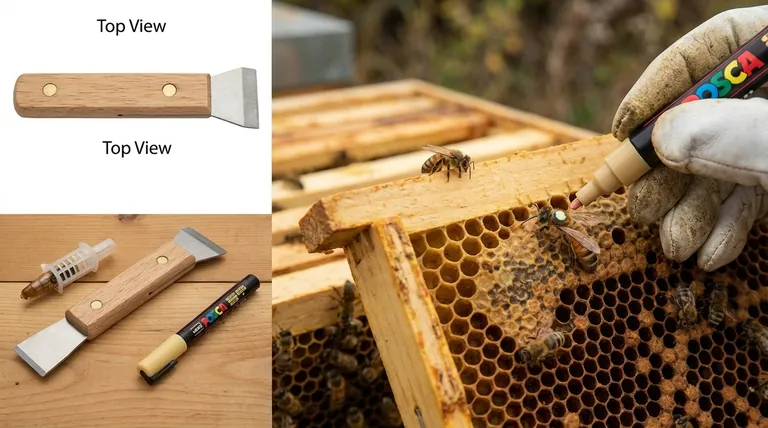
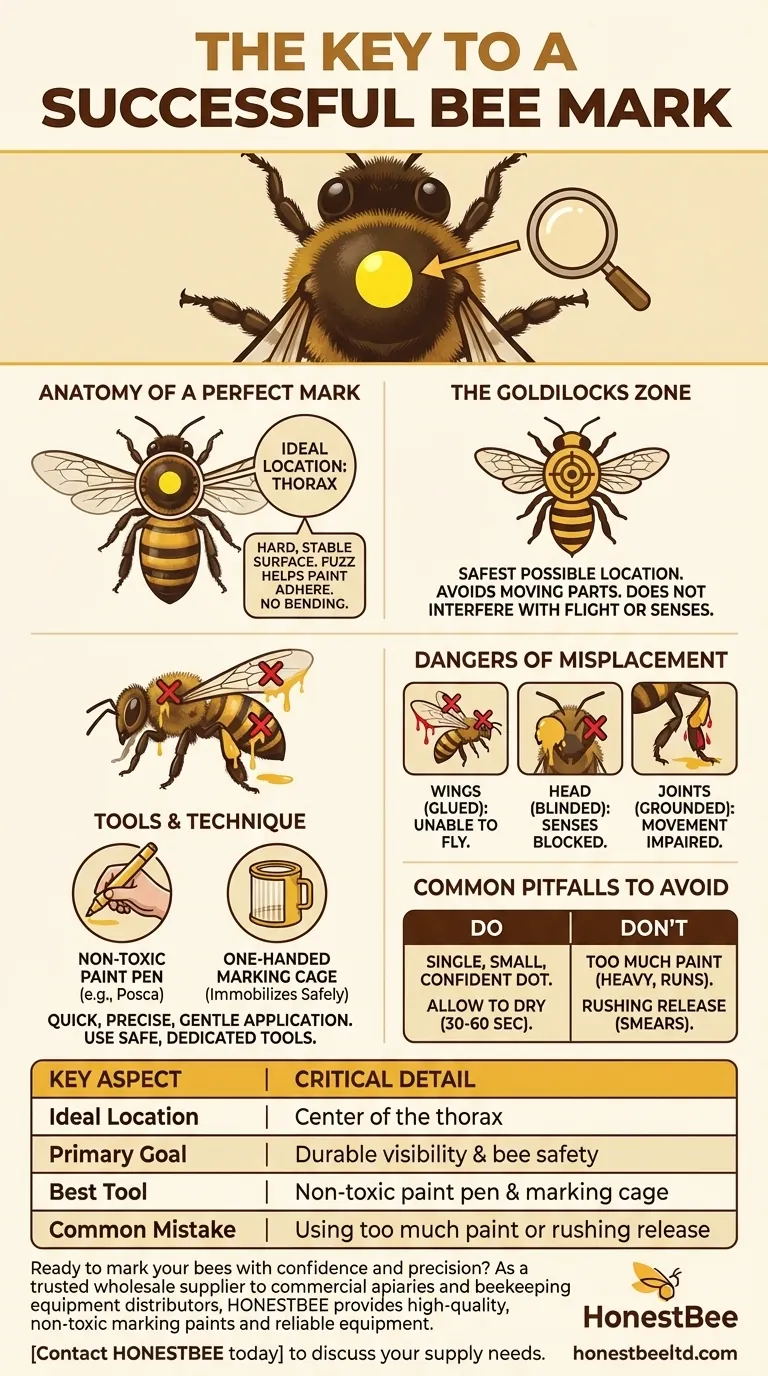
The key to a successful mark on a bee is to place a small, precise dot of paint squarely in the center of its thorax. This specific placement is critical to ensure the mark is both visible and safe, without getting any paint on the wings, head, joints, or allowing it to drip down the bee's body.
A successful mark is one that is both durable for long-term identification and completely safe for the bee. The entire technique revolves around achieving these two goals: visibility for you and well-being for the bee.
The Anatomy of a Perfect Mark
To understand why placement is so critical, you must think from the bee's perspective. A sloppy mark can be a death sentence, while a perfect one is a minor inconvenience that it will not even notice.
Why the Thorax?
The thorax is the bee's middle section, essentially its "upper back." It is the ideal location for a mark.
This part of the exoskeleton is a hard, sturdy plate. It doesn't bend or articulate like the abdomen or leg joints, providing a stable surface for the paint to adhere to.
Furthermore, the thorax is often covered in fine hairs (fuzz), which helps the paint "grab on" and stay in place once dried, increasing the mark's durability.
The "Goldilocks Zone"
The absolute center of the thorax is the safest possible location. Placing the dot here keeps it far from any moving parts.
A centrally located mark will not interfere with the powerful flight muscles that attach the wings to the thorax. It also avoids the joints where the legs and head connect, ensuring the bee can walk, fly, and sense its environment without impairment.
The Dangers of Misplacement
Even a small amount of paint in the wrong place can have severe consequences for the bee.
Paint on the wings will glue them together or weigh them down, making flight difficult or impossible. If it gets in the wing joints, the bee will be grounded permanently.
Paint on the head can cover the bee's simple or compound eyes, blinding it. If it covers the antennae, it will block the crucial senses of smell and touch that the bee uses for communication and navigation.
Tools and Technique
Achieving a perfect mark requires the right tools and a steady hand. The goal is to be quick, precise, and gentle.
Choosing Your Marking Paint
The most common and safest options are water-based, non-toxic paint pens, often sold specifically for marking queen bees. Brands like Posca are a popular choice among beekeepers.
These paints dry quickly, have low odor, and are designed to be harmless to the insect. Avoid oil-based paints or model enamels unless you are certain they are non-toxic and fast-drying, as the solvents can harm the bee.
Handling the Bee Safely
For beginners, the safest method is using a one-handed queen marking cage. This is a small tube with a plunger and a soft screen on top.
You can gently corral the queen or bee under the tube and push the plunger up until her thorax is pressed gently against the screen. This immobilizes her safely, allowing you to apply the mark through the screen with perfect stability. More experienced handlers may gently hold the bee between their thumb and forefinger.
Common Pitfalls to Avoid
Mistakes usually happen when the process is rushed or the wrong materials are used. Understanding these pitfalls is key to avoiding them.
Too Much vs. Too Little Paint
Applying too much paint is the most common error. A large blob is heavy, takes longer to dry, and has a high risk of running onto the bee's wings or joints.
Conversely, too little paint may not be visible from a distance or may flake off too easily, defeating the purpose of marking in the first place. The goal is a single, small, and confident dot.
Rushing the Release
After applying the mark, you must give the paint a moment to dry. The exact time depends on the paint and humidity, but 30-60 seconds is a good rule of thumb.
Releasing a bee with wet paint is disastrous. The paint will smear as it moves, potentially gluing down a wing or leg. Allow it to dry to a non-tacky finish before letting the bee go.
Making the Right Choice for Your Goal
Your approach may vary slightly depending on your objective.
- If your primary focus is marking your first queen: Prioritize safety above all else and use a one-handed marking cage to prevent the queen from being harmed or flying away.
- If your primary focus is tracking drones for research: Practice your freehand technique on a few drones first, as they are more expendable than a queen and will help you develop muscle memory.
- If your primary focus is maximum visibility and longevity: Ensure you apply the dot to a clean, dry section of the thorax and use a high-quality, dedicated queen marking paint.
A well-placed mark is a valuable tool for any beekeeper, serving your purpose without compromising the health of this vital insect.
Summary Table:
| Key Aspect | Critical Detail |
|---|---|
| Ideal Location | Center of the thorax (upper back) |
| Primary Goal | Durable visibility & bee safety |
| Best Tool | Non-toxic paint pen & marking cage |
| Common Mistake | Using too much paint or rushing release |
Ready to mark your bees with confidence and precision?
As a trusted wholesale supplier to commercial apiaries and beekeeping equipment distributors, HONESTBEE provides the high-quality, non-toxic marking paints and reliable equipment you need for safe, effective hive management. Our products are designed specifically for the demands of professional beekeeping.
Contact HONESTBEE today to discuss your supply needs and ensure the well-being of your vital pollinators.
Visual Guide
Related Products
- Queen Bee Marking Pen UNI Medium Point for Queen and Bee Marking
- One Hand Yellow Queen Marking Catcher Tube Cage Beekeeper Tool Accessory for Queen Bee
- Queen Bee Marking Tube Cage Bottle Catcher Holder with Clear Plastic Plunger Marker
- Queen Bee Marking Pen POSCA Queen Marking Pens for Beekeeping Bee Markers
- Queen Bee Catcher Plastic Bee Marker Bottle with Piston Marking Tube
People Also Ask
- What role do specialized marking pens and color-coding systems play in honeybee tracking? Enhance Research Precision
- What specifications are required for a high-quality queen bee marking pen? Ensure Safety and Precision for Your Colony
- What is the purpose of using a queen marking pen? Enhance Hive Management and Age Tracking
- What tools are available to assist in safely marking a queen bee? Essential Gear for Professional Beekeepers
- Why is the physical marking of a queen bee important? Ensure Precise Colony Replacement Cycle Tracking