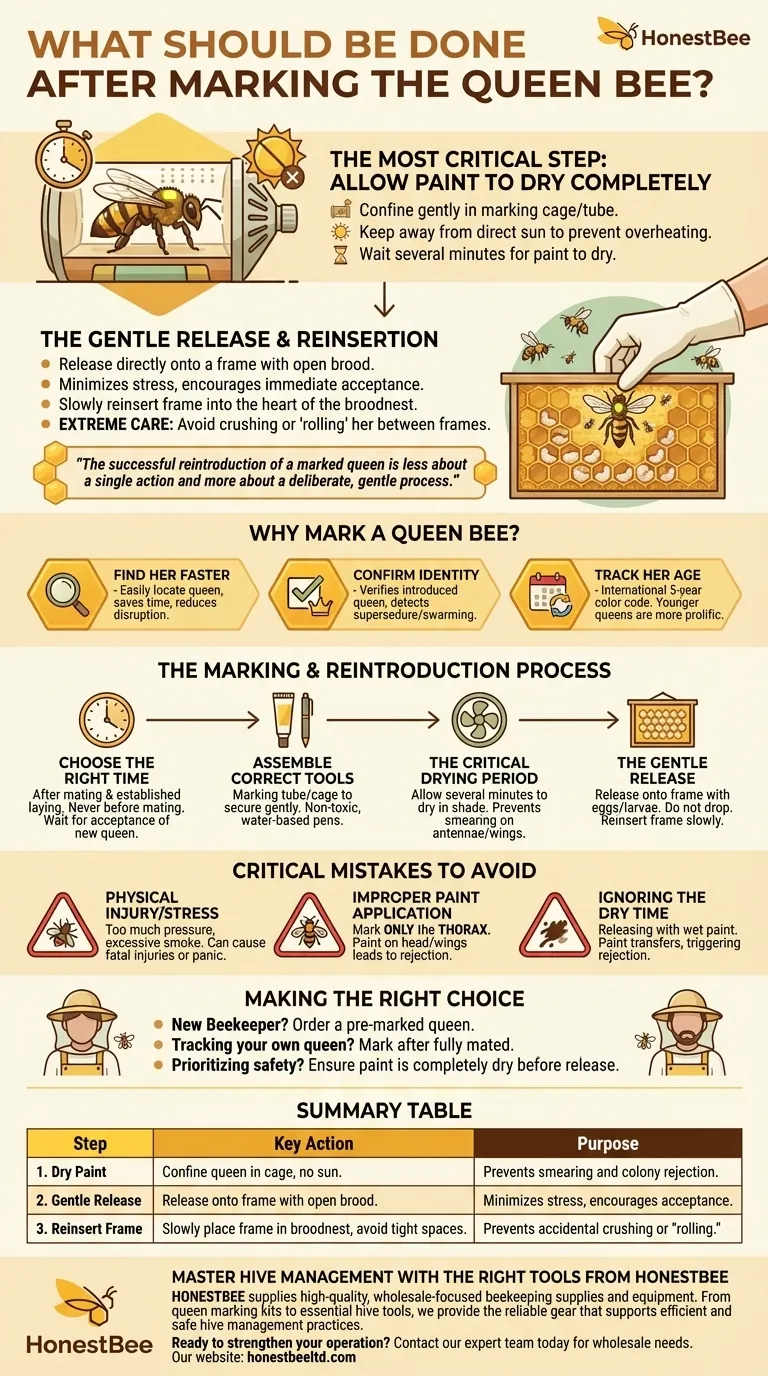
After marking your queen, the most critical step is to ensure the paint dries completely before she is returned to the colony. Keep her gently confined in a marking cage or tube for several minutes, away from direct sun to prevent overheating. Once dry, release her directly onto a frame with open brood and slowly reinsert it into the heart of the broodnest, taking extreme care not to crush or "roll" her between the frames.
The successful reintroduction of a marked queen is less about a single action and more about a deliberate, gentle process. Your primary goal is to minimize stress and ensure she is immediately accepted back by the colony, which requires patience and careful handling from capture to release.

Why Mark a Queen Bee?
Marking a queen is a foundational practice in modern beekeeping that provides invaluable data at a glance. It is not merely for aesthetics; it is for efficient and effective hive management.
### Find Her Faster
A small, brightly colored dot on the queen's thorax makes her significantly easier to locate during hive inspections. This saves time and reduces the disruption to the colony caused by prolonged searching.
### Confirm Her Identity
Marking confirms that the queen present is the one you introduced or raised. If you later find an unmarked queen, you know the original one has been replaced through a supersedure or swarm event, allowing you to assess the new queen's quality.
### Track Her Age
Beekeepers use an international color code that rotates over a five-year cycle to denote the year a queen was hatched. Knowing a queen's age is critical, as younger queens are typically more prolific egg layers and produce stronger pheromones, which helps maintain colony cohesion and reduces the impulse to swarm.
The Marking and Reintroduction Process
A successful marking event depends entirely on preparation and a calm, methodical approach. Rushing this process is the most common cause of failure.
### Choose the Right Time
The ideal time to mark a queen is after she has completed her mating flights and has established a consistent laying pattern. Marking a virgin queen before she has mated is a critical error. Similarly, if you introduce a new queen, wait until the colony has fully accepted her before attempting to mark her.
### Assemble the Correct Tools
Never attempt to mark a queen without the proper equipment. You will need a queen marking tube or cage to secure her gently and a set of non-toxic, water-based queen marking pens in the appropriate colors. These tools are designed to immobilize her without causing injury.
### The Critical Drying Period
After applying a small dot of paint to her thorax, you must allow it to dry. This takes several minutes. Confining her in the marking cage in a shaded spot prevents the wet paint from smearing onto her antennae or wings, which could trigger the colony to reject her.
### The Gentle Release
Do not simply drop the queen back into the hive. The best practice is to gently release her from the cage directly onto the surface of a frame containing eggs and young larvae. This places her back in the most familiar and appropriate part of the hive, surrounded by her own offspring and attendant bees.
### Reinserting the Frame
When placing the frame back into the brood box, do so slowly and deliberately. Be absolutely certain there is enough space, and avoid "rolling" the queen by pressing the frames together too tightly. This is a common way that beekeepers accidentally kill their queens.
Critical Mistakes That Cause Rejection
Marking a queen is a low-risk procedure when done correctly, but simple mistakes can lead to the colony injuring, rejecting, or replacing her—an event known as supersedure.
### Physical Injury or Stress
Using too much pressure when capturing or holding the queen can cause fatal internal injuries. Likewise, using excessive smoke during your inspection can cause panic and increase the risk of harming her during the capture.
### Improper Paint Application
The mark should be a small, neat dot on the thorax (the middle section of her body) only. Getting paint on her head, eyes, antennae, or wings can interfere with her senses and movement, causing the worker bees to perceive her as damaged and unworthy.
### Ignoring the Dry Time
Releasing a queen with wet paint is a serious error. The paint can transfer to other bees or to the queen's own appendages, which can lead to her being rejected by the colony.
Making the Right Choice for Your Hive
Your approach to queen marking should align with your experience level and goals for the hive.
- If you are a new beekeeper or prioritize minimal risk: Order a pre-marked queen from your supplier, which eliminates the need for you to handle her directly.
- If you need to track a queen you raised yourself: Prepare meticulously with the right tools and mark her only after she is fully mated and laying consistently.
- If your primary focus is the queen's immediate safety after marking: Ensure the paint is completely dry before releasing her gently onto a frame in the center of the brood nest.
By treating this process with precision and care, you transform queen marking from a potential risk into one of your most powerful tools for hive management.
Summary Table:
| Step | Key Action | Purpose |
|---|---|---|
| 1. Dry Paint | Confine queen in a marking cage away from sun. | Prevents smearing and colony rejection. |
| 2. Gentle Release | Release queen directly onto a frame with open brood. | Minimizes stress and encourages immediate acceptance. |
| 3. Reinsert Frame | Slowly place frame back into the broodnest, avoiding tight spaces. | Prevents accidental crushing or "rolling" of the queen. |
Master Hive Management with the Right Tools from HONESTBEE
A successful beekeeping operation relies on precision and the right equipment. Whether you're a commercial apiary or a beekeeping equipment distributor, HONESTBEE supplies the high-quality, wholesale-focused beekeeping supplies and equipment you need to excel. From queen marking kits to essential hive tools, we provide the reliable gear that supports efficient and safe hive management practices.
Ready to strengthen your operation? Contact our expert team today to discuss your wholesale needs and discover how HONESTBEE can be your trusted partner in beekeeping success.
Visual Guide
Related Products
- One Hand Yellow Queen Marking Catcher Tube Cage Beekeeper Tool Accessory for Queen Bee
- Queen Bee Marking Pen POSCA Queen Marking Pens for Beekeeping Bee Markers
- Queen Bee Marking Tube Cage Bottle Catcher Holder with Clear Plastic Plunger Marker
- Plastic Long Marker Device for Catching and Marking Bees Queen Bee Marking Tube and Cage
- Transparent Plastic Bee Catcher Queen Marker Tube Cage Beekeeping Tool Equipment
People Also Ask
- What is the significance of using queen marking tools in apiary performance monitoring? Optimize Your Hive Productivity
- What are the steps to mark a queen bee? A Safe, 3-Step Guide for Beekeepers
- What tools are recommended for marking a Queen bee? Ensure a Safe and Successful Mark
- What tools are recommended for marking queen bees? Safely Identify Your Queen with the Right Kit
- What are the specific advantages of using international standard marking tools in queen bee production and management?


