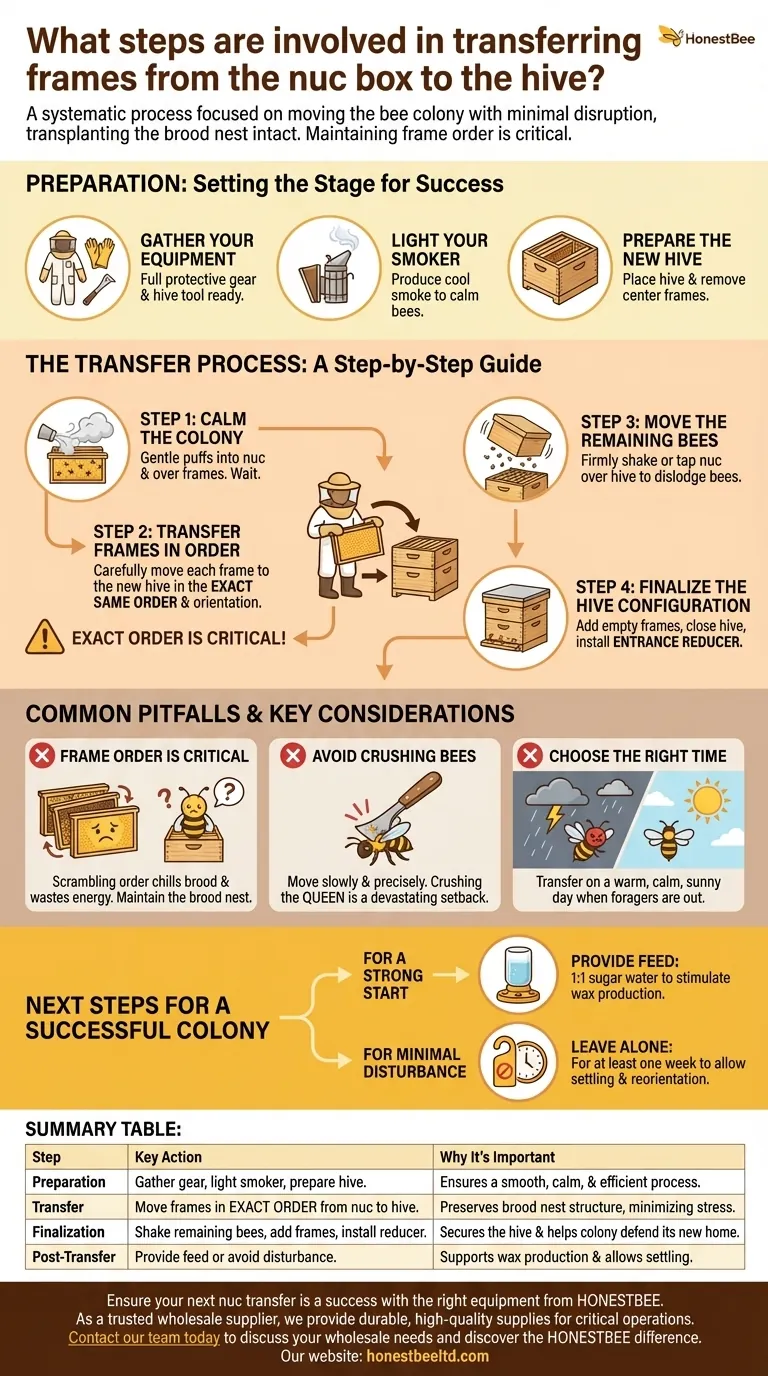
Transferring frames from a nuc box to a hive is a systematic process focused on moving the bee colony with minimal disruption. The core steps involve preparing your equipment, calming the bees with a smoker, carefully moving each frame into the new hive while maintaining their original order, and then securing the new hive.
The primary goal is not just to move bees, but to transplant the entire living structure of the colony—the brood nest—intact. Maintaining the precise order of the frames is the single most critical factor for ensuring the colony's stability and reducing stress.

Preparation: Setting the Stage for Success
Before you approach the bees, having everything prepared ensures the process is smooth, quick, and calm. A disorganized transfer increases stress on both you and the colony.
Gather Your Equipment
You will need your full set of protective gear, including a veil, suit, and gloves. Have your hive tool ready for prying frames and a lit smoker producing cool, white smoke.
Prepare the New Hive
Place your new hive body in its final location. Remove four or five frames from the center of the box to create a clear, open space for the nuc frames.
Light Your Smoker
The purpose of smoke is to mask the bees' alarm pheromone, which they release to signal danger. A few gentle puffs of smoke interrupt this communication, keeping the colony calmer during the inspection.
The Transfer Process: A Step-by-Step Guide
With your gear on and the hive ready, you can begin the transfer. Move deliberately and gently to avoid agitating the bees or accidentally harming the queen.
Step 1: Calm the Colony
Direct a few gentle puffs of smoke into the entrance of the nuc box. Wait about 30 seconds, then lift the cover slightly and puff a little smoke across the tops of the frames.
Step 2: Transfer Frames in Order
Carefully pry the first frame loose with your hive tool. Lift it straight up, inspect it briefly if you wish, and place it into the open space in your new hive box.
Continue this process, moving each frame from the nuc to the new hive, placing them in the exact same order and orientation as they were in the nuc.
Step 3: Move the Remaining Bees
After all frames are transferred, a cluster of bees will likely remain in the nuc box. Hold the box over the new hive and give it a firm shake or tap to dislodge the remaining bees into their new home.
Step 4: Finalize the Hive Configuration
Add your new, empty frames to fill the remaining space in the hive body. Gently push all the frames together into the center of the box.
Place the inner cover and top cover on the hive. Finally, install an entrance reducer on the smallest opening to help the small colony defend its new, larger space.
Common Pitfalls and Key Considerations
Successfully transferring a nuc goes beyond the physical steps. Understanding the reasoning behind them helps prevent common and stressful mistakes.
The Critical Importance of Frame Order
The bees organize their hive with purpose. The queen lays eggs in the center (the brood nest), which is surrounded by pollen and then honey. Scrambling this order forces the colony to expend enormous energy reorganizing and can chill the brood, setting the colony back significantly.
Avoid Crushing Bees, Especially the Queen
Every movement should be slow and precise. When placing frames, lower them carefully. When sliding frames together, do so slowly to give bees a chance to move. Crushing the queen would be a devastating setback for the new colony.
Choose the Right Time and Weather
Perform the transfer on a warm, calm, sunny day, preferably in the middle of the day. Most of the forager bees will be out of the hive, meaning you are dealing with fewer bees and a less defensive colony.
Next Steps for a Successful Colony
Once the transfer is complete, your immediate actions set the tone for the colony's future success.
- If your primary focus is a strong, healthy start: Provide the new colony with a 1:1 sugar water feed to stimulate wax production and help them draw out the new frames.
- If your primary focus is minimal disturbance: Leave the colony entirely alone for at least one week to allow them to settle, reorient, and begin working in their new space.
This careful and orderly transfer gives your new colony the best possible start in its new home.
Summary Table:
| Step | Key Action | Why It's Important |
|---|---|---|
| Preparation | Gather gear, light smoker, prepare new hive. | Ensures a smooth, calm, and efficient process. |
| Transfer | Move frames in exact order from nuc to hive. | Preserves the brood nest structure, minimizing colony stress. |
| Finalization | Shake in remaining bees, add empty frames, install entrance reducer. | Secures the hive and helps the small colony defend its new home. |
| Post-Transfer | Provide feed and avoid disturbance for at least a week. | Supports wax production and allows the colony to settle. |
Ensure your next nuc transfer is a success with the right equipment from HONESTBEE.
As a trusted wholesale supplier for commercial apiaries and beekeeping equipment distributors, we provide the durable, high-quality supplies you need for critical beekeeping operations like colony transfers. From reliable smokers and hive tools to essential protective gear, our products are designed to support the health of your bees and the efficiency of your business.
Let us help you equip your operation for success. Contact our team today to discuss your wholesale needs and discover the HONESTBEE difference.
Visual Guide
Related Products
- 5 Frame Wooden Nuc Box for Beekeeping
- Automatic Heat Preservation 6 Frame Pro Nuc Box for Honey Bee Queen Mating
- Styrofoam Mini Mating Nuc Box with Frames Feeder Styrofoam Bee Hives 3 Frame Nuc Box
- 5 Frame Langstroth Poly Nuc Corrugated Plastic Nuc Boxes
- 4 Frame Plastic Nuc Boxes for Beekeeping Bee Nuc Box
People Also Ask
- How are nuc boxes used in queen rearing? The Essential Tool for Reliable Queen Mating
- What are the characteristics of a standard nuc? Essential Guide for Professional Apiaries
- What built-in detail do many 5-frame nuc boxes have on the lid? A Guide to Efficient Hive Top Feeding
- What frames should be moved into the queenless hive when requeening with a nuc? Ensure a Successful Queen Introduction
- What is the primary function of five-frame nuclei boxes? Master Early Colony Establishment for Stronger Hives


