This guide provides detailed instructions for the setup, operation, and maintenance of our bee venom collection kit. Please read all safety precautions carefully before beginning.

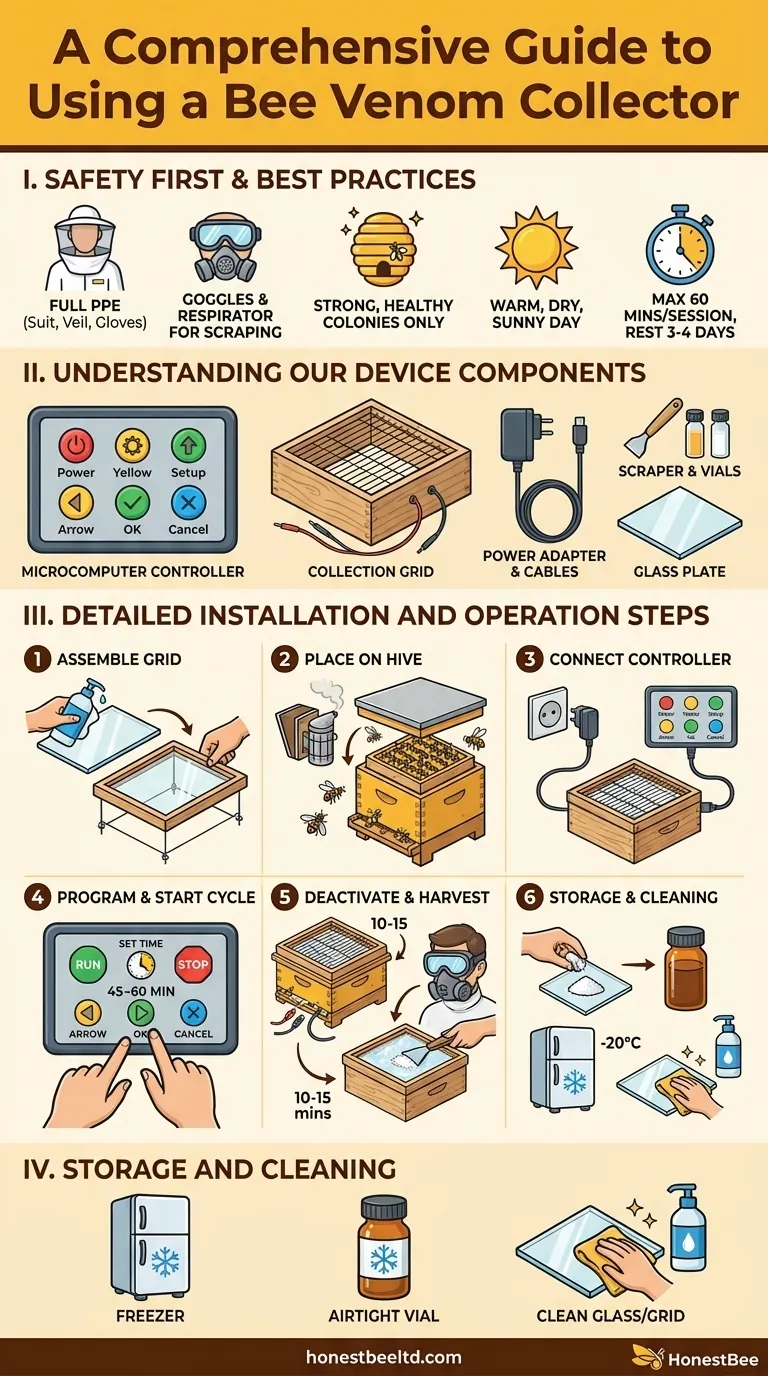
I. Safety First & Best Practices
- Personal Protective Equipment (PPE): Always wear a full beekeeping suit, veil, and gloves during installation and removal. The bees will become highly agitated. When scraping the dried venom, it is critical to wear safety goggles and a respirator/face mask to prevent the fine powder from entering your eyes or lungs.
- Hive Health: Only collect venom from strong, healthy, and populous colonies. The process is stressful for bees, and a weak hive may not recover.
- Optimal Conditions: The best time for collection is on a warm, dry, sunny day when bees are actively foraging. Avoid cold, rainy, or windy weather.
- Collection Frequency: Do not over-stress a colony. Collect from the same hive for a maximum of 60 minutes per session. Allow a rest period of at least 3-4 days before using the collector on the same hive again.
II. Understanding Our Device Components
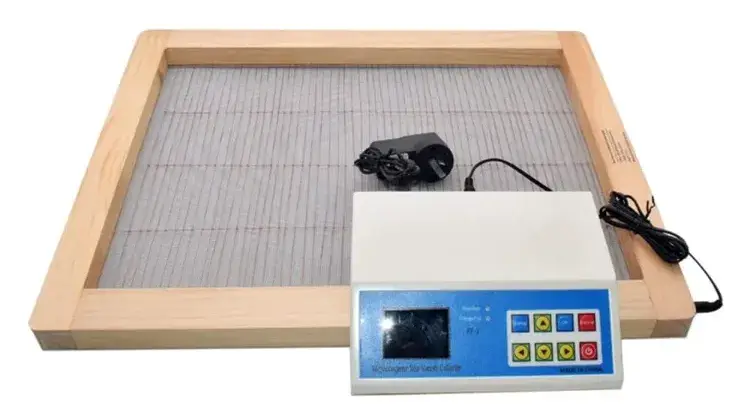
Our kit includes:
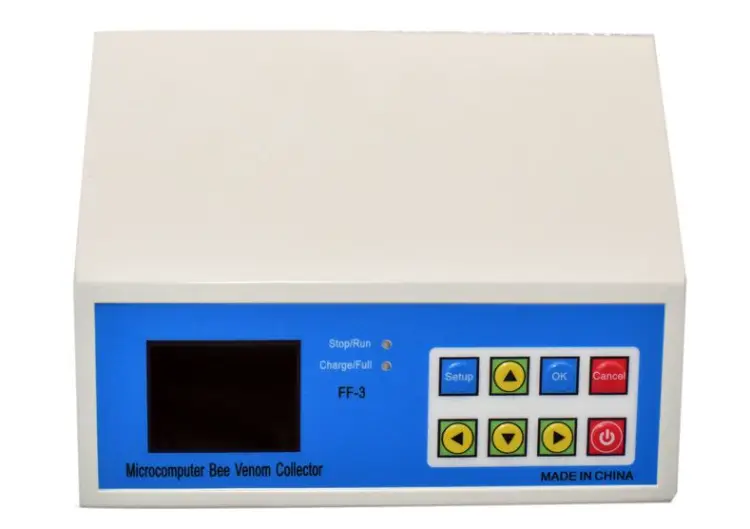
- Microcomputer Controller: The main unit with an LCD screen and control buttons. It powers and controls the electric grid.
- Collection Grid: The wooden frame with parallel wires.
- Power Adapter & Cables: To connect the controller to a power source and to the grid.
- Accessories: Includes a scraper for venom and small vials for storage.
- Glass Plate: A sheet of glass that fits inside the wooden frame, on the wires (self-provided, size: 445*345mm).
III. Detailed Installation and Operation Steps
Step 1: Assemble the Collection Grid
- Thoroughly clean the glass plate with alcohol to ensure it is free of any oils or residues. Let it dry completely.
- Carefully slide the clean glass plate into the wooden frame so that it sits on the electric wires.
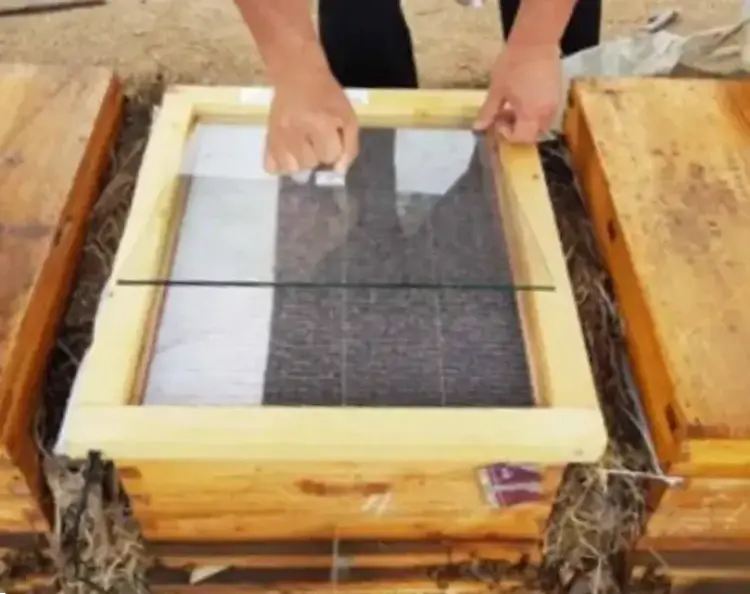
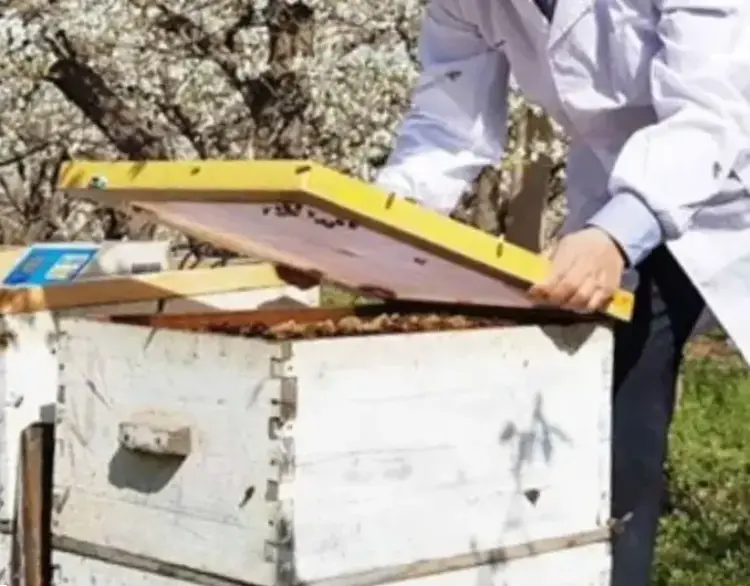
Step 2: Place the Collector on the Hive
- Gently smoke the bees at the top of the hive to calm them.
- Remove the outer cover and inner cover of the hive.
- Place the assembled collection grid (with the glass plate inside) directly on top of the uppermost hive box's frames.
- The bees will move up from between the frames, make contact with the wires, and deposit venom on the glass plate.
Step 3: Connect the Controller
- Place the controller box on a stable surface near the hive, such as on the hive's outer cover or a small stool.
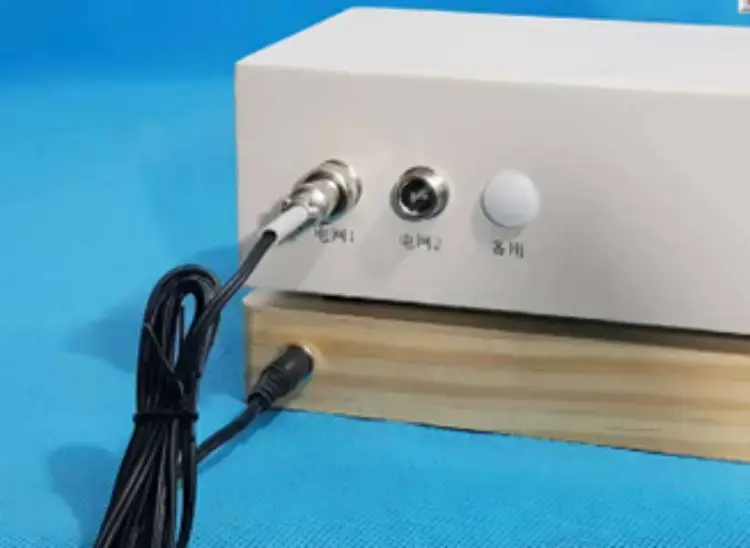
- Plug the AC power adapter into a wall socket and connect its barrel plug to the power input port on the back of the controller.
- Take the long connecting cable. Plug one end into one of the "OUTPUT" ports on the back of the controller.
- Plug the other end of the cable into the port on the side of the wooden collection grid.
Step 4: Program and Start the Collection Cycle
This controller is programmable. The buttons have the following functions:
- Red Button: Power ON/OFF
- Blue "Setup" Button: Enter settings mode.
- Yellow Arrow Buttons (◀ / ▶ or ▲ / ▼): To adjust time and other settings.
- Blue "OK" Button: Confirm settings and start the cycle.
- Red "Cancel" Button: Stop the cycle or exit settings.
Operating Sequence:
- Press the Red Power button to turn the controller on. The LCD screen will light up.
- Press the Blue "Setup" button to enter programming mode. You can likely set the "Run Time" and "Stop Time" for the electrical pulses, as well as the total collection duration.
- Use the Arrow buttons to set your desired time (a 45-60 minute total duration is standard).
- Press the Blue "OK" button to save the settings and start the collection process.
- The controller will now begin its cycle. The indicator lights and screen will show that it is alternating between "Run" (delivering an electrical pulse) and "Stop" (a rest period). This intermittent shock is designed to stimulate the bees without killing them.
Step 5: Deactivate and Harvest
- After the programmed time (e.g., 60 minutes) has passed, the controller will stop. You can also stop it manually by pressing the Red "Cancel" button and then the Red Power button.
- Disconnect the cables from the grid and controller.
- Leave the grid on the hive for another 10-15 minutes. This allows the agitated bees to calm down and leave the device.
- Carefully lift the collection grid from the hive. Gently brush or shake off any remaining bees. Replace your hive's inner and outer covers.
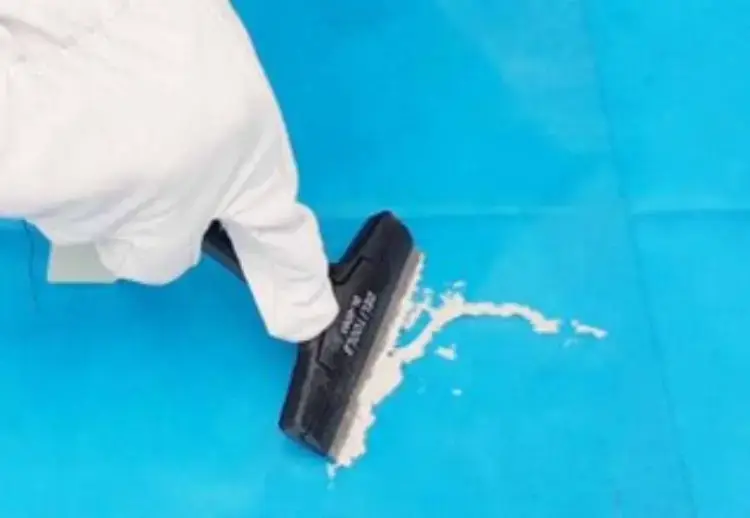
- Take the grid to a clean, indoor, draft-free area for harvesting. Put on your safety mask and goggles now.
- Carefully slide the glass plate out of the frame. You will see the dried venom as a white or yellowish crystalline substance.
- Use the provided scraper or a clean razor blade to gently scrape the venom crystals onto a clean piece of paper or directly into a storage vial.
Step 6: Storage and Cleaning
- Immediately transfer the collected venom powder into an airtight, light-proof glass vial (amber glass is best).
- For long-term preservation of its potency, store the vial in a freezer (-20°C / 0°F).
- Thoroughly clean the glass plate with alcohol and wipe down the grid wires to remove any propolis. Proper cleaning ensures the purity of your next collection and the longevity of your equipment.
Visual Guide
Related Products
- Full Set Beekeeping Electronic Bee Venom Collector Machine Device for Bee Venom Collecting
- 30 cm Plastic Entrance Hole Bee Pollen Trap and Collector
- Plastic Bee Pollen Trap Strips Comb Catcher Collector
- Removable Plastic Pollen Trap With Ventilated Tray for Bees Pollen Collector
- 8 Frame and 10 Frame Propolis Trap Collector Screen for Propolis Collection