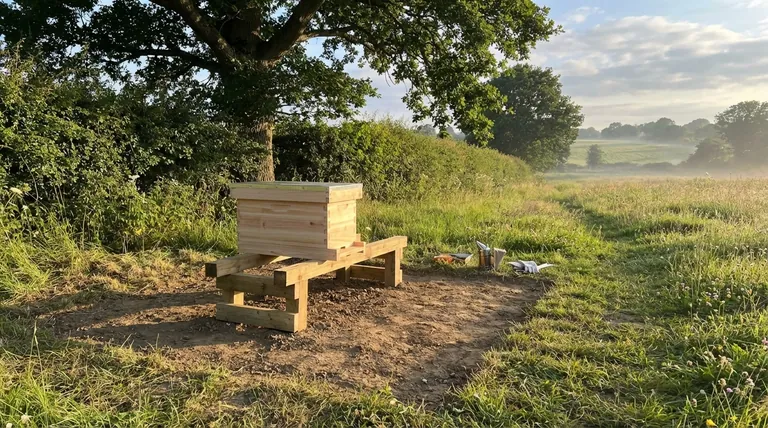
To prepare your hive location, you must select a site that provides a strategic balance of sunlight and shade, protection from harsh weather, and easy access for you, the beekeeper. Before the bees arrive, the ground should be cleared and leveled, and a proper hive stand should be put in place to create a stable, secure, and dry foundation for the colony's new home.
The goal of site preparation is not just to find a convenient spot for a box. It is to create a permanent micro-environment that minimizes stress on the colony and maximizes its chances of thriving for years to come.
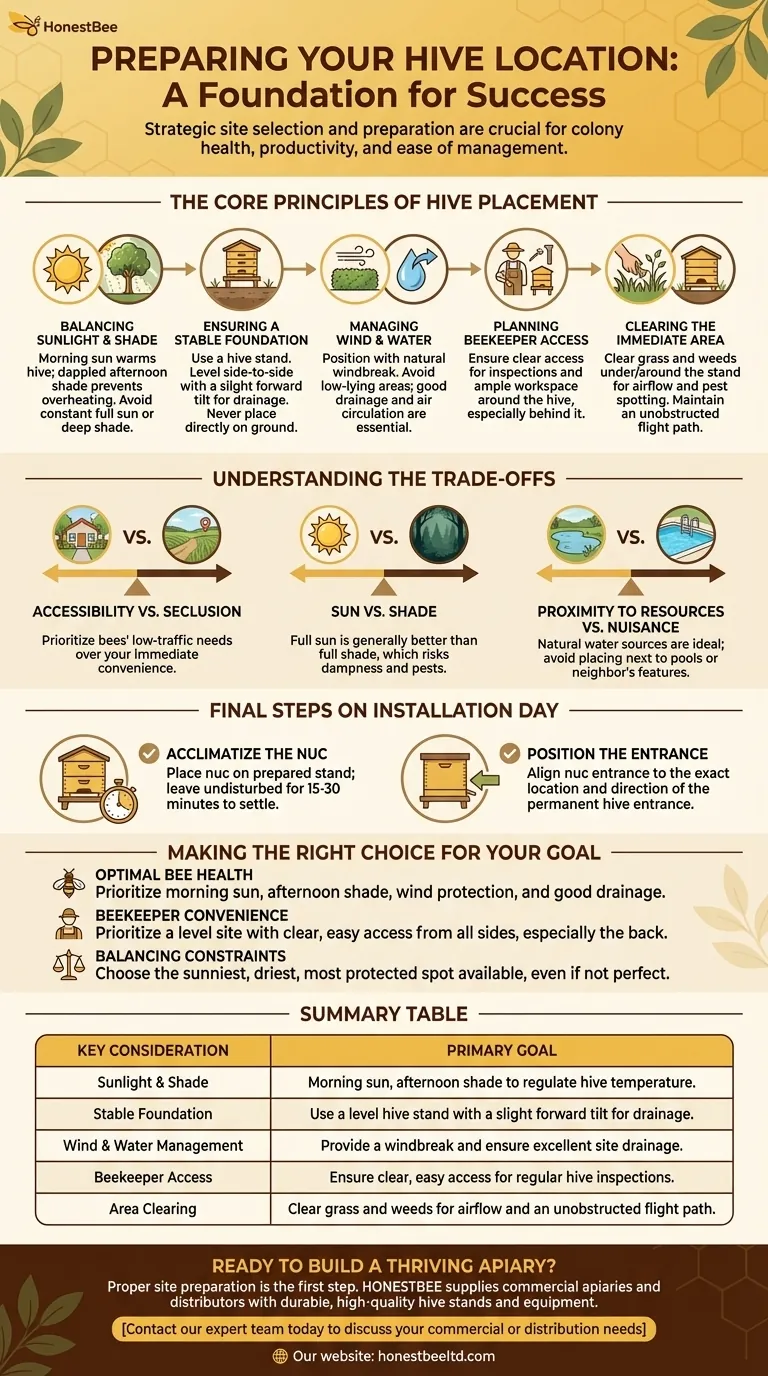
The Core Principles of Hive Placement
Proper hive placement is arguably one of the most critical decisions you will make for the long-term health of your colony. A well-chosen site reduces hive maintenance, prevents common problems, and supports a more productive and healthy population of bees.
Balancing Sunlight and Shade
A common mistake is placing a hive in full, unrelenting sun or deep, constant shade. The ideal location strikes a careful balance.
Place the hive where it will receive direct morning sun. This warms the hive early, encouraging the bees to begin foraging sooner.
The location should ideally have dappled shade during the hot afternoon hours. This prevents the hive from overheating, which forces the bees to expend precious energy and water just to cool the interior.
Ensuring a Stable Foundation
A hive is a heavy, vertical structure that must remain stable in all conditions. Never place your hive equipment directly on the ground.
Use a hive stand to elevate the hive off the ground. This improves air circulation, prevents moisture from seeping into the wood, and deters pests like skunks that might harass the hive entrance.
Ensure the hive stand is perfectly level from side-to-side but has a slight forward tilt (just a few degrees). This allows any rainwater that drives into the entrance to drain out rather than pooling inside.
Managing Wind and Water
Bees are sensitive to their immediate environment. Constant wind and damp conditions create significant stress.
Position the hive with a natural windbreak behind it, such as a hedge, fence, or building. This protects it from cold prevailing winds, especially in winter.
Avoid placing the hive in low-lying areas where water collects or air stagnates. Good drainage and air circulation are essential for preventing dampness and associated mold or disease.
Planning for Beekeeper Access
You will be visiting your hive regularly for inspections. Thinking about your own access now will save you significant frustration later.
Ensure you have clear, easy access to the site while carrying potentially heavy or awkward equipment.
Leave ample room to work around the hive, especially behind it. You will need space to stand, place hive components during an inspection, and maneuver without feeling cramped.
Clearing the Immediate Area
The area directly around the hive should be clear of obstructions and tall vegetation.
Clear grass and weeds from under and around the hive stand. This maintains airflow and makes it easier to spot pests or issues at the hive's base. It also reduces the risk of a grass fire threatening a wooden hive.
A clear entrance path ensures the bees have an unobstructed flight path into and out of the hive.
Understanding the Trade-offs
There is no single "perfect" hive location, and you will likely need to make a compromised decision. Understanding the trade-offs is key.
Accessibility vs. Seclusion
The most accessible spot for you (e.g., right next to your patio) is often the worst spot for the bees and for your family or neighbors. Prioritize the bees' need for a low-traffic area over your own convenience.
Sun vs. Shade
While afternoon shade is ideal, a location with full sun is generally better than a location with full shade. A damp, cool hive is susceptible to pests like small hive beetles and chalkbrood, whereas bees can manage heat if they have a nearby water source.
Proximity to Resources vs. Nuisance
Bees need water to drink and to cool the hive. Having a natural water source (a pond, a creek) nearby is excellent, but placing a hive right next to a swimming pool, birdbath, or neighbor's water feature can create a nuisance.
Final Steps on Installation Day
Once your site is fully prepared, there are two final considerations for the day you bring your nucleus hive home.
Acclimatize the Nuc
After you transport the nucleus hive, place the nuc box directly on your prepared hive stand and leave it undisturbed for at least 15-30 minutes. This allows the bees to settle and reorient before you begin the transfer.
Position the Entrance
Place the entrance of the nuc box so it is facing the same direction and is in the exact location where the permanent hive's entrance will be. This helps the bees' initial orientation flights lock onto the correct final position.
Making the Right Choice for Your Goal
Your final decision will depend on balancing the ideal with the practical. Use these points as a guide.
- If your primary focus is optimal bee health: Prioritize morning sun, afternoon shade, and excellent protection from wind and ground moisture.
- If your primary focus is beekeeper convenience: Prioritize a level site with clear, easy access from all sides, especially from the back.
- If you are balancing multiple constraints: Choose the sunniest, driest, most protected location you have, even if it isn't perfect, and be prepared to provide a dedicated water source.
Ultimately, thoughtful preparation of the hive's location sets the foundation for a successful and rewarding beekeeping experience.
Summary Table:
| Key Consideration | Primary Goal |
|---|---|
| Sunlight & Shade | Morning sun, afternoon shade to regulate hive temperature. |
| Stable Foundation | Use a level hive stand with a slight forward tilt for drainage. |
| Wind & Water Management | Provide a windbreak and ensure excellent site drainage. |
| Beekeeper Access | Ensure clear, easy access for regular hive inspections. |
| Area Clearing | Clear grass and weeds for airflow and an unobstructed flight path. |
Ready to build a thriving apiary? Proper site preparation is the first step to a successful beekeeping operation. HONESTBEE supplies commercial apiaries and beekeeping equipment distributors with the durable, high-quality hive stands and equipment needed to create a stable foundation for your colonies. Our wholesale-focused operations ensure you get the reliable supplies your business depends on.
Contact our expert team today to discuss your commercial or distribution needs and set your hives up for success.
Visual Guide
Related Products
- 5 Frame Wooden Nuc Box for Beekeeping
- Automatic Heat Preservation 6 Frame Pro Nuc Box for Honey Bee Queen Mating
- 4 Frame Plastic Nuc Boxes for Beekeeping Bee Nuc Box
- Steel Round Disc Entrance Reducer for Flexzion Bee Hive Nuc Box Gate
- Styrofoam Mini Mating Nuc Box with Frames Feeder Styrofoam Bee Hives 3 Frame Nuc Box
People Also Ask
- How are nuc boxes used in queen rearing? The Essential Tool for Reliable Queen Mating
- What roles do five-frame nucleus boxes and ten-frame Langstroth hive boxes play in colony standardization?
- What is the procedure for moving bees from a 5-frame nuc to a 10-frame hive? 6 Steps for a Successful Colony Transfer
- What are the characteristics of a standard nuc? Essential Guide for Professional Apiaries
- What are the options for adding frames to a nuc after taking two frames from the parent colony?


