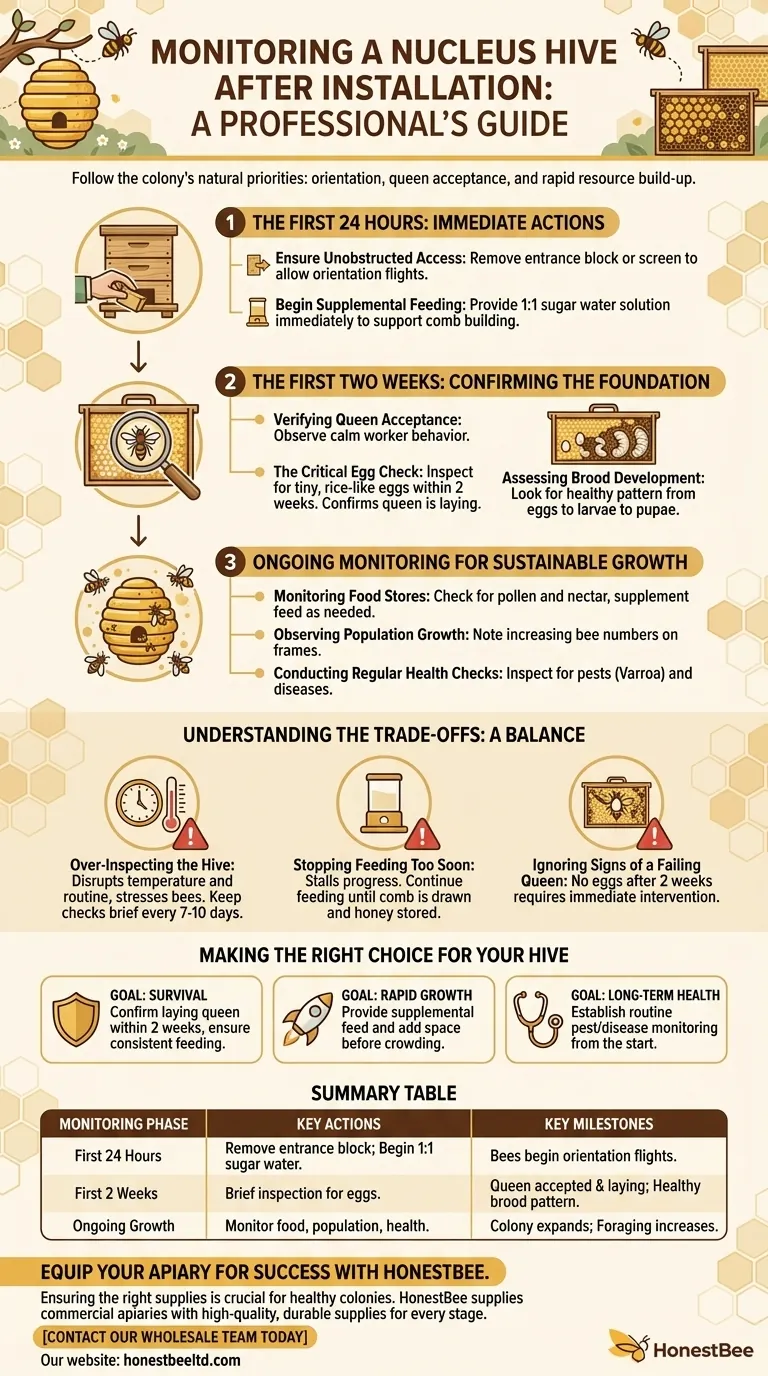
To successfully monitor a nucleus hive after installation, your process must follow the colony's natural priorities: immediate orientation, queen acceptance, and rapid resource build-up. This involves a sequence of checks, starting with ensuring the bees can fly on day one, verifying the queen is laying eggs within two weeks, and consistently feeding the hive until it is fully established on its new frames.
A new nucleus hive is a colony in a critical growth phase. Your monitoring goal is not just to check for survival, but to ensure it has the three essential resources for rapid establishment: a productive queen, adequate space, and consistent nutrition.
The First 24 Hours: Immediate Actions
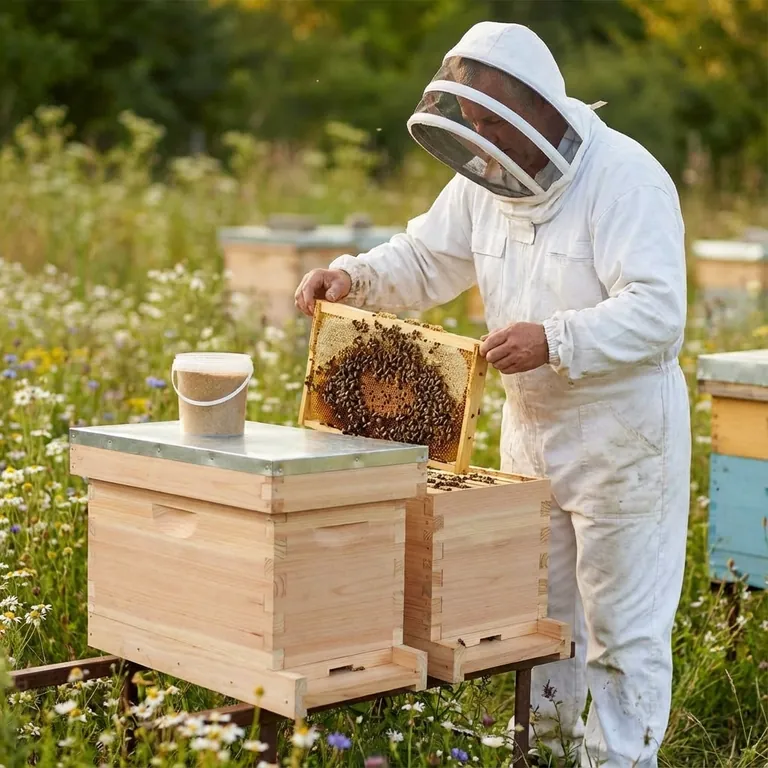
The moments after you place your new hive are crucial for setting the colony up for success. Your actions here help the bees orient themselves and begin work immediately.
Ensure Unobstructed Access
Once the hive is in its permanent location, you must remove the entrance block or any screen material covering the entrance.
This allows the bees to begin their orientation flights, where they map the hive's new GPS coordinates and learn their surroundings.
Begin Supplemental Feeding
A nucleus hive needs a tremendous amount of energy to build out new comb. You should begin feeding them a 1:1 sugar water solution right away.
Continue this feeding until the bees have drawn out the wax foundation on all the frames in their first box or until a major natural nectar flow begins.
The First Two Weeks: Confirming the Foundation
This initial period is dedicated to verifying the single most important component of the hive: the queen. Without a healthy, accepted, and productive queen, the colony cannot grow.
Verifying Queen Acceptance
The behavior of the worker bees is your first clue. If the queen was in a separate cage, the workers should not be aggressively biting or balling the cage. A calm hum around the queen is a positive sign.
The ultimate confirmation, however, comes from the comb itself.
The Critical Egg Check
Within two weeks of installation, you must perform an inspection to find eggs. Look in the center of the brood frames for tiny, rice-like grains, one per cell.
Finding eggs is the definitive sign that the queen has been accepted and is actively laying. This is your first major milestone.
Assessing Brood Development
After confirming eggs, subsequent checks should reveal a healthy brood pattern. You want to see the natural progression from eggs to C-shaped larvae and then to capped pupae.
This confirms not only that the queen is laying but that the brood is viable and developing properly.
Ongoing Monitoring for Sustainable Growth
Once the queen is established, your focus shifts to managing the colony's explosive growth. Regular, calm inspections are key.
Monitoring Food Stores
Even while feeding, take note of the colony's honey and pollen stores. A healthy hive will be actively collecting pollen (visible on bees' legs) and storing nectar.
This indicates they are successfully foraging and supplementing the sugar water you provide.
Observing Population Growth
A thriving nuc will grow in population noticeably from week to week. You should see an increasing number of frames covered with bees during each inspection.
This population boom is necessary to support the growing brood, forage for resources, and defend the hive.
Conducting Regular Health Checks
From your first inspections, establish a habit of looking for signs of pests and disease. Pay close attention to Varroa mites, a pervasive threat to honeybees.
Also, be aware of signs of more serious brood diseases, like American Foulbrood, to ensure you can address any health issues promptly. Proper ventilation is also key to managing hive humidity and health.
Understanding the Trade-offs
Proper monitoring is a balance. Your goal is to gather information without disrupting the colony's critical work.
Over-Inspecting the Hive
While it's tempting to look inside frequently, each inspection disrupts the hive's temperature and routine, stressing the bees. In the initial weeks, a brief check once every 7-10 days is sufficient.
Stopping Feeding Too Soon
A common mistake is to stop supplemental feeding prematurely. The colony needs this consistent energy source until they have fully drawn out their comb and have significant honey stores of their own. Cutting off their fuel can stall their progress indefinitely.
Ignoring Signs of a Failing Queen
A lack of eggs after two weeks is not something to wait on. It is a critical problem that signals the colony is queenless. This situation requires immediate intervention, typically by introducing a new queen.
Making the Right Choice for Your Hive
Your monitoring approach should align with your primary goal for the colony.
- If your primary focus is survival: Confirm the queen is laying eggs within two weeks and ensure the colony is fed consistently.
- If your primary focus is rapid growth: Provide both supplemental feed and ample space by adding new frames or boxes just before they become crowded.
- If your primary focus is long-term health: Establish a routine for monitoring pests like Varroa mites from your very first inspection.
By systematically confirming these key milestones, you transform a vulnerable nucleus hive into a resilient and productive colony.
Summary Table:
| Monitoring Phase | Key Actions | Key Milestones |
|---|---|---|
| First 24 Hours | Remove entrance block; Begin 1:1 sugar water feeding. | Bees begin orientation flights. |
| First 2 Weeks | Perform brief inspection to check for eggs. | Queen is accepted and laying; Healthy brood pattern develops. |
| Ongoing Growth | Monitor food stores & population; Conduct health checks for pests/disease. | Colony expands onto new frames; Foraging activity increases. |
Equip your apiary for success with HONESTBEE.
Monitoring a nucleus hive is just the beginning. Ensuring your beekeeping operation has the right supplies is crucial for healthy, productive colonies. HONESTBEE supplies commercial apiaries and beekeeping equipment distributors with the high-quality, durable supplies needed for every stage of hive management—from nuc installation to honey harvest.
Contact our wholesale team today to discuss your equipment needs and build a stronger, more resilient beekeeping business.
Visual Guide
Related Products
- 5 Frame Wooden Nuc Box for Beekeeping
- Automatic Heat Preservation 6 Frame Pro Nuc Box for Honey Bee Queen Mating
- 4 Frame Plastic Nuc Boxes for Beekeeping Bee Nuc Box
- Steel Round Disc Entrance Reducer for Flexzion Bee Hive Nuc Box Gate
- Styrofoam Mini Mating Nuc Box with Frames Feeder Styrofoam Bee Hives 3 Frame Nuc Box
People Also Ask
- What is the most common type of standard nuc? The 5-Frame Nuc Explained
- What is the primary function of five-frame nuclei boxes? Master Early Colony Establishment for Stronger Hives
- What is the typical composition of frames in a nuc? A 5-Frame Blueprint for a Thriving Hive
- What is the procedure for moving bees from a 5-frame nuc to a 10-frame hive? 6 Steps for a Successful Colony Transfer
- What are the characteristics of a standard nuc? Essential Guide for Professional Apiaries


