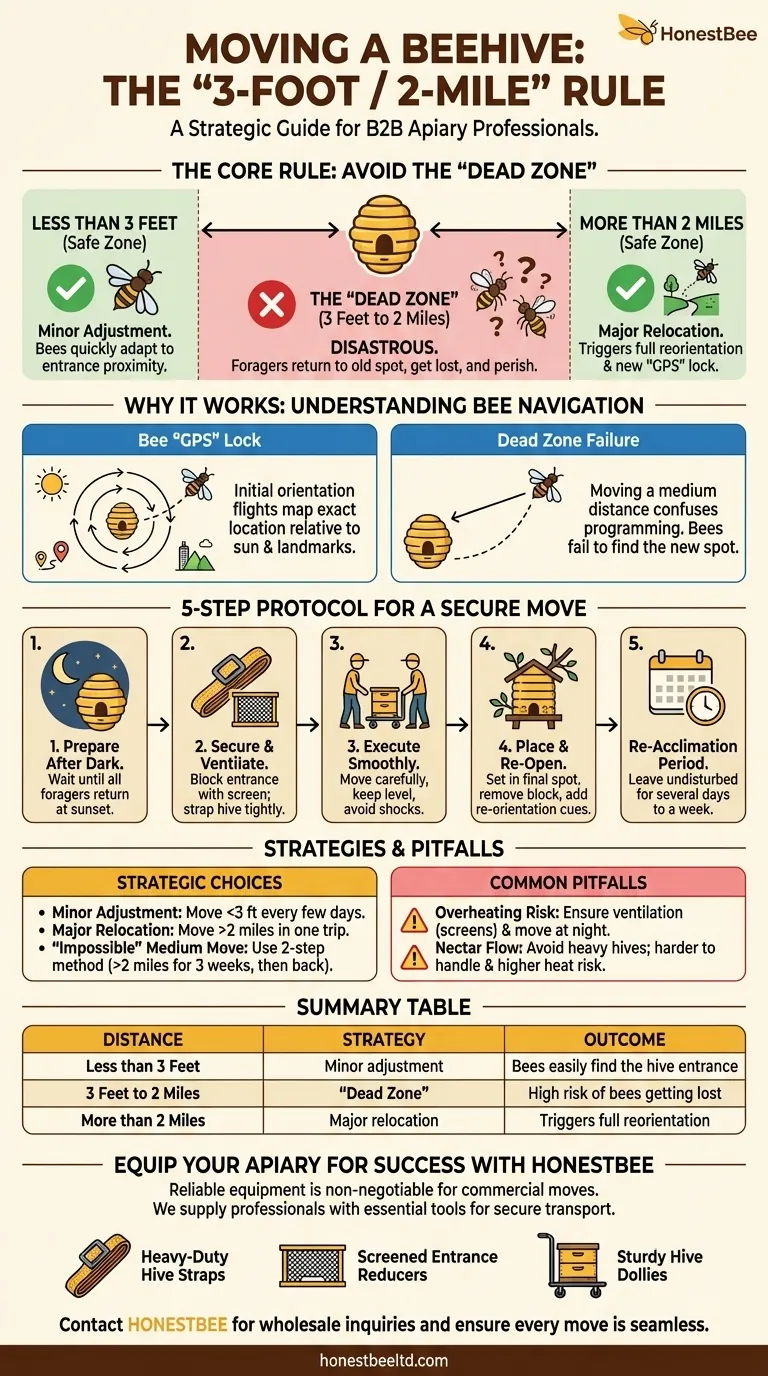
To move a beehive successfully, you must adhere to a strict distance rule: move the hive either less than three feet or more than two miles from its original location. This isn't an arbitrary guideline; it is a critical practice based on a honeybee's navigational biology. Following this rule is the single most important factor in preventing foraging bees from getting lost and ensuring the survival of your colony.
The "3-foot / 2-mile" rule is a strategic solution to a biological problem. It works by either keeping the hive's entrance within the bees' immediate search area or by moving it so far that it forces them to completely reset their internal GPS and learn a new home location.
Understanding Bee Navigation: The "Why" Behind the Rule
To safely move a colony, you must first understand how bees perceive their world. They are not simply looking for a box; they are returning to a precise point in space.
The Hive's "GPS" Lock
When a bee leaves the hive for the first time, it performs an orientation flight. It flies in expanding circles, mapping the hive's exact location relative to the sun and surrounding landmarks. This initial flight locks the hive's "GPS coordinates" into its memory.
The Problem with the "Dead Zone"
Moving a hive a "medium" distance—anywhere from three feet to two miles—is disastrous. Foraging bees will follow their programming and return to the exact spot where the hive used to be. Finding nothing, they will become disoriented, confused, and unable to find their colony. These lost bees will eventually perish, significantly weakening the hive by depleting its workforce.
Why "Less Than 3 Feet" Works
A move of less than three feet keeps the entrance within the bees' immediate field of view upon their return. They may be momentarily confused, but they will quickly locate the familiar scent and sight of their hive entrance nearby. This small adjustment is something they can easily adapt to.
Why "More Than 2 Miles" Works
A move of over two miles places the hive well outside the bees' established foraging range. When they emerge the next morning, they will immediately recognize that their entire environment is new. This triggers a full reorientation, compelling them to perform new orientation flights and establish a brand-new home base, effectively forgetting the old location.
A Step-by-Step Protocol for Moving Your Hive
Executing the move correctly is just as important as the distance. The goal is to transport the entire colony securely and with minimal stress.
Step 1: Prepare the Hive After Dark
Wait until well after sunset to begin the process. By this time, all the foraging bees will have returned from the field and are inside the hive for the night. Moving during the day will leave a large portion of your workforce behind.
Step 2: Secure the Entrance and Components
Block the hive entrance. Use a screened entrance reducer or a piece of hardware cloth that allows for ventilation but prevents bees from escaping. It is also crucial to strap the hive components (boxes, lid, and bottom board) together tightly with ratchet straps to prevent them from shifting during transit.
Step 3: Execute the Move Smoothly
Carry the hive carefully, keeping it as level as possible. Avoid jarring motions or sudden bumps, which can disturb the bees and potentially cause comb to break. A hive dolly or a second person can make this process much safer and easier.
Step 4: Placement and Re-Opening
Once at the new location, place the hive in its final position. You can then immediately remove the entrance block. Placing a few leafy branches against the entrance can help force the bees to re-evaluate their surroundings when they leave the next morning.
Step 5: Allow for a Re-Acclimation Period
Leave the colony undisturbed for at least a few days, and preferably a full week. They need time to settle, reorient, and resume their normal routines. Avoid the temptation to perform an inspection during this critical period.
Understanding the Trade-offs and Common Pitfalls
Even a well-planned move has risks. Being aware of them allows you to mitigate potential problems.
The Risk of Overheating
Blocking a hive entrance, even with a screen, restricts airflow. On a warm night, the colony can generate immense heat, which can lead to overheating and death. Work quickly and ensure your move is done during the coolest part of the night.
Ignoring the Calendar
Do not move a hive during a major nectar flow if you can avoid it. The hive will be heavy with honey and packed with bees, making it difficult to handle and increasing the risk of overheating.
The "Impossible" Medium-Distance Move
Sometimes, you have no choice but to move a hive a distance within the "dead zone" (e.g., 100 feet across your property). The safest way to do this is to first move the hive over two miles away, leave it there for two to three weeks, and then move it back to the desired final location. This forces the complete navigational reset.
Making the Right Choice for Your Goal
Your objective determines which part of the rule to follow.
- If your primary focus is a minor adjustment within your yard: Move the hive less than three feet at a time, ideally every few days, until you reach your target spot.
- If your primary focus is relocating to a new property or apiary: Move the hive more than two miles in a single, well-planned trip at night.
- If you absolutely must move the hive a "medium" distance: Use the two-step method—move it far away (>2 miles) for three weeks, then bring it back to the new, permanent spot.
A successful hive move is a measure of the beekeeper's respect for the colony's incredible navigational biology.
Summary Table:
| Distance | Strategy | Outcome |
|---|---|---|
| Less than 3 Feet | Minor adjustment | Bees easily find the hive entrance |
| 3 Feet to 2 Miles | "Dead Zone" | High risk of bees getting lost |
| More than 2 Miles | Major relocation | Triggers full reorientation |
Ensure Your Next Hive Move is a Success with the Right Equipment
Moving a beehive safely requires precision, timing, and reliable equipment. For commercial apiaries and beekeeping equipment distributors, using high-quality, durable supplies is non-negotiable for protecting your valuable colonies during transit.
HONESTBEE supplies beekeeping professionals with the essential tools for secure hive relocation, including:
- Heavy-Duty Hive Straps to keep boxes securely fastened.
- Screened Entrance Reducers for safe, ventilated transport.
- Sturdy Hive Dollies for smooth, level moving.
Don't leave your hive's safety to chance. Let our wholesale-focused operations equip your business for success.
Contact HONESTBEE today to discuss your equipment needs and ensure every hive move you make is seamless and stress-free.
Visual Guide
Related Products
- Wholesales Dadant Size Wooden Bee Hives for Beekeeping
- Stainless Steel Round Beehive Air Vents for Ventilation
- Metal Bee Hive Stand Bee Box Stand for Beekeeping
- Durable Plastic Hive Number Set for Beekeeping
- Wooden Bee Hive Frames for Beekeeping and Wholesale
People Also Ask
- How long do wooden bee hives last? Extend Your Hive's Lifespan Beyond 10 Years
- Why Increase Hive Installation Quantity in Commercial Apiaries? Offset Climate Risks with Scalable Infrastructure
- What are the key advantages of modern improved beekeeping hives? Scale Your Honey Yield and Production Efficiency
- How does the design of improved beekeeping hives contribute to maintaining honey quality and purity? Enhancing Purity
- What are the 2 types of bee hives? Langstroth vs. Top-Bar for Your Apiary


