To install a wire mesh beehive floor, you must first remove the hive's existing solid bottom board. Next, measure the interior dimensions of the hive body and cut the wire mesh to fit precisely, ensuring the holes are approximately 2.5mm to prevent bees from passing through. Secure the mesh to the bottom edge of the hive box using staples or screws, and then place a removable inspection board or tray underneath the new mesh floor.
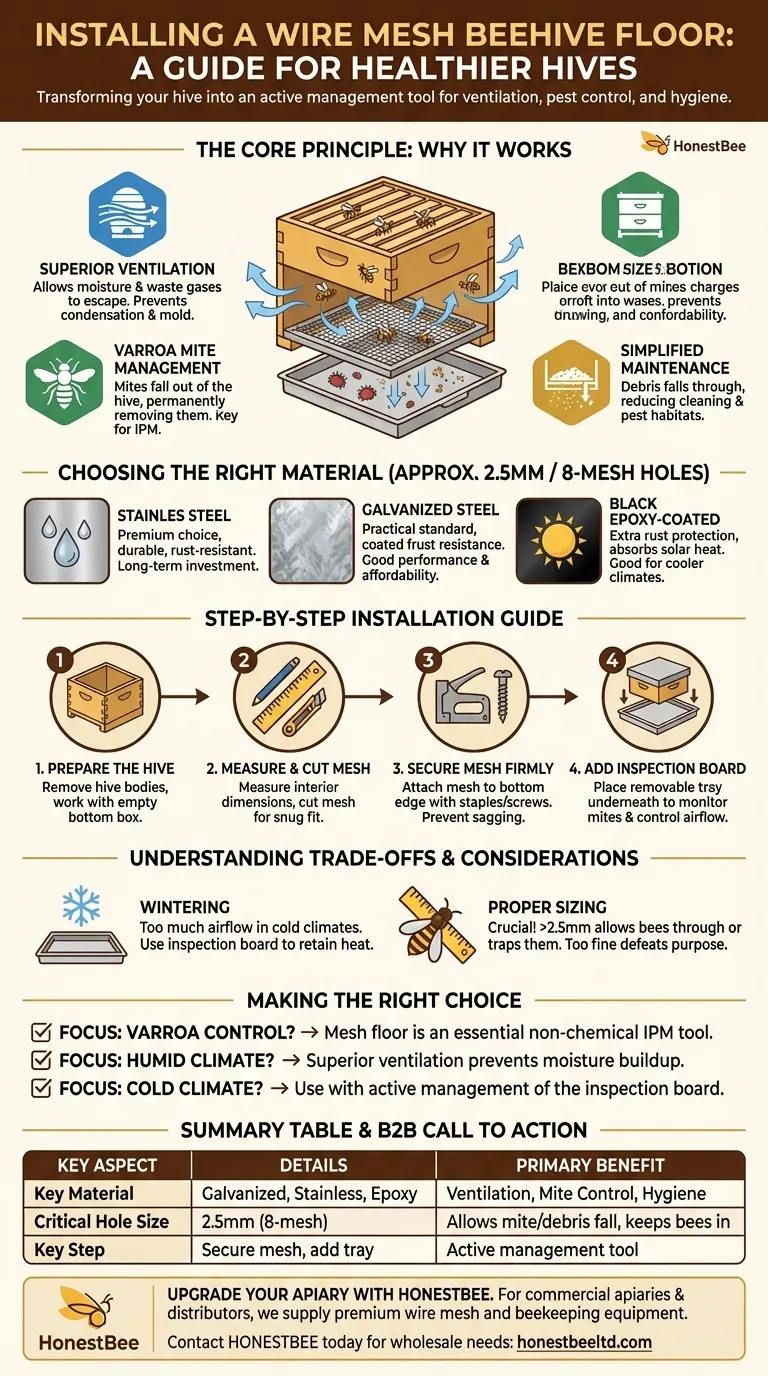
The real purpose of installing a wire mesh floor isn't just to replace a piece of wood; it's to transform the bottom of your hive into an active management tool for ventilation, pest control, and hive hygiene.
The Core Principle: Why a Mesh Floor Works
A screened or mesh bottom board is a fundamental upgrade for modern beekeeping. It addresses several critical factors that determine colony health and productivity.
Superior Ventilation and Moisture Control
A colony of bees generates significant heat and moisture. A solid floor traps this moist air, which can lead to condensation, mold, and fungal growth, stressing the bees and compromising honey quality.
A mesh floor allows this damp air to escape, creating a constant, gentle airflow that keeps the hive environment dry and healthy. This also helps vent waste gases like carbon dioxide.
A Critical Tool for Varroa Mite Management
Varroa mites are one of the greatest threats to honeybee colonies. During their lifecycle, mites occasionally fall off their bee hosts.
With a solid floor, these mites can simply climb back onto another bee. With a mesh floor, they fall completely out of the hive, permanently removing them from the colony. This "mite drop" is a key component of an Integrated Pest Management (IPM) strategy.
Simplified Hive Maintenance
Debris such as wax cappings, pollen, and dead bees naturally accumulates at the bottom of a hive. A mesh floor allows much of this debris to fall through, reducing the need for frequent cleanings and minimizing habitats for other pests like wax moths.
Choosing the Right Material
The type of mesh you choose impacts the longevity and performance of your hive floor. All options must have a hole size of approximately 2.5mm (or 8-mesh, meaning 8 holes per inch) to allow mites and debris to fall through without letting bees pass.
Stainless Steel: The Long-Term Investment
Stainless steel is the premium choice for durability and hygiene. It is highly resistant to corrosion and rust, making it exceptionally easy to clean and maintain. While the initial cost is higher, its long lifespan makes it a cost-effective choice.
Galvanized Steel: The Practical Standard
Galvanized steel wire mesh is a popular and practical option. It is coated in zinc to provide excellent rust resistance and durability. It offers a great balance of performance and affordability for most beekeepers.
Black Epoxy-Coated: The Climate-Specific Choice
This type of mesh is coated with a black epoxy layer, which provides extra protection against rust. A unique benefit is that the black color can absorb solar heat, which may help keep the hive slightly warmer in cooler climates.
Step-by-Step Installation Guide
Proper installation is straightforward but requires attention to detail to ensure a secure, bee-proof fit.
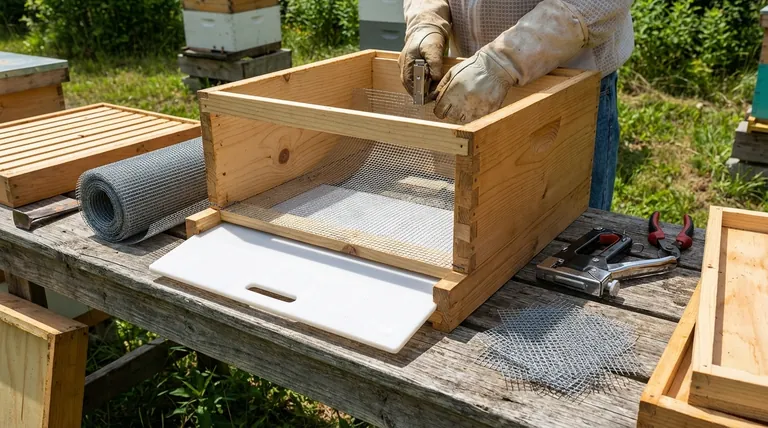
Step 1: Prepare the Hive
Carefully remove the hive bodies from the existing solid bottom board and set them aside. You will now be working with an empty bottom hive box (super).
Step 2: Measure and Cut Your Mesh
Place the hive box on a flat surface and measure its exact interior length and width. Using wire cutters, cut your chosen mesh to these dimensions for a snug fit.
Step 3: Secure the Mesh Firmly
Position the cut mesh over the bottom of the hive box. Using a heavy-duty staple gun or small screws with washers, attach the mesh securely to the wooden frame. Place fasteners every few inches to prevent any sagging or gaps.
Step 4: Add the Removable Inspection Board
A critical component of a mesh floor system is the removable tray or board that slides in underneath the mesh. This board allows you to monitor mite-drop levels to assess infestation and can be slid into place during winter to reduce drafts.
Understanding the Trade-offs
While highly beneficial, a mesh floor introduces new management considerations.
Wintering Considerations
In very cold climates, a fully open mesh floor can create too much airflow, making it difficult for the colony to maintain its winter cluster temperature. This is why the removable inspection board is crucial—it can be inserted during the coldest months to close off the floor and retain heat.
Proper Sizing is Non-Negotiable
Using a mesh with holes larger than 2.5mm is a serious mistake. Bees can get their legs caught, or smaller bees may even pass through, leading to injuries and disruption. Conversely, a mesh that is too fine will not allow mites and debris to fall through, defeating the purpose.
Making the Right Choice for Your Apiary
The decision to use a screened bottom board should be based on your specific goals and environment.
- If your primary focus is Varroa mite control: A mesh floor is an essential, non-chemical tool in your Integrated Pest Management plan.
- If your primary focus is hive health in a humid climate: The superior ventilation provided by a mesh floor is key to preventing moisture buildup and mold.
- If you are beekeeping in a very cold climate: You can absolutely use a mesh floor, but you must actively manage it with an inspection board to protect your colony during winter.
By correctly installing and managing a mesh floor, you can turn a simple hive component into a powerful tool for maintaining a thriving, healthy colony.
Summary Table:
| Key Aspect | Details |
|---|---|
| Primary Benefit | Enhanced ventilation, Varroa mite control, and hive hygiene. |
| Key Material | Galvanized steel, stainless steel, or black epoxy-coated mesh. |
| Critical Hole Size | 2.5mm (8-mesh) to allow mite/debris fall but prevent bees from passing. |
| Key Step | Secure mesh firmly to the bottom of the hive box; use a removable tray underneath. |
| Main Consideration | Use the inspection board to close the floor for winter in cold climates. |
Upgrade Your Apiary's Health with Professional-Grade Equipment
Installing a wire mesh floor is a key step in modern, proactive beekeeping. For commercial apiaries and beekeeping equipment distributors, having a reliable supply of high-quality, durable components is essential for maintaining healthy, productive colonies.
HONESTBEE supplies the beekeeping supplies and equipment you need, including premium wire mesh, through our wholesale-focused operations. We help you build stronger, more resilient hives.
Contact HONESTBEE today to discuss your wholesale needs and equip your beekeeping operation for success.
Visual Guide
Related Products
- Stainless Steel Bee Hive Frame Wire for Beekeeping
- Langstroth Solid Bottom Board for Beekeeping
- Solid Bottom Board Australian Pine Wood Langstroth Bottom Board for Wholesale
- HONESTBEE Wired and Assembled Wooden Bee Frames Foundation for a Thriving Hive
- HONESTBEE Professional Frame Wiring Board and Jig
People Also Ask
- What precautions should be taken when wiring beehive frames? Essential Steps for Comb Durability
- How is the wire tightened in a beekeeping frame? Expert Techniques for Durable Hive Frames
- How is the wire secured at the top of the frame? A Guide to Locking in Tension for Strong Honeycomb
- What tools are needed to wire a beehive frame? Essential Equipment for Durable Frame Construction
- What is the process for tightening and securing the wire at the bottom of the frame? Expert Beekeeping Tips