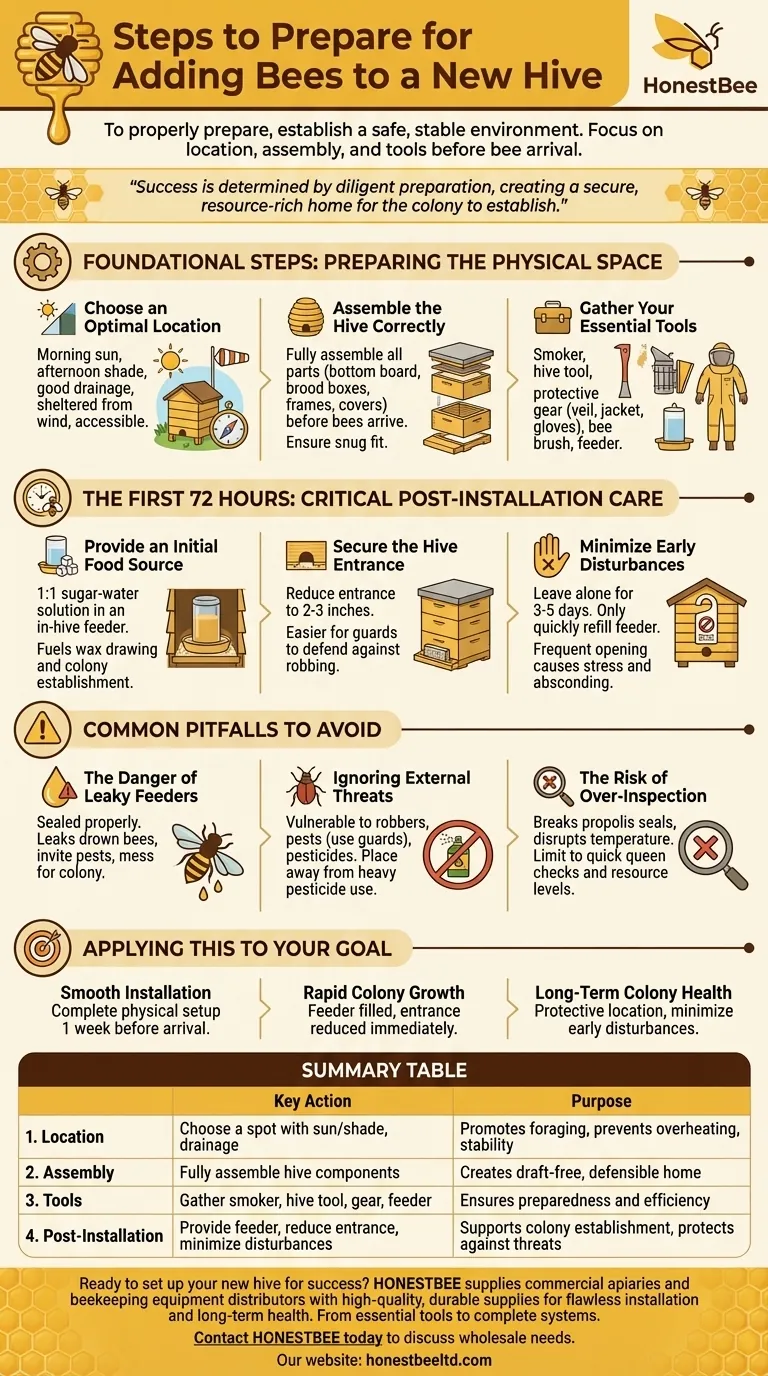
To properly prepare for adding bees to a new hive, you must first establish a safe and stable environment. This involves three core steps: choosing a suitable location for the hive, correctly assembling all hive components, and gathering the essential beekeeping tools before your bees arrive. Only after this physical preparation is complete should you finalize how you will obtain your bees.
The success of a new honeybee colony is determined less by the installation day itself and more by the diligent preparation that precedes it. Your goal is to create a secure, resource-rich home that minimizes stress and allows the bees to immediately begin establishing their colony.
Foundational Steps: Preparing the Physical Space
The physical setup of the hive is the most critical preparatory phase. Getting these details right ensures the bees have a strong foundation from which to build.
Choose an Optimal Location
The hive's location impacts its defensibility, productivity, and health. The ideal spot receives morning sun to encourage foraging but has some afternoon shade to prevent overheating.
Ensure the location has good drainage, is sheltered from strong winds, and is easily accessible for you to perform inspections without major disruption.
Assemble the Hive Correctly
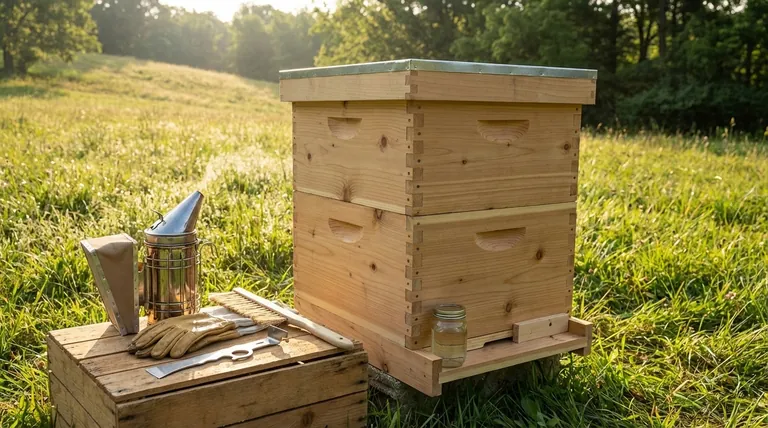
Before your bees arrive, your hive should be fully assembled and placed in its final location. This includes the bottom board, hive bodies (brood boxes), frames with foundation, an inner cover, and an outer cover.
Confirming all parts fit together snugly prevents drafts and makes the hive easier for the bees to defend.
Gather Your Essential Tools
Having your tools ready prevents panic and stress on installation day. The absolute essentials include a smoker, a hive tool, and protective gear like a veil, jacket, and gloves.
You will also need a bee brush and a feeder to provide the new colony with supplemental food.
The First 72 Hours: Critical Post-Installation Care
Once the bees are moved into their new hive, your focus shifts from preparation to support. These first few days are crucial for the colony's acceptance of their new home.
Provide an Initial Food Source
A new colony has no stored resources. You must provide them with a 1:1 sugar-water solution using an in-hive feeder.
This initial feeding fuels the intense work of drawing out wax comb, which is necessary for the queen to begin laying eggs and for workers to store pollen and nectar.
Secure the Hive Entrance
A new, small colony is vulnerable to robbing from stronger hives or other insects. Reduce the hive entrance to a small opening, typically 2-3 inches wide.
This smaller entrance is much easier for the guard bees to defend as the colony's population grows.
Minimize Early Disturbances
After installation, leave the bees alone for at least three to five days. Your only interaction should be to gently refill their feeder if necessary.
Constant opening of the hive creates stress, disrupts the bees' work, and can lead to them abandoning the hive, a behavior known as "absconding."
Common Pitfalls to Avoid
Even with perfect preparation, new beekeepers can make simple mistakes that jeopardize the colony. Understanding these risks is key to ensuring long-term success.
The Danger of Leaky Feeders
When feeding inside the hive, it is critical that your feeder is sealed properly. A slow leak can drown bees and, most catastrophically, could harm or kill the queen.
Drowned bees and sticky surfaces also invite pests and can make a mess that the colony must expend energy to clean.
Ignoring External Threats
A new hive is not just vulnerable to robbers; it's also susceptible to pests, pesticides, and predators.
Ensure your hive is placed away from areas with heavy pesticide use. Consider installing entrance reducers or mouse guards to protect against larger pests.
The Risk of Over-Inspection
While curiosity is natural, inspecting the hive too frequently in the early weeks is counterproductive. Every inspection breaks the propolis seals the bees create and disrupts the brood nest's temperature and humidity.
Limit your first few inspections to quick checks for the queen's presence (look for eggs) and to ensure the colony has enough food and space.
Applying This to Your Goal
Your approach to hive preparation should align with your primary objective as a beekeeper.
- If your primary focus is a smooth and stress-free installation: Complete all physical setup—location, assembly, and tool gathering—at least a week before your bees are scheduled to arrive.
- If your primary focus is rapid colony growth: Ensure a feeder is in place and filled the moment the bees are installed, and keep the entrance reduced to help them conserve energy and defend resources.
- If your primary focus is long-term colony health: Position the hive to protect it from prevailing winds and harsh weather, and remain disciplined about minimizing early disturbances to let the colony establish itself peacefully.
Ultimately, preparing for a new hive is about front-loading your effort to create an environment where the bees can thrive on their own terms.
Summary Table:
| Step | Key Action | Purpose |
|---|---|---|
| 1. Location | Choose a spot with morning sun, afternoon shade, good drainage. | Promotes foraging, prevents overheating, ensures hive stability. |
| 2. Assembly | Fully assemble hive components (bottom board, brood boxes, frames, covers). | Creates a draft-free, defensible home for the bees. |
| 3. Tools | Gather smoker, hive tool, protective gear, bee brush, and feeder. | Ensures you are prepared and efficient on installation day. |
| 4. Post-Installation | Provide sugar-water feeder, reduce hive entrance, minimize disturbances. | Supports colony establishment and protects against threats. |
Ready to set up your new hive for success? HONESTBEE supplies commercial apiaries and beekeeping equipment distributors with the high-quality, durable supplies needed for a flawless installation and long-term colony health. From essential tools to complete hive systems, our wholesale-focused operations ensure you get the reliable equipment your operation depends on.
Contact HONESTBEE today to discuss your wholesale needs and ensure your bees have the best possible start.
Visual Guide
Related Products
- Wholesales Dadant Size Wooden Bee Hives for Beekeeping
- Stainless Steel Round Beehive Air Vents for Ventilation
- Metal Bee Hive Stand Bee Box Stand for Beekeeping
- Durable Plastic Hive Number Set for Beekeeping
- Wooden Bee Hive Frames for Beekeeping and Wholesale
People Also Ask
- What are the disadvantages of using wooden hives? Overcome Maintenance and Weight Hurdles in Your Apiary
- How does the design of improved beekeeping hives contribute to maintaining honey quality and purity? Enhancing Purity
- What are the key advantages of modern improved beekeeping hives? Scale Your Honey Yield and Production Efficiency
- What are the 2 types of bee hives? Langstroth vs. Top-Bar for Your Apiary
- What are the strategic benefits of installing beekeeping hives at an elevation of 1 to 6 meters? Protect Your Assets


