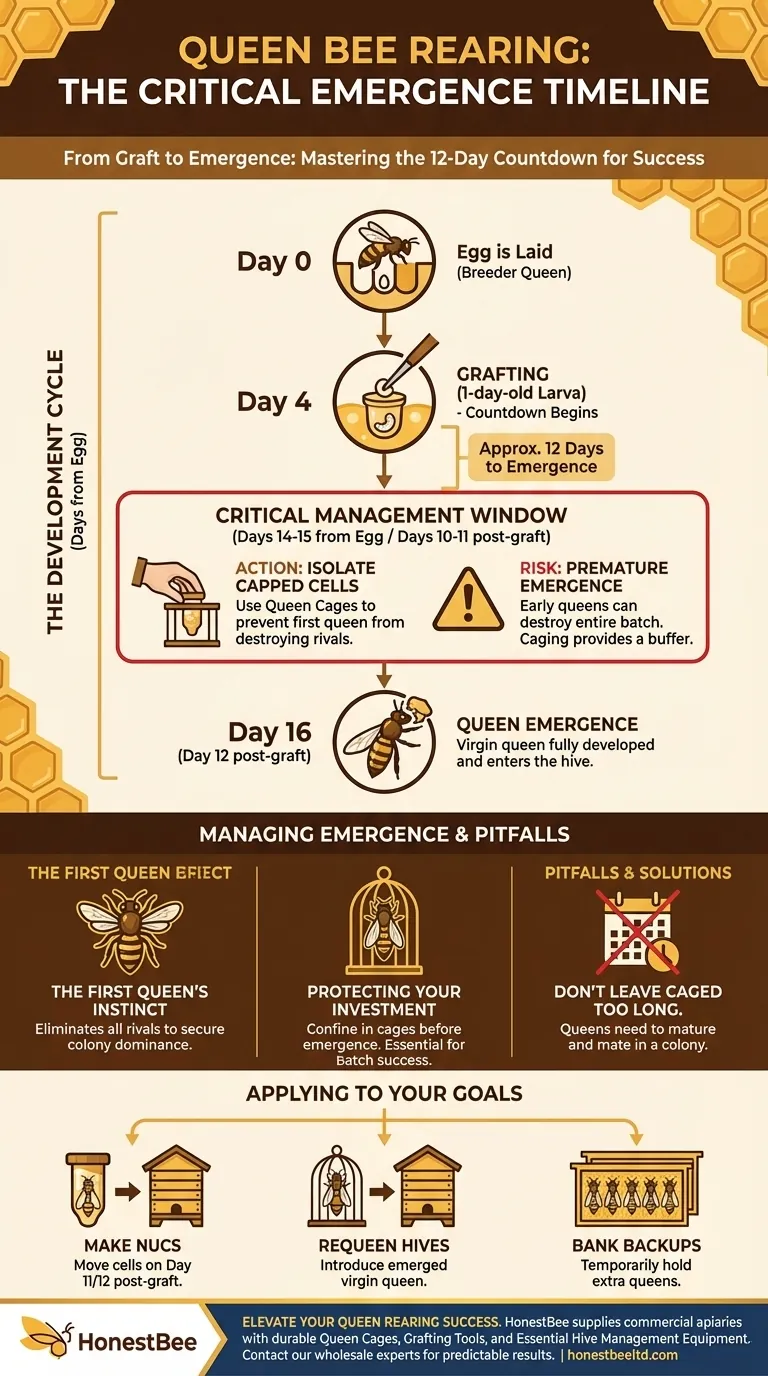
A new queen bee will typically emerge approximately 12 days after a larva has been grafted into a queen cell cup. This corresponds to Day 16 of her development, counting from the day the original egg was laid by the mother queen.
The key to successful queen rearing is understanding that the emergence date is not just a deadline, but a critical management window. Your primary task is to intervene before the first queen emerges to prevent her from destroying all the other developing queens.
The Queen Rearing Calendar: From Egg to Emergence
To master the timing, you must understand the full development cycle. The clock doesn't start at grafting; it starts when the egg is laid.
Day 0: The Egg is Laid
The process begins when a breeder queen lays a fertilized egg in a brood cell. For the first three days, it remains an egg.
Day 4: Grafting the Larva
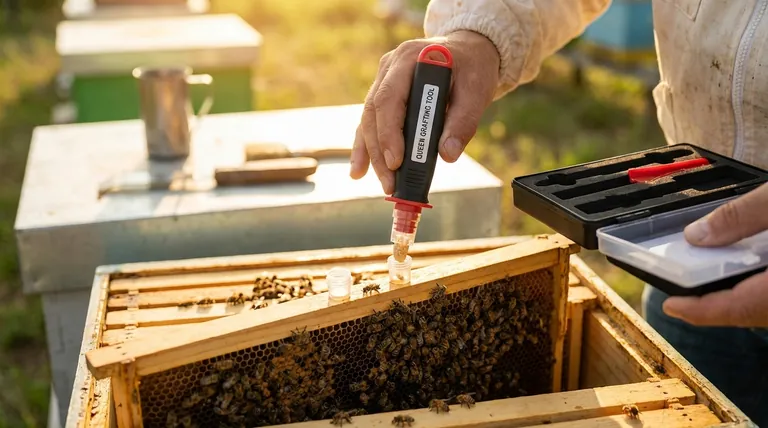
Beekeepers graft on Day 4 (when the larva is about 1-day-old). At this stage, the larva is tiny, C-shaped, and floating in a pool of royal jelly, making it ideal for transfer into an artificial queen cup. This is the event that starts your 12-day countdown.
Day 16: Emergence
Twelve days after you grafted the larva, the new virgin queen is fully developed. She will chew her way out of the capped queen cell and emerge into the hive.
Why Timing is Everything: The Critical Management Window
Knowing the emergence date is crucial because of the ruthless nature of virgin queens.
The First Queen's Instinct
The very first queen to emerge has one immediate priority: eliminate all rivals. She will patrol the frame, locate her sister queens still sealed in their cells, and sting them to death through the cell wall.
Protecting Your Investment
If you allow one queen to emerge freely in the cell builder colony, she can destroy an entire batch of valuable queen cells within hours. This is why you must take action on Day 10 or 11 post-grafting (Day 14 or 15 of the total cycle).
Using Cages to Isolate Queens
The standard practice is to place each capped queen cell into its own queen cage (such as a JZ-BZ cage or a "hair roller" style cage) before emergence. This confines the virgin queen upon hatching, protecting her from her sisters and protecting her sisters from her.
Understanding the Trade-offs and Potential Pitfalls
Managing queen emergence requires precision, as mistakes can be costly.
The Risk of Premature Emergence
If your initial larval age estimate was off and you grafted slightly older larvae, queens can emerge early. Caging cells on Day 10 post-grafting provides a buffer against this, preventing a single early queen from wiping out your batch.
The Danger of Leaving Queens Caged Too Long
A virgin queen cannot be left in a small cage indefinitely. She needs to emerge into a colony, mature for several days, and then take her crucial mating flights. Leaving her caged for more than a day or two post-emergence risks her being poorly cared for by the nurse bees.
Managing Extra Queens
The cages used to protect emerging queens can also serve as introduction cages for moving them into nucs or other hives. If you have more queens than you immediately need, they can be "banked" for a short period in a strong, queenless colony that is packed with nurse bees.
How to Apply This to Your Goal
Once your queens have emerged safely in their cages, your next action depends on your objective.
- If your primary focus is making new nucleus colonies: Move the protected, mature queen cells into queenless nucs on Day 11 or 12 post-grafting, just before they are due to emerge.
- If your primary focus is requeening existing hives: Allow the virgin queen to emerge in her cage within a cell builder, then introduce her to the queenless hive you intend to requeen.
- If your primary focus is having backup queens: Place your caged, newly emerged virgins into a dedicated "queen bank" colony for holding them for a few days until needed.
Mastering this timeline transforms queen rearing from a gamble into a predictable and highly rewarding process.
Summary Table:
| Event | Day (from Egg) | Day (from Grafting) | Key Action |
|---|---|---|---|
| Egg is Laid | Day 0 | - | Breeder queen lays the egg. |
| Larva is Grafted | Day 4 | Day 0 | Transfer 1-day-old larva to queen cup. |
| Critical Management Window | Day 14-15 | Day 10-11 | Isolate capped queen cells into cages. |
| Queen Emerges | Day 16 | Day 12 | Virgin queen chews out of her cell. |
Ready to Elevate Your Queen Rearing Success?
Precision timing is essential, and so is using the right equipment. HONESTBEE supplies commercial apiaries and beekeeping equipment distributors with the high-quality, reliable tools needed for efficient large-scale operations.
We can help you streamline your process with:
- Durable Queen Cages to safely isolate and protect your emerging queens.
- Grafting Tools & Cell Cups for efficient and successful larval transfer.
- Essential Hive Management Equipment to support your entire operation.
Don't leave your valuable queen crop to chance. Contact our wholesale experts today to discuss your equipment needs and ensure your queen rearing is a predictable success.
Visual Guide
Related Products
- Heavy Duty Stainless Steel Queen Bee Catcher Clip
- Portable Queen Bee Incubator with 12V Car Adapter for Safe Transport
- JZBZ Type Wide Base Plastic Queen Cell Cups for Base Mounting and Queen Rearing
- Professional Queen Catcher and Introduction Queen Cage
- Stainless Steel Scraper for Metal Queen Bee Excluders
People Also Ask
- What role does a queen catcher play in the hive splitting process? Ensure Colony Safety & Precise Hive Management
- What is the function of a queen clip catcher? Ensure Safe Queen Handling & Protect Your Colony
- What are the dual functions of queen bee catchers? Protect Your Queen with Isolation & Precision Management
- What is the purpose of a hair clip queen catcher? Protect Your Queen and Streamline Hive Inspections
- What is a queen catcher and what is its purpose? Master Safe Queen Bee Handling in Your Apiary