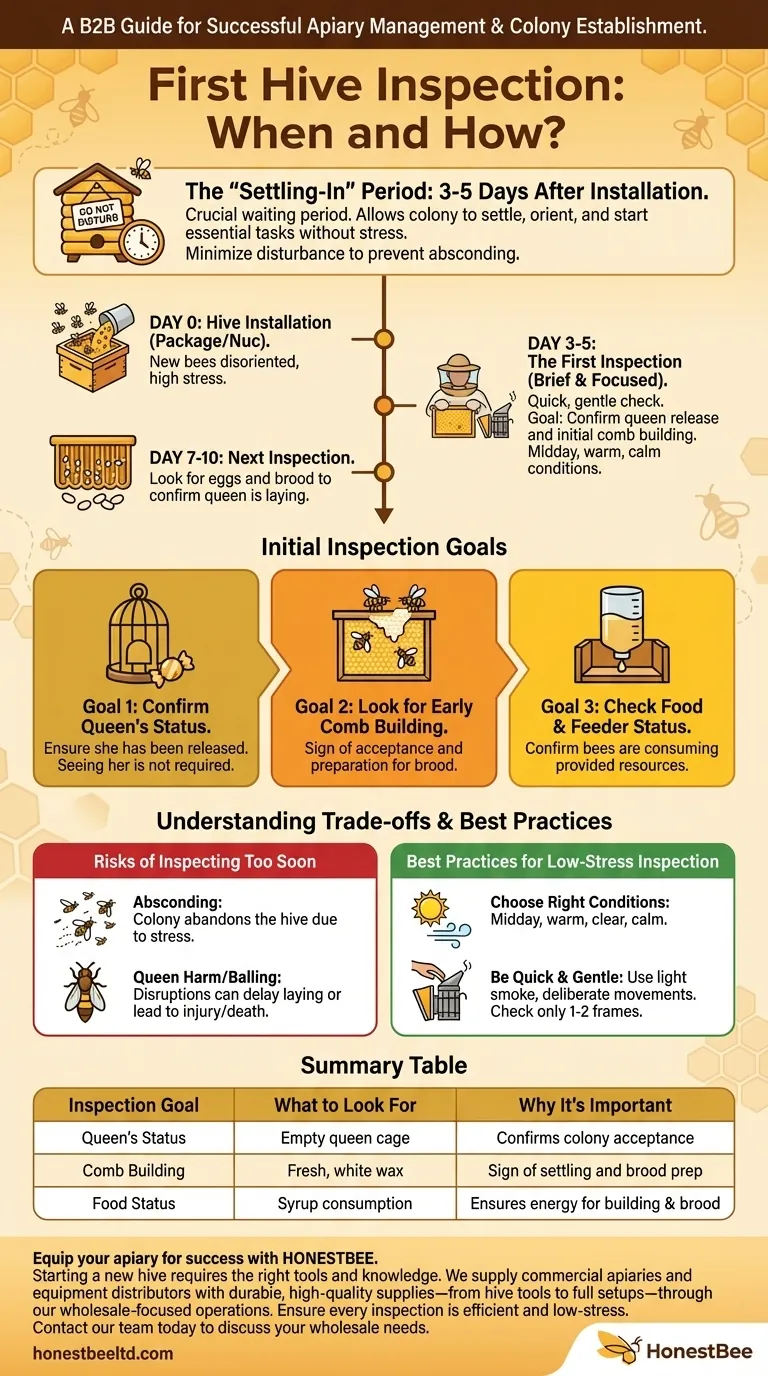
For your first hive inspection, you should wait a few days after installing the new bees. This brief waiting period is crucial, allowing the colony to settle, orient themselves to their new home, and begin their essential work with minimal initial stress.
The primary goal of the first inspection is not a deep dive, but a quick, gentle check to confirm the colony is establishing itself successfully—specifically, that the queen is safe and the bees are beginning to build their new home.
The Purpose of the "Settling-In" Period
When you first install a package or nuc of bees, they are disoriented and under stress from their journey. Giving them a few days of peace is a critical investment in their long-term health.
Why You Must Wait
The bees use this initial period for critical tasks like orientation flights, beginning to draw out wax comb on the new foundation, and establishing the scent of their new queen throughout the hive.
Interrupting this process too early can cause significant stress. In a worst-case scenario, excessive disturbance can cause the colony to abscond, meaning they abandon the hive entirely.
Your Goals for the First Inspection
This initial check should be brief and focused, lasting only a few minutes. Your goal is to confirm three key things without disrupting the colony more than necessary.
Goal 1: Confirm the Queen's Status
Your top priority is the queen. If you installed a package, check that she has been released from her queen cage. The bees will have chewed through the candy plug to free her.
You do not need to physically see the queen. Simply confirming she is no longer in her cage is sufficient for this first check.
Goal 2: Look for Early Comb Building
Gently lift out a central frame. You should see the bees beginning to draw out fresh, white wax comb. This is a clear sign that they have accepted their new home and are preparing for the queen to lay eggs.
Goal 3: Check Food and Feeder Status
Ensure the bees are taking the sugar syrup you've provided. If you're using an entrance feeder, you can see the level drop without opening the hive. For internal feeders, this quick check confirms it's working and they have access to it.
Understanding the Trade-offs: Inspecting Too Soon
Patience is a beekeeper's most valuable tool. Acting too early comes with significant risks that can set your colony back or cause it to fail.
The Risk of Absconding
The most severe risk is causing the colony to abscond. A disturbed, stressed colony may decide the location is unsafe and leave in search of a better home.
The Risk of Harming the Queen
An early, disruptive inspection can stress the queen, potentially delaying the start of her egg-laying. In a clumsy inspection, you also run the small but real risk of accidentally injuring or "balling" the queen, where the workers surround and kill her.
Best Practices for a Low-Stress Inspection
When the time is right, following a few simple rules will make the inspection smooth for both you and the bees.
Choose the Right Conditions
As the references note, the ideal time is midday on a clear, calm, and warm day. During this time, a large portion of the foragers are out of the hive, reducing traffic and defensive behavior.
Be Quick and Gentle
Use your smoker lightly and your hive tool carefully. Your movements should be slow and deliberate. For this first inspection, you only need to look at one or two frames from the center of the hive to confirm the queen's release and see new comb.
Making the Right Choice for Your Goal
Your approach should be guided by the goal of establishing a strong, healthy colony for the long term.
- If your primary focus is a successful start: Prioritize patience. Give the bees 3-5 days of uninterrupted peace before performing your quick, targeted check.
- If you are concerned about the queen: Simply confirm she has been released from her cage. Resist the urge to hunt for her, as her presence will be confirmed by the sight of eggs in the next inspection (around 7-10 days).
Ultimately, your role in this early stage is to be a calm and confident observer, providing resources and ensuring the colony has the best possible start.
Summary Table:
| Inspection Goal | What to Look For | Why It's Important |
|---|---|---|
| Queen's Status | Queen cage is empty; bees have released her. | Confirms the colony's acceptance of their new leader. |
| Comb Building | Bees drawing out fresh, white wax on foundation. | Sign they are settling in and preparing for brood. |
| Food Status | Bees are consuming provided sugar syrup. | Ensures they have energy for comb building and brood rearing. |
Equip your apiary for success with HONESTBEE. Starting a new hive requires the right tools and knowledge. We supply commercial apiaries and beekeeping equipment distributors with durable, high-quality supplies—from hive tools and smokers to full hive setups—through our wholesale-focused operations. Ensure every inspection is efficient and low-stress for your bees. Contact our team today to discuss your wholesale needs and build a stronger foundation for your beekeeping business.
Visual Guide
Related Products
- Australian Pine Wood Langstroth Screen Bottom Board for Wholesale
- Professional Large-Format Hive Number Set for Beekeeping
- Modern Flat-Mount Hive Number Set for Beekeeping
- Durable Plastic Hive Number Set for Beekeeping
- Professional Engraved Round Hive Number Tags for Beekeeping
People Also Ask
- What are the advantages of a screened bottom board? Boost Hive Health with Superior Ventilation & Pest Control
- What is the function of screening bottom boards in large-scale beekeeping management? Boost Colony Health with Data
- What is the primary function of a screen bottom board? Achieve Accurate Varroa Mite Assessment in Your Apiary
- Why might a screen bottom board be less effective for pest control? Understanding the 'Mixed Sunlight' Complication
- What is the primary function of screened bottom boards in the mechanical control of Varroa destructor? A Core IPM Tool