For beekeepers, rearing your own mite-resistant queens isn’t just about self-sufficiency—it’s a survival strategy. Varroa mites decimate colonies, and commercially bred queens often lack the genetic resilience needed for long-term apiary health. This guide breaks down proven methods to raise robust queens, from larval selection to mating success, using equipment and principles trusted by professional beekeepers.
Queen Rearing Fundamentals
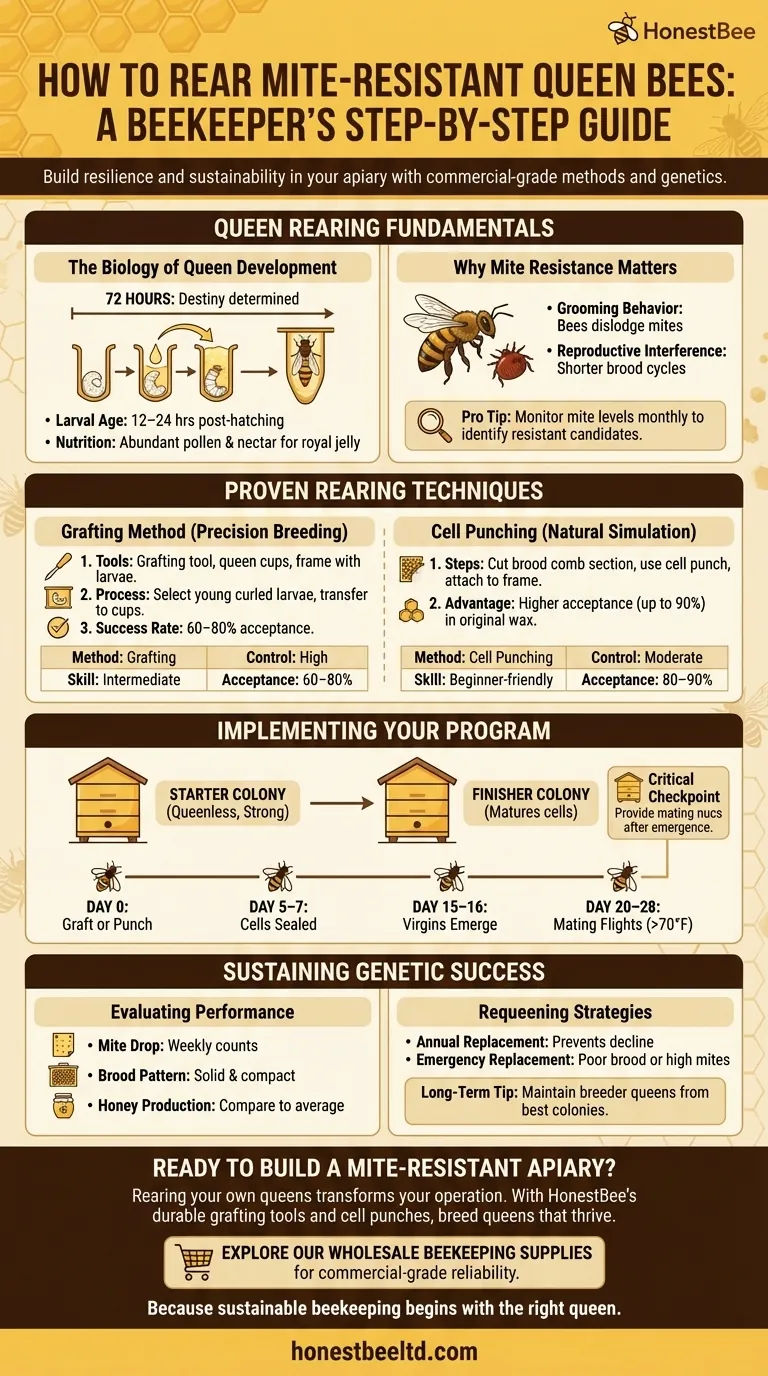
The Biology of Queen Development
A queen’s destiny is determined within her first 72 hours as a larva. Worker bees feed her royal jelly, triggering developmental pathways that differentiate her from worker bees. Key factors influencing quality:
- Larval Age: Younger larvae (12–24 hours post-hatching) adapt better to queen cell development.
- Nutrition: Colonies must have abundant pollen and nectar to produce high-quality royal jelly.
Why Mite Resistance Matters
Varroa mites weaken bees by transmitting viruses and feeding on fat bodies. Resistant queens pass traits like:
- Grooming Behavior: Bees that dislodge mites through vigorous movement.
- Reproductive Interference: Shorter brood cycles that disrupt mite reproduction.
Pro Tip: Monitor mite levels monthly with alcohol washes or sticky board counts to identify colonies with natural resistance—ideal candidates for queen rearing.
Proven Queen Rearing Techniques
Grafting Method for Precision Breeding
Grafting involves transferring larvae into artificial queen cups. It’s favored for its control over genetics and timing:
- Tools Needed: A grafting tool, queen cups, and a frame with young larvae.
-
Process:
- Select larvae curled at the bottom of their cells (indicating recent hatching).
- Gently scoop and place them into wax or plastic queen cups.
- Success Rate: Approximately 60–80% acceptance when done correctly.
Cell Punching for Natural Swarm Simulation
This method mimics swarming by creating artificial queen cells from existing brood comb:
-
Steps:
- Cut a section of comb containing young larvae.
- Use a cell punch tool to extract larvae with surrounding wax.
- Attach these to a frame for worker bees to develop into queen cells.
- Advantage: Higher acceptance rates (up to 90%) as larvae remain in their original environment.
Comparison:
| Method | Control Over Genetics | Skill Level Required | Acceptance Rate |
|---|---|---|---|
| Grafting | High | Intermediate | 60–80% |
| Cell Punching | Moderate | Beginner-friendly | 80–90% |
Implementing Your Program
Selecting Starter/Finisher Colonies
- Starter Colony: A strong, queenless hive with ample nurse bees to care for grafted larvae (ideal: 8+ frames of brood).
- Finisher Colony: A separate hive to mature queen cells after 1–2 days in the starter.
Timeline from Larva to Mated Queen
- Day 0: Graft larvae or punch cells.
- Day 5–7: Queen cells are sealed.
- Day 15–16: Virgin queens emerge.
- Day 20–28: Mating flights occur (requires temperatures above 70°F/21°C).
Critical Checkpoint: After emergence, provide mating nucs (mini-hives) with worker bees to support virgin queens.
Sustaining Genetic Success
Evaluating Queen Performance Metrics
Track these indicators in daughter colonies:
- Mite Drop: Count mites on sticky boards weekly;
- Brood Pattern: Solid, compact brood indicates healthy laying.
- Honey Production: Compare yields to baseline apiary averages.
Requeening Strategies for Colony Health
- Annual Replacement: Prevents age-related decline in egg-laying.
- Emergency Replacement: If a colony shows poor brood patterns or high mite loads.
Long-Term Tip: Maintain breeder queens from your best-performing colonies to perpetuate resistant genetics.
Ready to Build a Mite-Resistant Apiary?
Rearing your own queens transforms your beekeeping operation from vulnerable to resilient. With HONESTBEE’s durable grafting tools and cell punches, you’re equipped to breed queens that thrive—season after season. Explore our wholesale beekeeping supplies to start your queen-rearing journey with commercial-grade reliability.
Because sustainable beekeeping begins with the right queen.
Visual Guide
Related Products
- Durable Galvanized Steel Spring Queen Bee Cage
- Professional Queen Bee Introduction and Transport Cage
- Professional Multi-Functional Queen Bee Cage
- Portable Queen Bee Incubator with 12V Car Adapter for Safe Transport
- Classic Wooden and Mesh California Queen Cage
Related Articles
- An Engineered Truce: The Psychology of the Queen Cage
- A Timed Release of Power: The Social Engineering of the Queen Cage
- Maximizing Queen Cage Value: A Beekeeper's Guide to Safe Reuse & Long-Term Savings
- The Queen Cage's Ledger: A Systems Approach to Apiary Biosecurity
- Engineering Acceptance: Why the JZ-BZ Queen Cage is More Than Just a Box