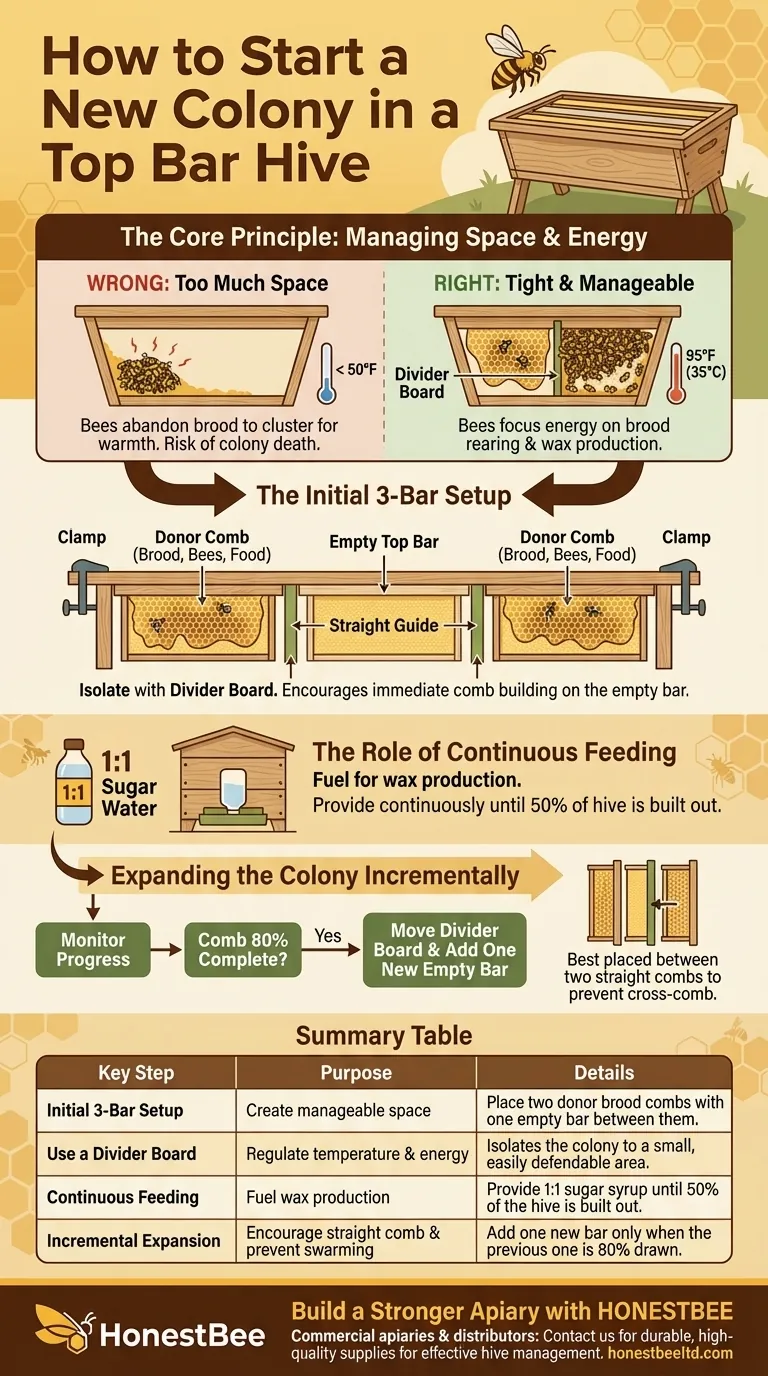
To start a new colony in a top bar hive, you will use two combs of brood and bees from a donor hive, placing one empty top bar between them. This initial three-bar setup is then isolated using a divider board to create a small, manageable space. This tight environment is crucial for helping the new colony regulate temperature and focus its energy on building new comb.
Success in a top bar hive is not about giving the bees a large space to grow into; it is about providing them with precisely the amount of space they need right now. This principle of incremental expansion is the key to managing temperature, encouraging straight comb, and ensuring a new colony thrives.
The Core Principle: Managing Space and Energy
A top bar hive is a horizontal cavity. Unlike a vertically stacking Langstroth hive, a new colony is placed in one end of a long, empty box. Their primary challenge is maintaining the critical temperature of the brood nest (around 95°F or 35°C) within this large, vacant space.
Why Restricting Space is Essential
A divider board is the most important tool for starting a new colony. By walling off the unused portion of the hive, you create a small cavity that the bees can easily warm and defend.
This focuses the colony's energy. Instead of spending resources on thermoregulation, they can dedicate themselves to the vital tasks of raising brood and producing wax to build new comb.
The Initial 3-Bar Setup
Your starting point should be a tight cluster of three bars.
- Place a comb containing brood, bees, and food from a donor hive.
- Place one empty top bar next to it.
- Place a second donor comb on the other side of the empty bar.
This arrangement encourages the bees to immediately begin building on the empty bar, using the two adjacent combs as a straight guide.
The Role of Continuous Feeding
A new colony has an immense need for carbohydrates to produce wax. Providing a continuous supply of 1:1 sugar water (by weight) via an internal feeder acts as a powerful stimulant for comb construction.
Do not stop feeding until the colony has built out at least 50% of the bars in the hive. This consistent resource flow is critical for rapid and healthy establishment.
Expanding the Colony Incrementally
Your job as the beekeeper is to expand the hive one bar at a time, staying just ahead of the colony's growth.
When to Add New Bars
Monitor the colony's progress. Once the bees have drawn out the comb on a new bar to about 80% complete, it is time to give them more space.
Adding space too soon forces the bees to heat a larger area, stressing the colony. Adding it too late can induce swarming.
The Expansion Process
To expand, simply move the divider board down the hive by one position and place a new empty bar adjacent to the most recently built comb.
It is best to place the new empty bar between two existing straight combs. This acts as a template, dramatically reducing the chance of the bees building problematic cross-comb.
Common Pitfalls to Avoid
The horizontal nature of a top bar hive presents unique challenges that can cause a new colony to fail if not properly managed.
The Danger of Too Much Space
Never start a colony with more than five bars of available space. The single biggest mistake is giving the bees the entire hive cavity at once.
If overnight temperatures fall below 50°F (10°C), a small colony in a large space may be forced to abandon its own brood to cluster for warmth, leading to colony death.
The Problem of Cross-Comb
Bees will sometimes build comb that is not parallel to the top bar, attaching it to an adjacent comb or the hive wall. This makes inspections impossible without destroying comb and harming the colony.
Placing new bars between straight, established combs is your best defense against this. Regular, quick inspections will help you catch and correct any off-angle comb before it becomes a major problem.
Making the Right Choice for Your Goal
Your management strategy should be guided by your environment and your primary objective for the colony.
- If your primary focus is rapid, healthy buildup: Keep the space tight with the divider board and provide continuous 1:1 sugar syrup to fuel wax production.
- If you are facing cool spring temperatures: Be extra conservative with expansion, waiting until a comb is nearly 100% drawn before adding a new bar and moving the divider board.
- If your primary focus is ensuring straight combs: Always place new, empty bars between two fully drawn, straight combs to provide a clear guide for the bees.
By mastering the art of incremental expansion, you empower your bees to build a strong, productive, and resilient colony.
Summary Table:
| Key Step | Purpose | Details |
|---|---|---|
| Initial 3-Bar Setup | Create a manageable space | Place two donor brood combs with one empty bar between them. |
| Use a Divider Board | Regulate temperature & energy | Isolates the colony to a small, easily defendable area. |
| Continuous Feeding | Fuel wax production | Provide 1:1 sugar syrup until 50% of the hive is built out. |
| Incremental Expansion | Encourage straight comb & prevent swarming | Add one new bar only when the previous one is 80% drawn. |
Build a Stronger Apiary with HONESTBEE
Starting and managing a top bar hive requires the right equipment for success. At HONESTBEE, we supply commercial apiaries and beekeeping equipment distributors with the durable, high-quality supplies needed for effective hive management.
We understand the challenges of colony establishment and growth. Our wholesale-focused operations ensure you get the reliable top bars, divider boards, and feeders essential for mastering incremental expansion and building thriving, productive colonies.
Ready to equip your operation for success? Contact HONESTBEE today to discuss your wholesale needs and how our products can support your beekeeping goals.
Visual Guide
Related Products
- Top Bar Beehive for Beekeeping Wholesales Kenya Top Bar Hive
- Long Langstroth Style Horizontal Top Bar Hive for Wholesale
- HONESTBEE Top Bar & Bottom Bar Forming Machine | Bee Frame Machine
- HONESTBEE Square Top Hive Bee Feeder Top Bee Feeder
- Professional Hive Top Bee Feeder for Beekeeping
People Also Ask
- What is the fundamental difference between a top bar hive and a Langstroth hive? Choose the Best System for Your Apiary
- How does the design of a top bar hive minimize disturbance to the bees during inspection? Achieve a Calmer, More Natural Approach
- How does a top bar hive help control Varroa mite populations? Natural Pest Management Explained
- What design modifications can improve top bar hive performance in hot climates? Protect Your Apiary from Heat Failure
- How is honey harvested from a top bar hive system? Master the Crush and Strain Method for Pure Honey and Beeswax