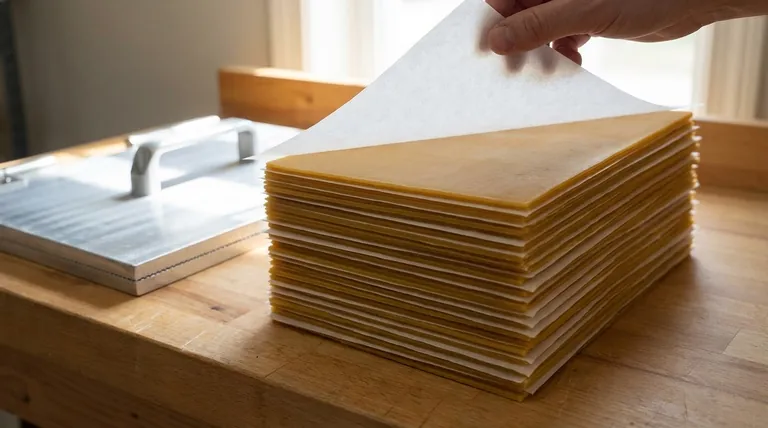
To properly stack wax sheets, you must layer them between sheets of pre-cut paper on a flat board or plate. After peeling the wax from the dipping board and trimming the edges, this layering technique prevents the warm, pliable sheets from sticking together and helps retain heat. This retained warmth is essential for making the subsequent milling or embossing process smoother and more effective.
The core principle of stacking wax sheets is not just about storage, but about preparation. Using separation paper and creating neat stacks is a critical step that prevents damage while preserving the warmth and ductility needed for high-quality foundation.
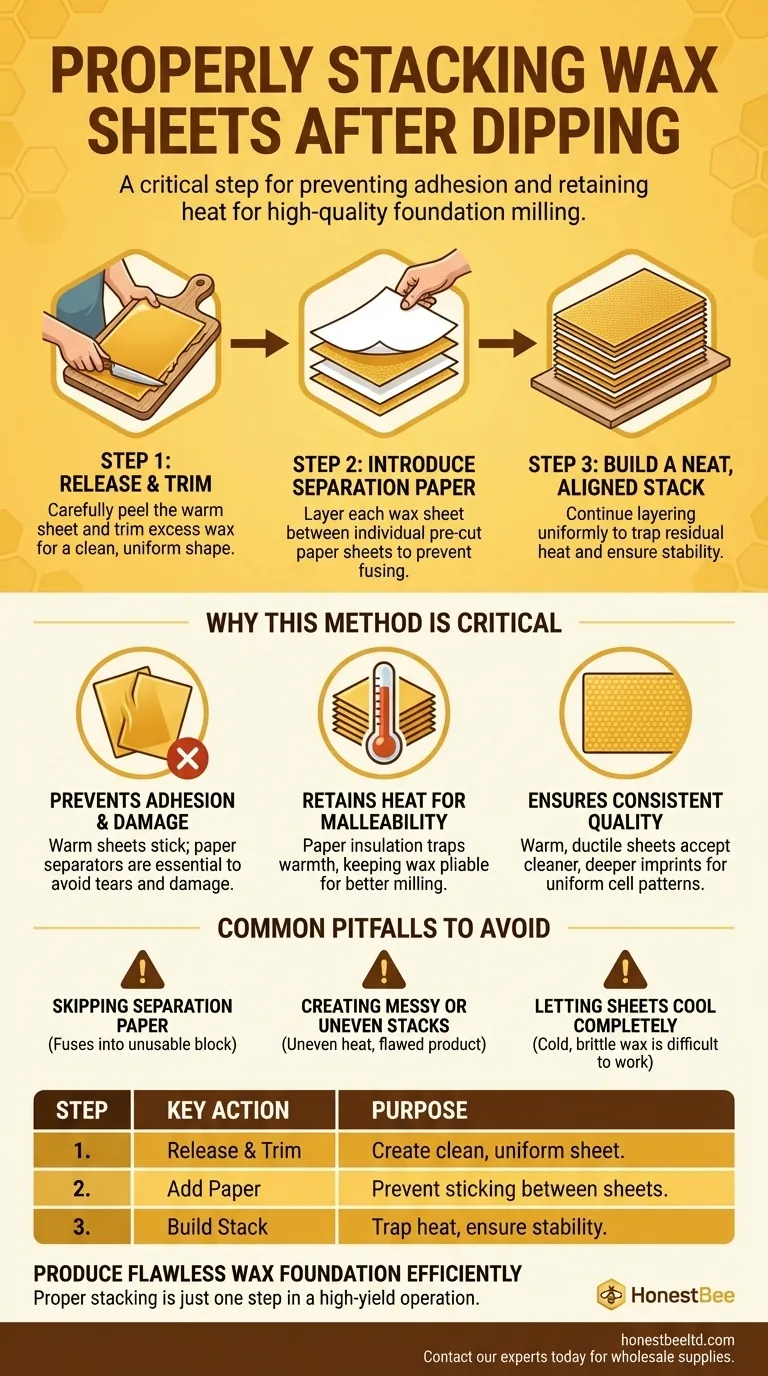
The Core Stacking Procedure
Properly stacking your freshly dipped wax sheets is a straightforward but vital process. Each step is designed to protect the integrity of the sheet and prepare it for the final stages of production.
Step 1: Release and Trim
Before stacking, carefully peel the new wax sheet off the dipping board. Once removed, use a knife to trim the excess wax from around the sides for a clean, uniform shape.
Step 2: Introduce Separation Paper
Place a sheet of pre-cut paper onto your stacking board or plate. Lay your freshly trimmed wax sheet flat on top of this paper.
Immediately place another sheet of paper over the wax. This paper is the key to preventing the warm, tacky wax sheets from fusing together.
Step 3: Build a Neat, Aligned Stack
Continue this process, layering each new wax sheet between individual sheets of paper. It is crucial to stack them as neatly and uniformly as possible.
An aligned stack is more stable and efficient at trapping the residual heat from the dipping process.
Why This Method is Critical
The way you stack your sheets directly impacts the quality of your final wax foundation. Skipping these steps can lead to wasted material and a frustrating milling experience.
Preventing Adhesion and Damage
Warm wax sheets are naturally adhesive. Without paper separators, they will stick firmly to one another, making them impossible to separate without causing tears and damage.
Retaining Heat for Malleability
The process works best when the wax is warm and pliable. Neatly stacking the sheets with paper insulation traps a significant amount of warmth, keeping the wax in an ideal state for milling or embossing. Cold, brittle wax is much more difficult to work with.
Ensuring Consistent Quality
A warm and ductile wax sheet accepts the imprint from an embossing mill more cleanly and deeply. This ensures a consistent, high-quality cell pattern across your entire batch of foundation.
Common Pitfalls to Avoid
While the process is simple, a few common mistakes can undermine your efforts and lead to poor results. Being aware of them is key to a smooth workflow.
Skipping the Separation Paper
This is the most critical error. Failing to use paper between each layer will result in a single, unusable block of fused wax sheets, forcing you to remelt and restart the entire process.
Creating Messy or Uneven Stacks
Haphazardly piling the sheets reduces their stability and allows heat to escape unevenly. This can create cool spots in the wax, leading to inconsistent ductility and a flawed final product.
Letting Sheets Cool Completely
Do not dip all your sheets and leave them sitting out individually before stacking. Stack them immediately after trimming to capture as much of the heat from the dipping process as possible.
Best Practices for Your Workflow
To integrate this into your process effectively, consider your primary goal.
- If your primary focus is speed and efficiency: Pre-cut all your separation paper and have your stacking board ready before you even begin dipping the first sheet.
- If your primary focus is maximum quality: Pay close attention to creating a perfectly aligned stack to ensure heat is retained as evenly as possible for a superior embossing result.
Ultimately, proper stacking is the essential bridge between dipping and milling that ensures your final foundation is both durable and well-formed.
Summary Table:
| Step | Key Action | Purpose |
|---|---|---|
| 1. Release & Trim | Peel sheet from board and trim edges. | Create a clean, uniform sheet for stacking. |
| 2. Add Paper | Place a wax sheet between two pre-cut paper sheets. | Prevent warm, tacky sheets from sticking together. |
| 3. Build Stack | Continue layering, keeping the stack neat and aligned. | Trap heat for malleability and ensure stability. |
Produce flawless wax foundation efficiently. Proper stacking is just one step in a high-yield beekeeping operation. HONESTBEE supplies commercial apiaries and beekeeping equipment distributors with the durable, wholesale-focused supplies needed for quality foundation production. Contact our experts today to discuss your equipment needs and boost your productivity.
Visual Guide
Related Products
- Beeswax Foundation Sheets Beehive Foundation for Wholesale
- Beeswax Machine Press Embosser Wax Foundation Mold Printer Bee Hive Equipment Making Sheet
- Electric Beeswax Flat Sheet Machine with Operating Tray for Wax Processing
- Manual Beeswax Flat Sheet Machine for Beeswax Processing
- Fully Automatic Beeswax Embossing Machine Foundation Mill
People Also Ask
- What are the negative consequences of using old or contaminated beeswax in foundations? Protect Your Hive Today
- What are the primary benefits of using beeswax foundation sheets? Maximize Yields and Efficiency for Commercial Apiaries
- How do beeswax foundation sheets benefit modern hives? Boost Honey Yield and Optimize Colony Efficiency
- What are the characteristics of the beeswax sheets made for beekeeping? Boost Hive Efficiency with Precision Wax Foundation
- What are the specific advantages of regular comb replacement? Boost Hive Health with New Beeswax Foundations


