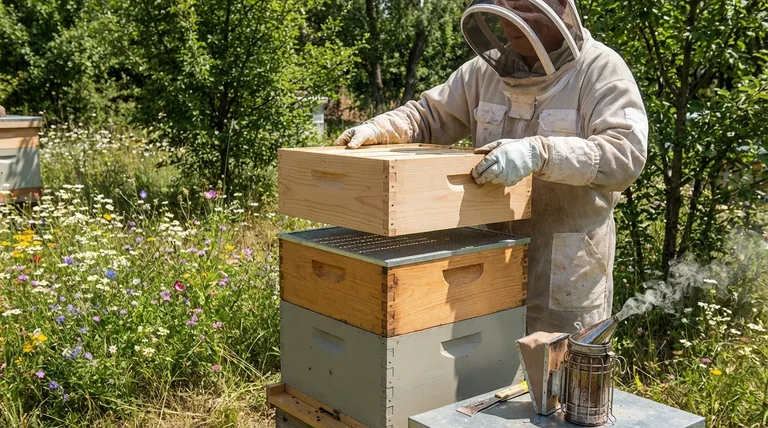
To add a super to a beehive, you must first prepare the equipment, then inspect the colony to confirm it's ready for expansion. The core process involves placing a queen excluder on the top brood box, setting the new super on top, and closing the hive, followed by monitoring to ensure the bees begin using the new space.
The act of adding a super is simple, but the timing is critical. Your goal is to provide more space right before the colony becomes too congested, turning their natural impulse to swarm into an opportunity for honey production.
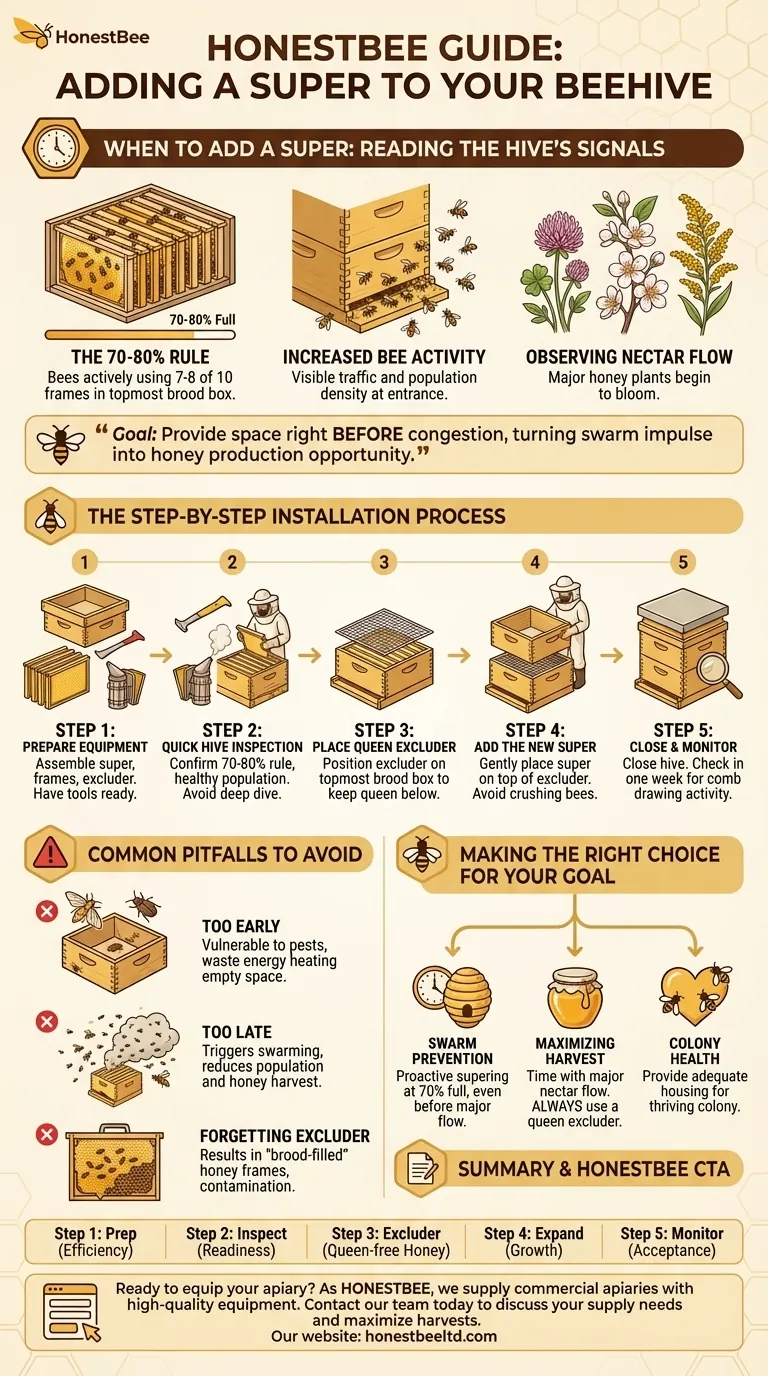
When to Add a Super: Reading the Hive's Signals
Adding a super is a response to the colony's growth and the availability of nectar. Giving them space too early forces the bees to defend and heat an unnecessarily large area; giving it to them too late can trigger swarming.
The 70-80% Rule
The most reliable indicator is frame usage. Open your topmost brood box and inspect the frames.
When the bees have drawn out the wax comb and are actively working on seven or eight of the ten frames, it is time to add a super. This shows the colony is strong enough to expand.
Increased Bee Activity
A significant, visible increase in traffic at the hive entrance is a strong sign. You may see an unusual number of bees on the landing board or "bearding" on the front of the hive during warm evenings.
This indicates a high population density inside the hive, and the bees need more room.
Observing the Nectar Flow
Your local environment provides the best clues. When you see major honey plants like clover, fruit trees, or goldenrod begin to bloom, you know the nectar flow has started.
Adding a super just as this flow begins ensures the bees have immediate space to store the incoming resources.
The Step-by-Step Installation Process
Once you've determined the time is right, the physical process is straightforward and should be done calmly and efficiently to minimize disturbance to the colony.
Step 1: Prepare Your Equipment
Have your new super fully assembled and ready before you open the hive. This includes the super box itself, along with all frames fitted with foundation or drawn comb. Keep your queen excluder, hive tool, and smoker within easy reach.
Step 2: Conduct a Quick Hive Inspection
Gently smoke the hive entrance and wait a minute before opening the lid. Your goal is to confirm the hive is healthy and queen-right, but this is not the time for a deep dive.
Focus on the top brood box. Confirm you see signs of a healthy population and that they meet the 70-80% rule for expansion. It's helpful, but not essential, to locate the queen to ensure she stays in the brood chamber.
Step 3: Place the Queen Excluder
The queen excluder is a screen that allows worker bees to pass through but is too small for the larger queen. This is a critical tool for pure honey harvesting.
Place the excluder directly on top of the uppermost brood box. This prevents the queen from moving into the honey super and laying eggs, which would contaminate the honey harvest.
Step 4: Add the New Super
Gently and carefully place the new super on top of the queen excluder. Avoid crushing bees by setting one edge down first and then slowly lowering the other side.
Step 5: Close the Hive and Monitor
Place the inner cover and outer cover back on top of the new super. Leave the bees undisturbed for about a week.
After a week, perform a quick check to see if the bees have moved up and have started drawing out the comb in the new super. This confirms they have accepted the additional space.
Common Pitfalls to Avoid
Success is often about avoiding simple mistakes. Understanding the consequences of poor timing or technique is essential for effective hive management.
Adding a Super Too Early
If the colony is not strong enough, they will struggle to patrol and manage the extra space. This can make them vulnerable to pests like wax moths or small hive beetles and forces them to expend extra energy heating the vacant area.
Adding a Super Too Late
This is the most common and costly mistake. When a strong colony runs out of space during a nectar flow, its natural instinct is to swarm. The bees will create a new queen, and the old queen will leave with half the workforce, drastically reducing your hive's population and potential honey harvest.
Forgetting the Queen Excluder
If you do not use a queen excluder, the queen is free to move into the honey super and lay eggs. This results in "brood-filled" honey frames, which are very difficult to extract honey from and disrupts the colony's natural organization.
Making the Right Choice for Your Goal
Your approach to supering should align with your primary objective as a beekeeper.
- If your primary focus is preventing swarms: Add a super proactively as soon as you see the brood box is 70% full, even if the main nectar flow hasn't started.
- If your primary focus is maximizing honey harvest: Time your supering to coincide precisely with the start of a major nectar flow and always use a queen excluder.
- If your primary focus is colony health: View supering as a way to provide adequate housing for a growing family, reducing stress and ensuring they have the resources and space to thrive.
Ultimately, effective supering is about partnering with your bees by anticipating their needs for space and resources.
Summary Table:
| Step | Key Action | Purpose |
|---|---|---|
| 1. Preparation | Assemble the super, frames, and queen excluder. | Ensure a smooth, efficient installation process. |
| 2. Inspection | Check the top brood box for 70-80% frame usage. | Confirm the colony is strong enough and ready for expansion. |
| 3. Placement | Position the queen excluder on the top brood box. | Prevent the queen from laying eggs in the honey super. |
| 4. Expansion | Gently set the new super on top of the excluder. | Provide immediate space for honey storage and colony growth. |
| 5. Monitoring | Check after one week for comb drawing activity. | Verify the bees have accepted the new space. |
Ready to equip your apiary for successful expansion? As HONESTBEE, we supply commercial apiaries and beekeeping equipment distributors with the high-quality, durable supers, frames, and queen excluders needed for precise hive management. Our wholesale-focused operations ensure you get the reliable equipment your business depends on. Contact our team today to discuss your supply needs and let us help you maximize your honey harvests.
Visual Guide
Related Products
- Australian Langstroth Beehive Boxes for Beekeeping Wholesales
- Professional Bee Frame Machine for Side Bar Shaping
- Wholesales Dadant Size Wooden Bee Hives for Beekeeping
- HONESTBEE Professional Hive Top Bee Feeder Feeding Solution
- Stainless Steel Round Beehive Air Vents for Ventilation
People Also Ask
- What factors influence the honey yield capacity of Langstroth boxes? Maximize Efficiency in Your Apiary
- What are the main types of boxes used in beekeeping? Choose the Right Hive System for Your Apiary
- How many beehive boxes are needed when starting a new hive? A Guide to Proper Hive Setup
- What are the differences between the three standard depths of Langstroth boxes? Choose the Best Size for Your Apiary
- How does the frame capacity of a Langstroth box affect hive management? Optimize for Weight and Efficiency