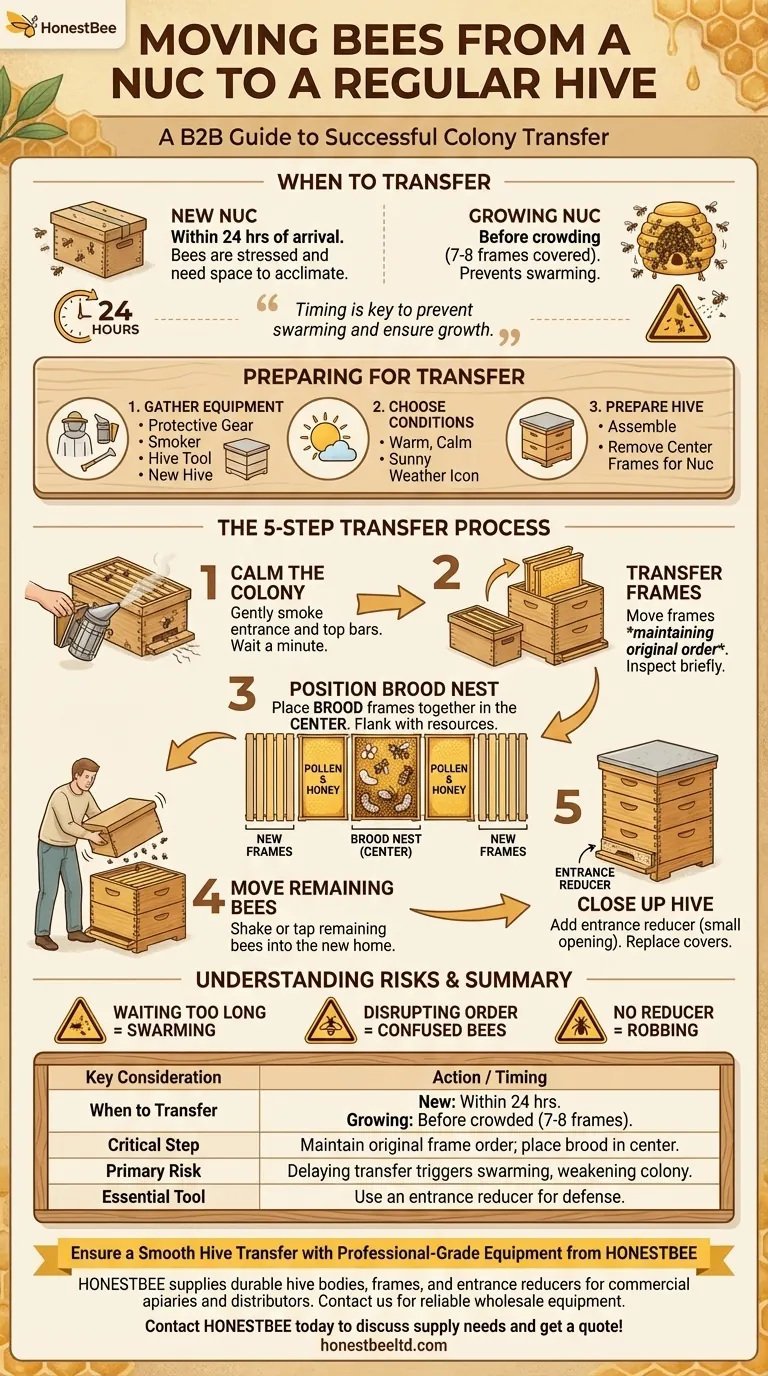
In short, moving bees from a nuc to a full-sized hive is a process of transferring the frames from the small nuc box into a larger hive body. You must maintain the original order and structure of the colony, placing the brood nest in the center, and then provide new frames for expansion. This gives the growing colony the space it needs to thrive and prevents it from swarming.
The physical act of moving frames is simple. The true success of the transfer hinges on proper timing, minimizing stress on the bees, and correctly re-establishing the brood nest within the new, larger space.
When to Transfer Your Nuc
Knowing when to move the colony is the first critical decision. The answer depends on whether you have just purchased the nuc or have been raising it yourself.
For a Newly Purchased Nuc
Most beekeepers should transfer a new nuc into a full-sized hive almost immediately. The bees are often stressed from travel and have likely outgrown their small box.
A good practice is to set the nuc box beside or on top of your permanent hive location for about 24 hours. This allows the bees to acclimate and orient to their new home before the transfer.
For an Existing, Growing Nuc
If you are raising a nuc, you must move it before it becomes too crowded. A congested hive is the primary trigger for swarming, where the queen and half the bees will leave.
Look for signs that the nuc is full, such as a high population of bees covering most of the frames, a congested brood nest, and especially the presence of queen cells, which are a direct indicator of swarm preparation.
Preparing for a Smooth Transfer
Preparation ensures the process is quick, calm, and safe for both you and the bees.
Gather Your Equipment
Before you begin, have all your tools ready. You will need your full set of protective gear, a smoker, a hive tool, and the new hive body filled with the correct number of new frames.
Choose the Right Conditions
The ideal time for a transfer is on a warm, calm, and sunny day. Good weather ensures the bees are less defensive and that any exposed brood does not get chilled.
Prepare the New Hive
Your new hive box should be fully assembled and placed in its final location. Remove some of the new, empty frames from the center to make space for the nuc frames you are about to transfer.
The Step-by-Step Transfer Process
With your preparations complete, the transfer itself is a straightforward, methodical process.
1. Calm the Colony
Light your smoker and give a few gentle puffs of smoke into the entrance of the nuc box. Wait a minute, then open the lid and apply a little smoke across the top of the frames. This calms the guard bees and encourages the colony to prepare for disruption.
2. Transfer the Frames
Using your hive tool, gently pry up and lift each frame out of the nuc box one by one. Inspect them briefly as you go, looking for the queen, brood, and resources.
Place the nuc frames into the center of the new hive body. It is critical to maintain their original order as much as possible.
3. Position the Brood Nest
The colony's structure is vital. The frames containing brood (eggs, larvae, and pupae) must be placed together in the very center of the new hive.
Frames containing resources like pollen and honey should be placed on either side of the brood frames. Finally, add your new, empty frames to the outermost edges of the hive box.
4. Move the Remaining Bees
After all the frames are transferred, a cluster of bees will remain in the old nuc box. Simply hold the box over the new, open hive and give it a firm shake or a few sharp taps to dislodge the remaining bees into their new home.
5. Close Up the New Hive
Place an entrance reducer on the hive, set to the smallest opening. This helps the small colony defend itself from robbers. Finally, replace the inner cover and the outer cover to secure the hive.
Understanding the Risks
A successful transfer is about managing the colony's stress and avoiding common pitfalls.
The Risk of Waiting Too Long
The biggest risk of delaying a transfer is swarming. Once a nuc feels congested, it will raise a new queen and the old queen will leave with a large portion of the workforce, significantly weakening your colony.
The Importance of Frame Order
Disrupting the structure of the brood nest can confuse the bees and chill the brood. Always keep brood frames together in the center, insulated by resource frames, just as the bees would do naturally.
Why You Need an Entrance Reducer
A small nuc colony cannot defend the large entrance of a full-sized hive. The entrance reducer prevents robber bees from other hives from entering and stealing honey, which could cause the new colony to fail.
Making the Right Choice for Your Colony
Your goal is to give the colony space to expand without causing undue stress.
- If your primary focus is rapid growth: Transfer a newly purchased nuc within 24 hours to give them immediate room to expand the brood nest and store resources.
- If your primary focus is preventing swarming: Move an established nuc into a larger hive as soon as you see bees covering 7-8 of the 10 available frames to get ahead of their instinct to swarm.
- If your primary focus is minimizing stress: Always choose a warm, calm day for the transfer and work deliberately but quickly to reduce the time the hive is open.
By respecting the bees' natural structure and choosing the right time, you can ensure a seamless transition that sets your colony up for a productive season.
Summary Table:
| Key Consideration | Action / Timing |
|---|---|
| When to Transfer | New nuc: Within 24 hours. Growing nuc: Before it becomes crowded (bees on 7-8 frames). |
| Critical Step | Maintain original frame order; place brood frames in the center of the new hive. |
| Primary Risk | Delaying transfer can trigger swarming, severely weakening the colony. |
| Essential Tool | Use an entrance reducer to help the small colony defend its new, larger hive. |
Ensure a Smooth Hive Transfer with Professional-Grade Equipment from HONESTBEE
A successful nuc transfer depends on having the right tools and a well-built hive. HONESTBEE supplies durable, high-quality beekeeping supplies and equipment—including hive bodies, frames, and entrance reducers—designed specifically for the needs of commercial apiaries and beekeeping equipment distributors.
Let our wholesale-focused operations provide your business with the reliable equipment needed to build strong, productive colonies. Contact HONESTBEE today to discuss your supply needs and get a quote!
Visual Guide
Related Products
- Plastic Transporting Bee Packages and Nuc Boxes for Beekeeping
- Steel Round Disc Entrance Reducer for Flexzion Bee Hive Nuc Box Gate
- Styrofoam Mini Mating Nuc Box with Frames Feeder Styrofoam Bee Hives 3 Frame Nuc Box
- Automatic Heat Preservation 6 Frame Pro Nuc Box for Honey Bee Queen Mating
- 5 Frame Wooden Nuc Box for Beekeeping
People Also Ask
- Why is the timely introduction of high-quality bee packages critical? Save Your Apiary from Asian Hornet Invasions
- What is the typical worker bee population in package bees vs nucleus colonies? Choose the Right Start for Your Hive
- What measures can be taken during the installation of a honey bee package to prevent the bees from leaving? Pro Tips
- What benefits do standardized bee packages offer for queen breeding? Boost Yields by 80% and Scale Apiaries Efficiently
- How should a beekeeper introduce a package of bees into a hive box? Master the Queen Release Process